Delicious & Light: The Ultimate Weight Watchers Marble Loaf Cake (Only 5 WW Points!)
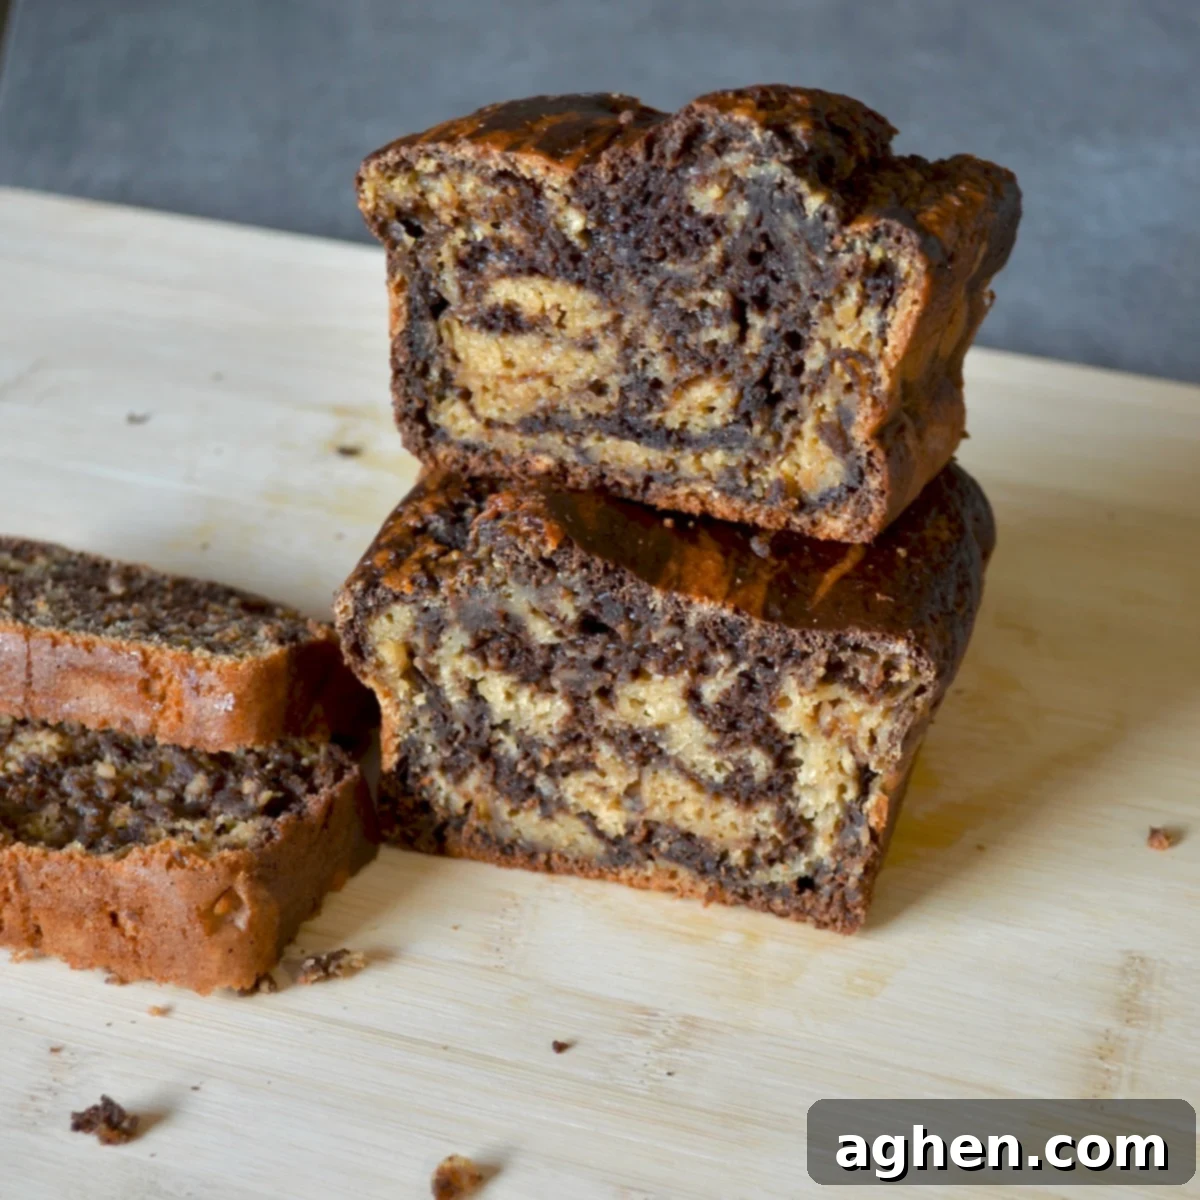
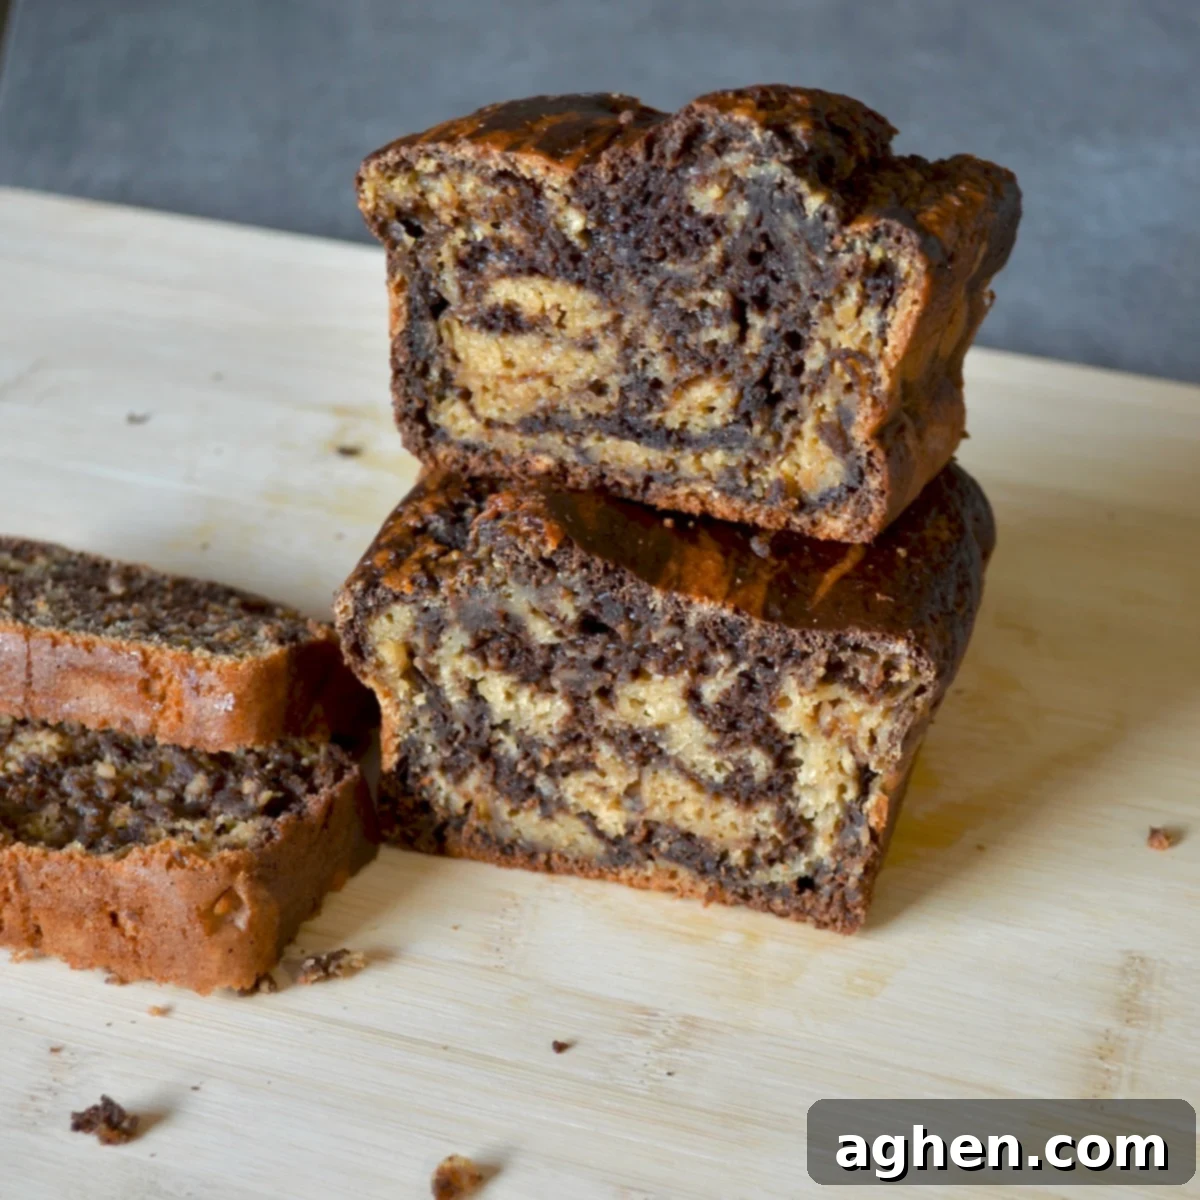
Indulge in a truly delightful and guilt-free treat with our **Weight Watchers Marble Loaf Cake**, a recipe that masterfully blends rich chocolate and delicate vanilla flavors into a beautiful, swirled masterpiece. Best of all, each generous slice is a mere **5 WW points**, making it an ideal choice for anyone looking to enjoy delicious desserts without derailing their health goals. If the thought of baking a marble cake has ever seemed intimidating, prepare to be pleasantly surprised. This recipe is surprisingly straightforward, allowing even novice bakers to create a visually stunning loaf with a whimsical, swirly design that will impress everyone.
The magic of marble cake lies in the contrast: a vibrant vanilla batter intertwined with a deep, cocoa-rich counterpart. The process involves simply alternating scoops of light and dark batter and then gently running a knife or skewer through them. The result is not just a treat for the taste buds but also a feast for the eyes, revealing intricate patterns with every slice.
What sets this particular marble loaf apart is its perfectly balanced sweetness. Unlike many overly sugary desserts, this recipe offers a sophisticated flavor profile where the robust notes of unsweetened cocoa powder create a satisfying dark chocolate essence, beautifully complementing the classic vanilla. This thoughtful balance makes it incredibly versatile – whether you’re looking for a delightful morning pick-me-up, a satisfying afternoon snack, or a light after-dinner dessert. For those who enjoy portion control and spreading out their treats, a slice can easily be split, providing a sweet moment both earlier and later in the day.
Beyond personal enjoyment, this elegant marble loaf cake is also perfectly suited for entertaining. Imagine the gasps of delight as you slice into it at a party or special event, revealing those captivating swirls! Its universally loved vanilla and deep chocolatey flavors are sure to be a crowd-pleaser, proving that healthy eating can be utterly delicious and impressive.
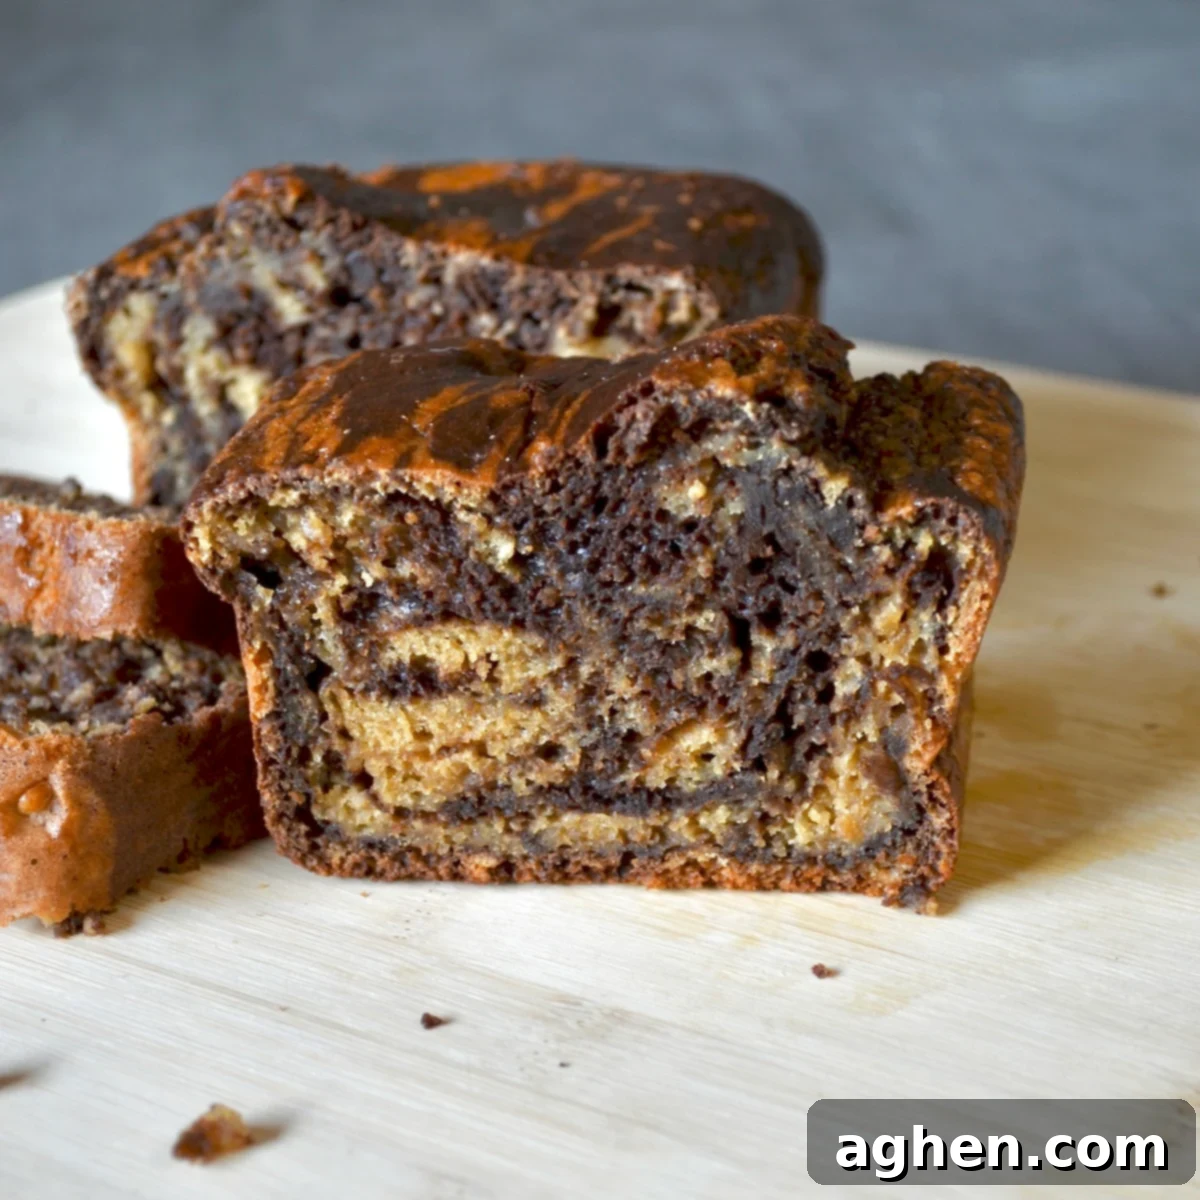
Why This Weight Watchers Marble Loaf Cake is a Must-Bake
This isn’t just another cake recipe; it’s a testament to how delicious and satisfying healthier baking can be. Here’s why this **low-point marble loaf** should be next on your baking list:
- Accessible & Simple Ingredients: Forget trips to specialty stores! This delightful vanilla and chocolate loaf relies on common pantry staples. You likely have most, if not all, of the necessary items in your kitchen right now, making it an incredibly convenient recipe to whip up whenever a craving strikes. This simplicity not only saves time but also makes baking more enjoyable and less daunting.
- Health-Conscious & Delicious: Low-Fat with Real Sugar: We understand that not everyone enjoys or can consume artificial sweeteners. This recipe is a fantastic alternative, crafted with regular granulated sugar for that authentic sweet taste, while cleverly keeping it light. The secret lies in unsweetened applesauce, which acts as a brilliant fat replacer, allowing us to create an entirely butter and oil-free cake. This innovative approach significantly reduces the fat content without compromising on moisture or flavor, making it a truly guilt-free indulgence.
- Excellent Storage for Meal Prep & Enjoyment: Planning ahead is a breeze with this marble loaf. It maintains its delicious freshness for 4-5 days, making it perfect for preparing in advance for gatherings or simply having on hand for quick snacks throughout the week. To preserve its moisture and prevent individual slices from drying out, we recommend storing the loaf whole and slicing it only as needed. This ensures every piece tastes as fresh as the first.
- Versatile for Any Occasion: From a cozy breakfast alongside your morning coffee to an elegant dessert for a dinner party, this marble loaf fits seamlessly into any scenario. Its balanced flavors and appealing marble pattern make it a welcome addition to any table, proving that healthy treats can still be celebratory.
- Satisfying Flavor Without the Guilt: The harmonious blend of dark cocoa and sweet vanilla provides a deeply satisfying experience. You get the richness you crave without the heavy feeling or high point value, allowing you to truly enjoy your dessert while staying on track with your Weight Watchers goals.
- Effortlessly Impressive Aesthetics: Don’t let the beautiful swirls fool you into thinking it’s complicated. Achieving that signature marble effect is surprisingly easy, involving just a few simple steps. You’ll love the compliments you receive on its professional appearance!
Recipe At a Glance: Weight Watchers Marble Loaf Cake
Here’s a quick summary to help you plan your baking session for this delightful and **low-point marble loaf**:
- Serving Size: Enjoy a generous 1 slice (approximately 72 g) per serving, perfectly portioned for a satisfying treat.
- Number of Servings: This recipe yields 10 slices, making it ideal for a small family, a week of mindful snacking, or sharing with friends.
- Prep Time: Roughly 15-20 minutes.
- Cook Time: Approximately 55 minutes to 1 hour 5 minutes. Baking times can vary slightly, so always keep an eye on your oven.
- Total Time: Around 1 hour 10 minutes to 1 hour 25 minutes.
- WW Points Per Serving: Each delicious slice is just **5 WW points**. The entire loaf, when divided into 10 slices, totals 54 WW points. For easy tracking and detailed nutritional information within your Weight Watchers plan, you can click here to view the recipe directly in the WW app (a WW login may be required).
Essential Ingredients for Your Weight Watchers Marble Loaf
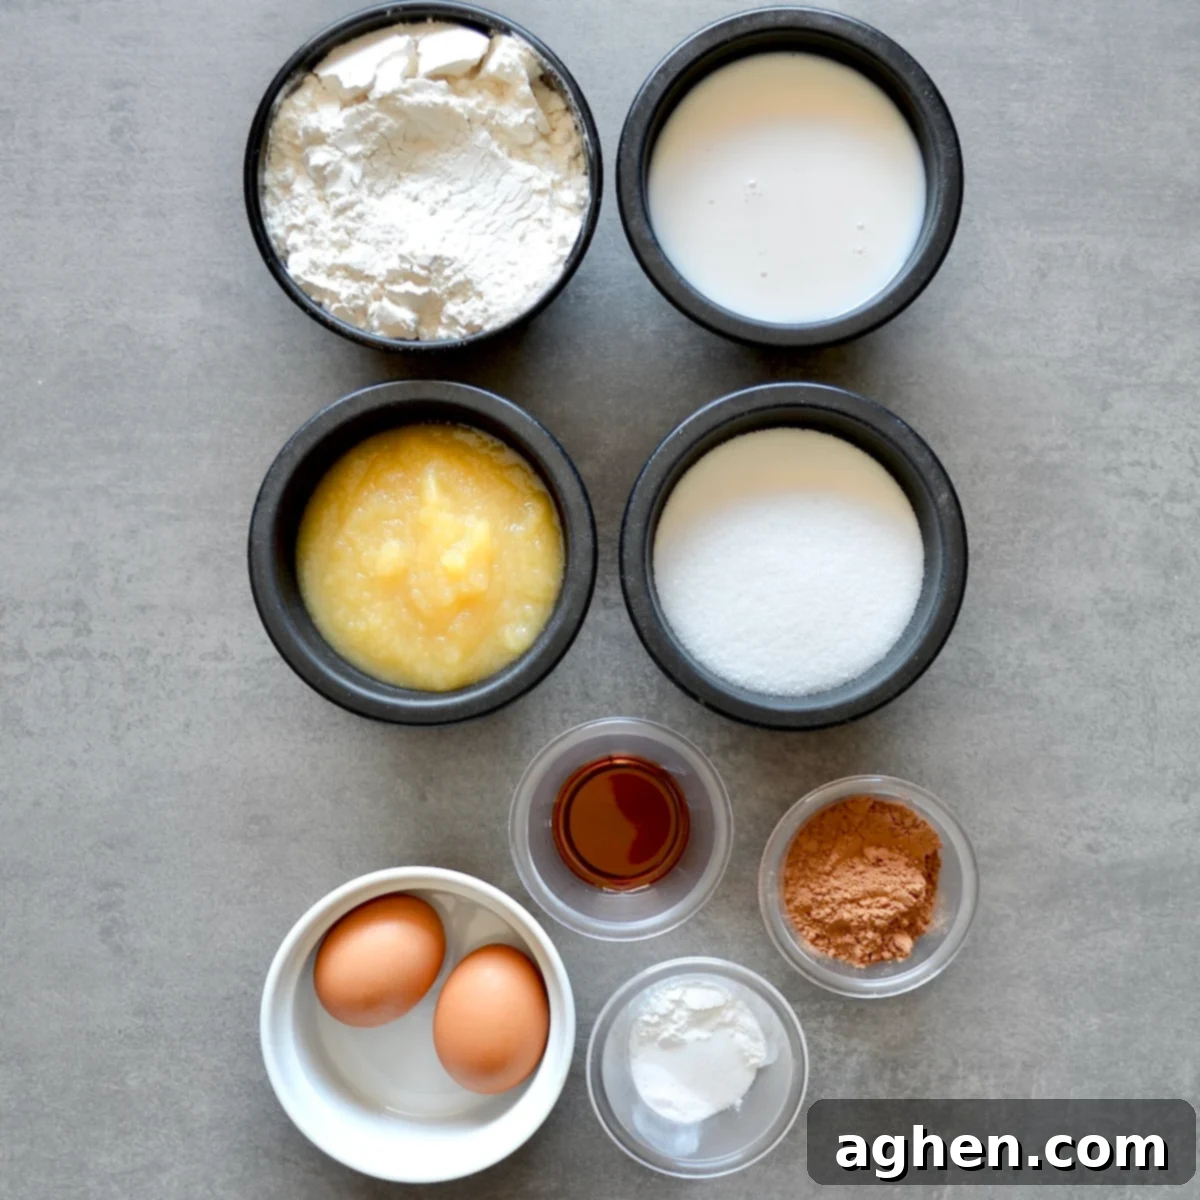
Crafting this light and flavorful marble loaf requires a selection of readily available ingredients. Using high-quality components will always result in a superior bake. Ensure all your cold ingredients, such as eggs and almond milk, are at room temperature before you begin; this helps them combine more smoothly and creates a more uniform batter.
- 1 ½ cups All-purpose flour: The foundation of our cake, providing structure. Sifting it can help ensure a lighter texture.
- 1 ¼ tsp Baking powder & ½ tsp Baking soda: These leavening agents work in harmony to give the loaf its beautiful rise and tender crumb.
- ½ tsp Table salt: A pinch of salt is crucial for balancing the sweetness and enhancing all the flavors in the cake.
- ⅔ cup unsweetened applesauce: This is our star ingredient for keeping the loaf low in fat. Applesauce not only adds natural sweetness but also contributes significant moisture, replacing traditional fats like butter or oil without sacrificing texture.
- ⅔ cup Granulated sugar: Provides the classic sweetness and helps with browning and tenderizing the crumb.
- 2 Eggs: Essential for binding the ingredients, adding richness, and contributing to the cake’s structure.
- 1 ½ tsp Vanilla extract: A key flavor enhancer, bringing warmth and depth to the vanilla batter. Use a good quality extract for the best taste.
- ⅔ cup Unsweetened plain almond milk: Chosen for its low-calorie count, this liquid helps achieve the perfect batter consistency while keeping the recipe WW-friendly.
For the Rich Chocolate Swirl (Chocolate Batter Addition):
- 3 tbsp Cocoa powder, unsweetened: The secret to the deep, rich chocolate flavor and dark color. Unsweetened ensures you control the overall sweetness of the cake.
- 2 tbsp Hot water: Used to “bloom” the cocoa powder. This process intensifies the chocolate flavor, making it more vibrant and delicious.
Step-by-Step Instructions: Crafting Your Perfect Marble Loaf
Follow these simple steps to create a beautiful and delicious Weight Watchers Marble Loaf Cake. Precision and gentle handling are key to achieving that signature swirl!
- Prepare Your Oven and Pan: Begin by preheating your oven to 350°F (175°C). This ensures a consistent baking temperature from the moment your loaf enters the oven. Next, prepare an 8 or 9-inch loaf pan. Line it completely with parchment paper, allowing an overhang on the longer sides. This creates a “parchment sling,” which makes removing the baked loaf incredibly easy and prevents sticking.
- Combine Wet Ingredients: In a large mixing bowl, start by whisking the eggs and granulated sugar together vigorously until the mixture is light in color, smooth, and slightly fluffy. This step incorporates air, which contributes to a tender cake. Once combined, add the unsweetened applesauce, vanilla extract, and unsweetened plain almond milk (all wet ingredients, excluding the hot water for cocoa). Stir these gently until they are just combined, ensuring a homogenous liquid base for your batter.

3. Incorporate Dry Ingredients: Sift together your all-purpose flour, baking powder, baking soda, and table salt into a separate bowl. Then, gradually add these dry ingredients to your wet mixture. Using a spatula, gently fold them in. Mix until there are no visible streaks of flour and the batter is just combined. **Crucially, avoid overmixing.** Overmixing develops the gluten in the flour too much, which can result in a tough, dense, or gummy cake. A few small lumps are perfectly fine and preferable to an overmixed batter.
4. Divide and Create Chocolate Batter: Carefully divide your vanilla batter into two portions. One portion should be slightly smaller – this will be your chocolate batter. To this smaller portion, add the unsweetened cocoa powder and the 2 tablespoons of hot water. Mix thoroughly until the cocoa powder is fully incorporated and the batter is a rich, uniform chocolate color. The hot water helps “bloom” the cocoa, enhancing its flavor and preventing a dry chocolate batter. Now you have two distinct batters: one vanilla and one chocolate.
5. Layer for the Marble Effect: Transfer your prepared loaf pan to a flat surface. Begin the layering process by placing alternating scoops of the vanilla and chocolate batters into the pan. Start with a scoop of light batter, followed by a scoop of dark batter, then another scoop of light batter. For the next layer, switch the pattern: place a vanilla scoop on top of a chocolate layer and a chocolate scoop on top of a vanilla layer. Continue this alternating pattern, distributing the batters evenly, until both mixtures are used up. Don’t worry about perfection; the beauty is in the imperfection of the swirls.
6. Achieve the Perfect Swirl: This is where the magic happens! Take a thin knife or a skewer. Gently insert it into the batter and draw a slow, deliberate S-line or a zigzag pattern through the layers. Repeat this process only once or twice. The key is to swirl just enough to create beautiful patterns without overmixing the batters, which would result in a muddy, uniform brown color rather than distinct, elegant swirls. Less is often more for a visually striking marble effect.
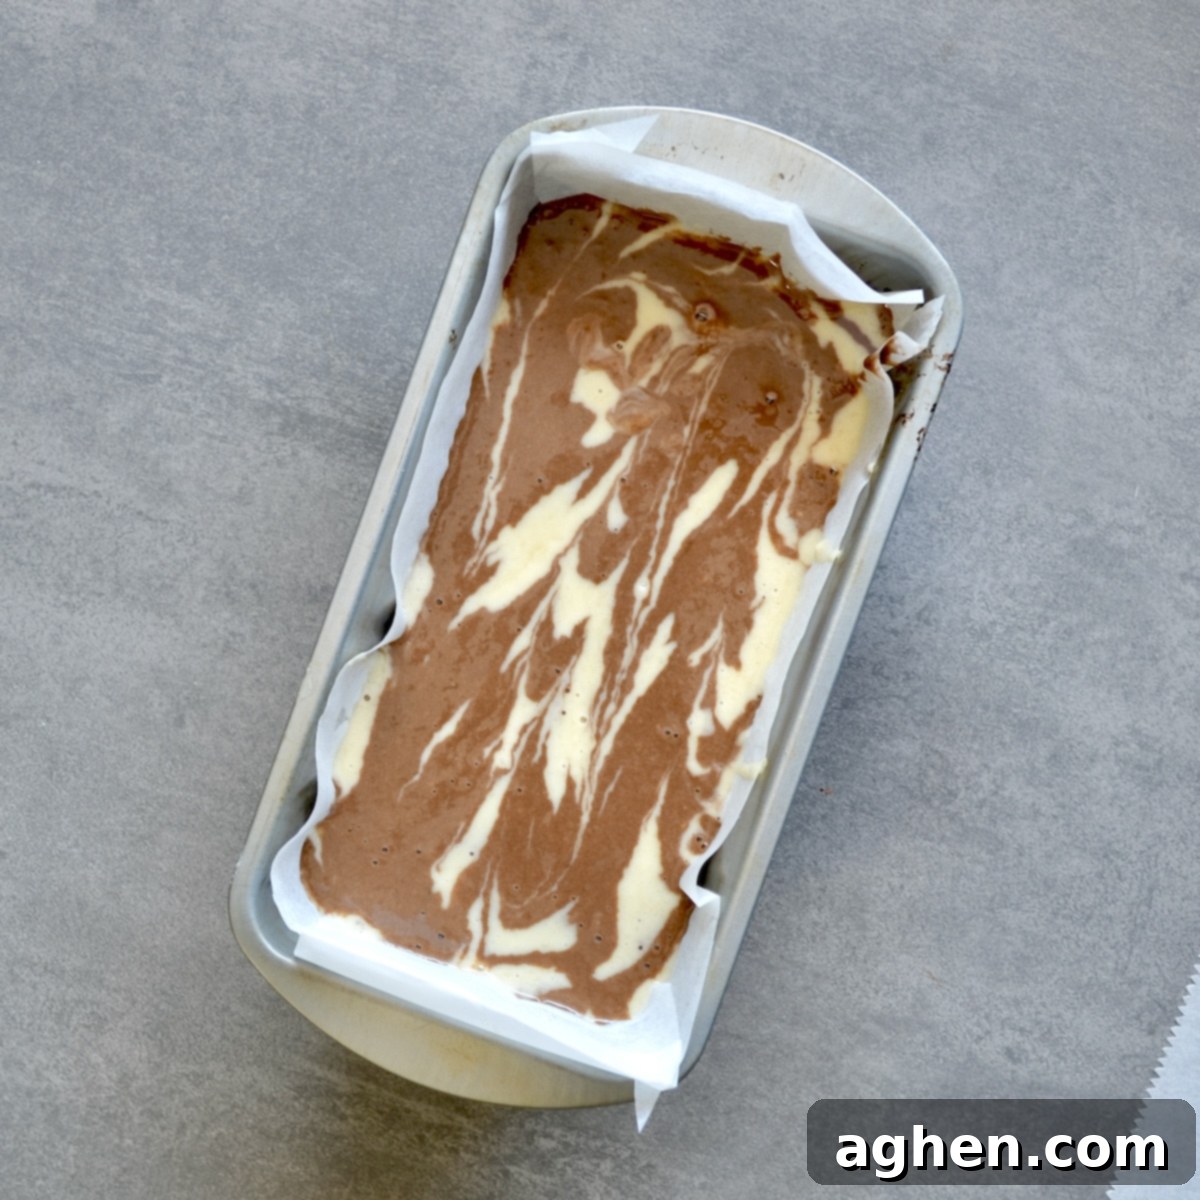
7. Bake to Golden Perfection: Place your loaf pan into the preheated oven. Bake for an initial 45 minutes. At this point, the top might be getting quite golden. To prevent over-browning and ensure the center cooks through evenly, carefully cover the loaf with aluminum foil. Continue baking for an additional 15-20 minutes, or until the cake is thoroughly baked. You can test for doneness by gently pressing the top – it should spring back. Alternatively, insert a toothpick into the center; it should come out clean. Once baked, remove the loaf from the oven and allow it to cool completely in the pan on a wire rack before attempting to slice it. This cooling period is crucial for the cake to set properly and prevents it from crumbling when cut.
Creative Variations & Smart Substitutions for Your Marble Loaf
One of the joys of baking is the ability to customize. This **Weight Watchers marble loaf cake** is incredibly adaptable, allowing you to tailor it to your dietary needs, available ingredients, or simply your personal taste preferences. Here are some fantastic ways to get creative:
- Further Reduce WW Points: For an even lighter treat, consider using a 1:1 sugar replacement, such as Swerve or erythritol-based sweeteners, in place of granulated sugar. Always check the specific brand’s WW point value, as they can vary. Another effective strategy is to simply cut the loaf into more than 10 slices. While each slice will be thinner, this allows for smaller, more frequent indulgences throughout your day without consuming too many points.
- Exploring Cocoa Powder Types: Whether you reach for natural cocoa powder or Dutch-process cocoa, both will work beautifully in this recipe. It’s worth noting their subtle differences: natural cocoa tends to be fruitier and slightly more acidic, resulting in a lighter chocolate color, while Dutch-process cocoa is smoother, darker, and less acidic. Both will yield a delicious marble effect, so use what you have on hand or what you prefer for chocolate intensity.
- Alternative Milk Options: Unsweetened almond milk is our go-to for its minimal point value, keeping this recipe extremely light. However, feel free to substitute with other milk types based on your preference or what’s available. Fat-free milk, reduced-fat milk, or even unsweetened oat milk can be used. Just be aware that these may slightly adjust the overall nutritional profile and WW points per slice.
- Indulgent Chocolate Ganache Topping: If you have a few extra Weight Watchers points to spare and want to elevate this marble loaf into a truly decadent dessert, a simple chocolate ganache is a wonderful addition. After the loaf has cooled completely, drizzle or spread a thin layer of ganache over the top. For a more WW-friendly ganache, consider using sugar-free dark chocolate chips, such as Lily’s brand, melted with a small amount of unsweetened almond milk or fat-free half-and-half. This adds a luxurious touch without excessive points.
- Tangy Cream Cheese Frosting: Another exquisite topping option is a lightened-up cream cheese frosting. The slight tanginess of cream cheese beautifully complements and balances the sweet vanilla and rich cocoa flavors of the cake. To make a WW-friendly version, use reduced-fat cream cheese, a splash of unsweetened almond milk or regular milk to reach desired consistency, and powdered sugar or a powdered sugar substitute to taste.
- Add a Zesty Twist: For a bright, aromatic lift, consider adding the zest of one orange or lemon to your vanilla batter. Citrus zest pairs wonderfully with both vanilla and chocolate, adding an unexpected layer of flavor.
- Mix-Ins for Texture: While keeping points low, a small amount of sugar-free chocolate chips or chopped nuts (like walnuts or pecans) can be gently folded into the batter (either vanilla or chocolate, or both!) before layering. Be mindful that these additions will increase the point value, so adjust servings accordingly.
- Coffee-Infused Chocolate: For an even deeper chocolate flavor, try adding 1/2 teaspoon of instant espresso powder or coffee granules to the hot water when blooming your cocoa powder for the chocolate batter. Coffee naturally enhances chocolate notes without making the cake taste like coffee.
Expert Tips & Tricks for a Flawless Weight Watchers Marble Loaf
Achieving a perfectly moist, tender, and beautifully marbled loaf is easy when you follow a few key tips. These insights will help you avoid common baking pitfalls and ensure your **WW marble loaf cake** turns out spectacular every time:
- Mastering the Marble Swirl: The batter for this loaf is on the thinner side, which is ideal for creating soft swirls. However, this also means you need a light hand when creating the marble effect. Insert your knife or skewer just beneath the surface of the batter and gently draw an S-shape or zigzag pattern. Resist the urge to over-swirl or stir too vigorously, as this will cause the vanilla and chocolate batters to blend completely, resulting in a dull, uniform brown cake rather than distinct, elegant swirls. Aim for just 1-2 passes for the best visual impact.
- Preventing Overmixing for Perfect Texture: This is arguably one of the most critical baking rules. Once you add the dry ingredients to the wet, mix only until the flour streaks disappear and everything is just combined. Overmixing develops the gluten in the flour excessively, leading to a tough, dense, gummy, or overly chewy texture. For a light, tender crumb, err on the side of slightly under-mixed rather than over-mixed.
- The Parchment Paper Sling for Easy Removal: We cannot emphasize enough the benefit of lining your loaf pan with parchment paper. Instead of just greasing the pan, cut a piece of parchment paper to fit the bottom and extend up the two longer sides, creating “handles.” This parchment sling allows you to effortlessly lift the entire baked loaf out of the pan once it’s cooled slightly, preventing it from sticking, breaking, or damaging its beautiful crust.
- The Importance of Cooling Completely: Patience is a virtue, especially when it comes to baked goods. It might be tempting to slice into your warm, fragrant marble loaf right out of the oven, but resist! The cake continues to cook and set as it cools. Slicing it too soon can result in a crumbly texture and an unfinished structure. Allow the loaf to cool completely on a wire rack for at least an hour (or longer) before cutting into it. This ensures neat slices and the best eating experience.
- Optimal Storage for Lasting Freshness: To keep your marble loaf cake moist and delicious for as long as possible, proper storage is key. Once fully cooled, wrap the entire loaf tightly in plastic wrap, then enclose it in aluminum foil, or place it in an airtight, zip-top resealable bag. Stored at room temperature, it will stay fresh for approximately 3 days. For extended freshness, refrigerate the wrapped loaf for up to 5 days. For longer-term storage, the loaf freezes beautifully for up to 2-3 months. Thaw frozen slices or the whole loaf at room temperature or gently warm in the microwave.
- Room Temperature Ingredients: Always aim to have your eggs and almond milk at room temperature before you start mixing. Room temperature ingredients emulsify better, creating a smoother, more uniform batter and a more tender final product.
- Doneness Test with a Toothpick: While oven times are a good guide, ovens can vary. The best way to check if your loaf is fully baked is to insert a wooden toothpick or thin skewer into the very center of the cake. If it comes out clean with no wet batter attached, your loaf is ready. If there’s wet batter, continue baking for a few more minutes and retest.
- Serving Suggestions: Enjoy this versatile loaf as is, or enhance it further. A light dusting of powdered sugar (check points if using on WW), a dollop of fat-free whipped cream, or a few fresh berries can add a lovely touch without significantly increasing points.
Related Recipes
If you’ve enjoyed this delightful low-point loaf, be sure to explore these other fantastic recipes:
Orange and Dark Chocolate Marble Loaf
Chocolate Chip Banana Bread
Chocolate Strawberry Bread
Weight Watchers Marble Loaf Cake
Ingredients
- 1 ½ cups All-purpose flour
- 1 ¼ tsp Baking powder
- ½ tsp Baking soda
- ½ tsp Table salt
- ⅔ cup unsweetened applesauce
- ⅔ cup Granulated sugar
- 2 Eggs
- 1 ½ tsp Vanilla extract
- ⅔ cup Unsweetened plain almond milk
Chocolate Batter Addition
- 3 tbsp Cocoa powder, unsweetened
- 2 tbsp Hot water
Instructions
-
Prepare Your Oven and Pan: Begin by preheating your oven to 350°F (175°C). This ensures a consistent baking temperature from the moment your loaf enters the oven. Next, prepare an 8 or 9-inch loaf pan. Line it completely with parchment paper, allowing an overhang on the longer sides. This creates a “parchment sling,” which makes removing the baked loaf incredibly easy and prevents sticking.
-
Combine Wet Ingredients: In a large mixing bowl, start by whisking the eggs and granulated sugar together vigorously until the mixture is light in color, smooth, and slightly fluffy. This step incorporates air, which contributes to a tender cake. Once combined, add the unsweetened applesauce, vanilla extract, and unsweetened plain almond milk (all wet ingredients, excluding the hot water for cocoa). Stir these gently until they are just combined, ensuring a homogenous liquid base for your batter.
-
Incorporate Dry Ingredients: Sift together your all-purpose flour, baking powder, baking soda, and table salt into a separate bowl. Then, gradually add these dry ingredients to your wet mixture. Using a spatula, gently fold them in. Mix until there are no visible streaks of flour and the batter is just combined. **Crucially, avoid overmixing.** Overmixing develops the gluten in the flour excessively, leading to a tough, dense, gummy, or overly chewy texture. A few small lumps are perfectly fine and preferable to an overmixed batter.
-
Divide and Create Chocolate Batter: Carefully divide your vanilla batter into two portions. One portion should be slightly smaller – this will be your chocolate batter. To this smaller portion, add the unsweetened cocoa powder and the 2 tablespoons of hot water. Mix thoroughly until the cocoa powder is fully incorporated and the batter is a rich, uniform chocolate color. The hot water helps “bloom” the cocoa, enhancing its flavor and preventing a dry chocolate batter. Now you have two distinct batters: one vanilla and one chocolate.
-
Layer for the Marble Effect: Transfer your prepared loaf pan to a flat surface. Begin the layering process by placing alternating scoops of the vanilla and chocolate batters into the pan. Start with a scoop of light batter, followed by a scoop of dark batter, then another scoop of light batter. For the next layer, switch the pattern: place a vanilla scoop on top of a chocolate layer and a chocolate scoop on top of a vanilla layer. Continue this alternating pattern, distributing the batters evenly, until both mixtures are used up. Don’t worry about perfection; the beauty is in the imperfection of the swirls.
-
Achieve the Perfect Swirl: Take a thin knife or a skewer. Gently insert it into the batter and draw a slow, deliberate S-line or a zigzag pattern through the layers. Repeat this process only once or twice. The key is to swirl just enough to create beautiful patterns without overmixing the batters, which would result in a muddy, uniform brown color rather than distinct, elegant swirls. Less is often more for a visually striking marble effect.
-
Bake to Golden Perfection: Place your loaf pan into the preheated oven. Bake for an initial 45 minutes. At this point, the top might be getting quite golden. To prevent over-browning and ensure the center cooks through evenly, carefully cover the loaf with aluminum foil. Continue baking for an additional 15-20 minutes, or until the cake is thoroughly baked. You can test for doneness by gently pressing the top – it should spring back. Alternatively, insert a toothpick into the center; it should come out clean. Once baked, remove the loaf from the oven and allow it to cool completely in the pan on a wire rack before attempting to slice it. This cooling period is crucial for the cake to set properly and prevents it from crumbling when cut.
Notes
Nutrition
Nutrition information is automatically calculated, so should only be used as an approximation.
