Mastering Texas BBQ: The Ultimate Aaron Franklin Brisket Smoking Guide
Embarking on the Aaron Franklin Brisket Challenge is more than just cooking; it’s a commitment, a journey, and an unparalleled culinary adventure. After dedicating a full 12 hours of my life to perfecting that legendary first bite, I can confidently say it’s a mission well worth undertaking. Now, consider yourself tagged – it’s your turn to experience where the rich aroma of Post Oak Wood meets the savory delight of perfectly smoked beef. This is where every other food item on your plate will humbly take a backseat, and where you truly earn your barbecue cooking medal.
This article unveils the signature method of smoking brisket, the very technique that draws legions of devotees to Franklin Barbecue in Austin, Texas. Aaron Franklin, the owner and a true pitmaster legend, established this process, and its popularity, driven by his super-tender recipe and distinct cooking style, shows no signs of waning. My personal quest involved meticulously following Aaron’s technique, smoking a pristine 12-pound brisket on a Large Big Green Egg. The process began with the first rays of sunrise, accompanied by a steaming cup of coffee, culminating in a late dinner served long after sunset, a truly epic culinary day.
Below, you’ll discover a comprehensive, step-by-step guide designed to help you replicate this iconic Texas-style brisket. We’ll cover everything from selecting the ideal cut and precise trimming, to seasoning it just right, building the perfect fire, expertly smoking the meat, understanding the crucial wrap and rest stages, and finally, slicing it to perfection to share with delighted diners. Plan for approximately 1.25 hours of cooking time per pound of beef, and as Franklin himself advises, “Get ready to clear your schedule.” This isn’t just a recipe; it’s an immersive experience that transforms a tough cut of meat into an edible masterpiece.
Why All the Excitement Over a Hunk of Meat and a Pitmaster?
To truly appreciate the magic of brisket, it’s essential to understand its origins. Each steer yields eight “primal” butcher cuts: chuck, rib, loin, round, flank, short plate, shank, and brisket. Specifically, there are two briskets per steer, located in the pectoral area just beneath the shoulder. This muscle group supports a significant portion of the animal’s weight, making it inherently tough due to its high concentration of connective tissue. Historically, brisket was often overlooked, relegated to ground beef or stew meat due to its challenging nature.
However, a culinary revelation changed its fate: the discovery that smoking brisket over low, indirect heat for many hours could slowly and meticulously tenderize the meat, rendering its substantial fat into a flavorful, moist delight without burning. This slow cooking process breaks down collagen into gelatin, transforming a tough cut into a wobbly, succulent sensation. Suddenly, briskets became the undisputed star of barbecue, and no one has championed and popularized this transformation more than Aaron Franklin with his distinct Texas-style BBQ.
Franklin is renowned for his use of offset steel smokers and his unwavering commitment to quality. In his most recent book, he shares that he sources premium black Angus beef, often from esteemed suppliers like Creekstone Farms in Arkansas City, Kansas. It’s a testament to his dedication to the craft that he started, like many, with a humble $99 smoker and a “bad brisket.” Yet, through sheer persistence and an insatiable desire for perfection, he refined his process, transforming himself into a global pitmaster icon and the owner of what is arguably the nation’s hottest BBQ joint. As he wisely stated in a PBS video, “You can’t worry about it. It’s just a piece of meat with fire. It’s the oldest way to cook.” His meticulous recipe and techniques are now widely shared across various platforms, from videos and MasterClass articles to interviews, and my aim here is to consolidate this wealth of knowledge into one accessible guide.
All the Ingredients You Need for Aaron Franklin’s Brisket
The beauty of Aaron Franklin’s brisket lies in its simplicity. A truly great brisket doesn’t require an elaborate rub or marinade; the quality of the meat and the smoking process are paramount. Here’s what you’ll need:
- 1 whole packer brisket (approximately 10-14 pounds, ideally around 11-12 pounds for a balance of cooking time and yield)
- 2 1/2 tbsp. coarse kosher salt (the coarse texture helps form a better bark and adheres well to the meat)
- 2 1/2 tbsp. coarsely ground black pepper (freshly ground is always best for maximum flavor and aroma)
- Sonny’s BBQ Sweet sauce, optional (to be offered on the side only, respecting the Texas tradition of unadulterated brisket flavor)
Essential Equipment for Your Brisket Journey:
Having the right tools is just as crucial as the ingredients themselves. These items will ensure a smooth and successful smoking process:
- Large Big Green Egg (or your preferred kamado-style cooker or offset smoker capable of maintaining stable low temperatures)
- Big Green Egg Natural Oak & Hickory Lump Coal (or another high-quality, all-natural lump charcoal for a clean burn)
- 6 large chunks B&B Post Oak Wood (Post Oak is Franklin’s signature wood, imparting a distinct, robust flavor that defines Texas BBQ)
- 1 water pan, maximum 15” long for Large Big Green Egg (essential for maintaining moisture in the cooking chamber, preventing the meat from drying out)
- ThermoPro Dual Probe Wireless Thermometer (critical for accurately monitoring both internal meat temperature and ambient smoker temperature without opening the lid)
- Meat thermometer manual probe stick (for spot-checking tenderness and internal temperatures in various parts of the brisket)
- 1 water spritzer filled with water (used during the mid-smoking phase to keep drier spots moist and promote bark development)
- 1 roll butcher paper (unwaxed and uncoated, crucial for wrapping the brisket during the “stall” to push through and protect the bark)
- 1 curved boning knife and 1 brisket slicing blade (sharp, specialized knives make trimming and slicing significantly easier and more precise)
How to Choose the Right Cut of Beef
The brisket itself is a fascinating cut, composed of two distinct muscles: the point and the flat. The point, often referred to as the “deckle,” is the larger, rounder half, generously marbled with fat, contributing to its rich succulence and intense flavor. The flat, true to its name, is leaner and flatter, offering a complementary, delicate texture. For an authentic Aaron Franklin brisket, you must request a “whole packer” cut from your butcher. This ensures you receive both the point and the flat intact, allowing you to serve a harmonious blend of textures and flavors to each diner.
When planning your next BBQ gathering, a good rule of thumb is to estimate about 1/2 pound of raw brisket per person. Keep in mind that a packer-cut brisket will yield approximately 50-60% of its original weight after trimming and cooking, depending on how aggressively you trim the fat. The day before my cook, I contacted several local butchers before realizing that Sam’s Club, even with its annual membership fee, offered the best selection of high-quality packer briskets in the ideal 12-pound range. I was fortunate to find a Prime-grade packer cut, which is highly recommended for its superior marbling and tenderness. If your budget allows, opting for Prime Angus can elevate the experience even further.
Expert Tip for Selection: If you have the luxury of choice, always opt for a brisket with visible marbling (intramuscular fat) throughout the lean sections and the thickest possible flat. This ensures that the leaner flat portion cooks at a more consistent rate with the richer, fattier point, minimizing the risk of drying out one section while the other finishes cooking. I purchased my packer brisket the afternoon before smoking, immediately refrigerated it on paper towels overnight to absorb any excess moisture, and set my alarm for 5:30 AM – ready to embrace a long but rewarding day of brisket making. My schedule was officially cleared.
10 Steps to Make the Perfect Aaron Franklin Brisket
From the initial trim and precise seasoning to the final, crucial resting period, there are 10 indispensable steps to follow if you aspire to achieve the same mouth-watering brisket that Aaron Franklin serves to his devoted legions of customers. Each stage is vital in developing the legendary flavor and texture.
Step 1: Trim the Brisket
My brisket challenge began before dawn. After brewing a pot of coffee, letting the dog out, and stretching, I felt a surge of anticipation. The first critical task: remove the cold brisket from the refrigerator and begin trimming immediately. Working with a cold brisket is paramount, as the fat will be firmer and easier to make clean, precise cuts. As the meat warms, the fat softens, making trimming significantly more challenging and less accurate.
Throughout these initial steps, I highly recommend using disposable grilling gloves, such as Grease Monkey brand. As Franklin himself emphasizes, these gloves serve multiple purposes: they prevent the transfer of food juices and particles, protect your hands from fatty acids and spicy ingredients, offer a degree of insulation when handling warmer surfaces, and most importantly, provide a much better grip, reducing the risk of slips with a sharp knife.
The art of trimming brisket involves a delicate balance. Too much fat left on, and the brisket can taste overly greasy; too much removed, and it risks drying out during the long cook. The general guideline is to aim for a consistent 1/4 inch fat cap across the entire surface. Given that I was using a Large Big Green Egg with an 18.25-inch diameter, I also needed to trim at least two inches off the length of the brisket to ensure it fit properly on the cooking grid without touching the sides. This isn’t an issue for users of larger smokers like Traeger or Weber Pit Boss pellet smokers, which is why Franklin typically doesn’t trim the ends of his briskets.
Don’t discard any trimmings! Fat trimmings can be rendered into tallow, a prized ingredient for cooking or finishing steaks. In my case, I carefully set aside any trimmings that contained meat, knowing my dog, Bear, would be in for a special treat at the end of this epic cookout! Having previously watched numerous trimming videos, I felt about 90% prepared for this step. My only regret was not investing in a curved boning knife, similar to the one handed down to Franklin by his father, which he expertly uses in his tutorials. However, by effectively combining my newly acquired large and small Big Green Egg brand knives, I managed quite well. Ensure your knife game is sharp and ready.
Step 2: Season the Brisket
Aaron Franklin’s philosophy on seasoning is refreshingly simple: coarse salt and coarsely ground black pepper, nothing more. He mixes these two ingredients thoroughly in a shaker. His application technique involves holding a loose wrist, almost like a hinge, and shaking the rub evenly across the brisket, using his other hand to cup the sides to ensure even coverage. Once one side is seasoned, the brisket is flipped, and the process is meticulously repeated. This minimalist approach allows the natural beef flavor and the smoky essence of the Post Oak to truly shine through.
While I adhered closely to Franklin’s salt-and-pepper principles, I did improvise slightly by opting for a jar of Kinder’s seasoning called “The Blend,” which conveniently combines salt, pepper, and garlic. After applying the seasoning generously, I patted the brisket well to ensure good adhesion. The seasoned brisket was then left to sit for 30-60 minutes at room temperature, allowing the rub to “set” while I transitioned to the crucial next step: building the fire.
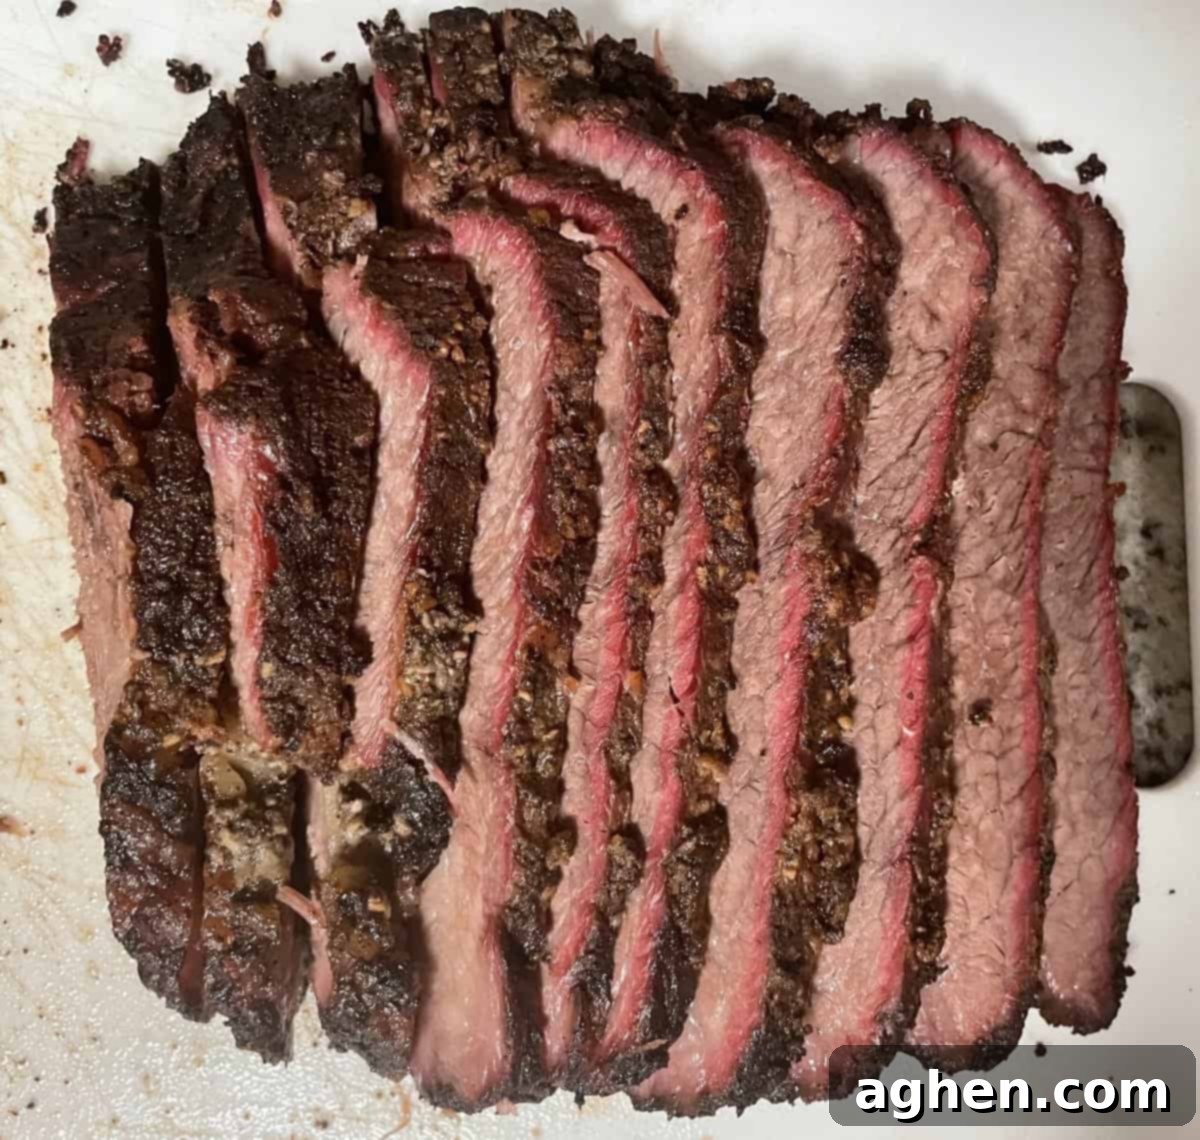
Step 3: Build the Fire
For Aaron Franklin, the choice of wood is non-negotiable: only Post Oak Wood, carefully dried for 9-12 months, makes it into his offset pit smoker. This specific wood imparts the signature, deep smoky flavor characteristic of Central Texas barbecue. While my setup was different, using a Big Green Egg, the principle of a clean, consistent burn with quality wood remained. I started by utilizing leftover lump charcoal from my previous BBQ session, supplementing it with a fresh batch of Big Green Egg Natural Oak and Hickory Lump Charcoal, carefully building it to the rim of the firebox.
To ignite the coals, I used four SpeediLight cubes and allowed the fire to establish itself for about 10 minutes until the coals were sufficiently glowing. Then, I reached for my bag of B&B 100% Natural Post Oak Wood and strategically placed six large chunks around and on top of the glowing charcoal. This ensures a steady, clean smoke throughout the cook. The next crucial step for indirect heating in the Big Green Egg was repositioning the ceramic convEGGtor plate setter directly above the fire, making sure its legs pointed upwards. This creates a barrier between the direct heat and the meat.
On top of the convEGGtor, I placed an aluminum water drip pan, ensuring a small wad of aluminum foil created a slight gap underneath for better airflow and to prevent direct contact. The pan was then filled halfway with hot water. This water pan is your primary tool for moisture control, helping to stabilize internal smoker temperature and humidify the cooking environment, which is vital for a moist brisket. Finally, using the grid lifting tool, I carefully placed the ceramic cooking grid back into its position, ready for the star of the show.
Step 4: Put the Meat on the Fire
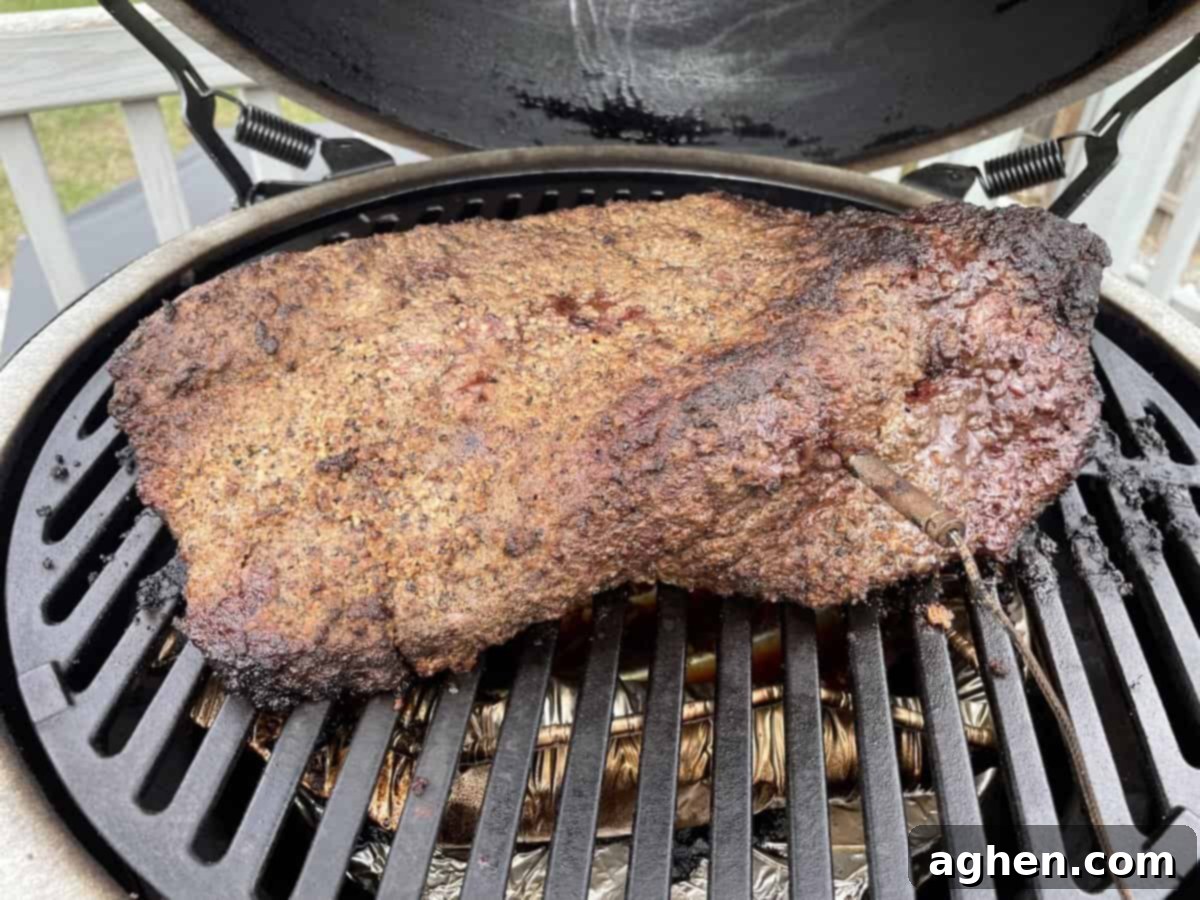
The moment of truth arrived once the temperature gauge on the Big Green Egg read a stable 250 degrees Fahrenheit, and the initial billowy white smoke had transitioned to a faint, thin blue smoke stream emanating from the top vent. This “thin blue smoke” is the hallmark of a clean-burning fire, essential for imparting desirable smoke flavor without bitterness. For me, this milestone occurred at 9:15 a.m., roughly two hours later than my intended start. This delay was due to a morning dash to acquire the Post Oak Wood and my cautious approach to the initial steps, ensuring everything was perfect.
Franklin recommends placing the brisket fat side up on the smoker. However, this advice can vary slightly depending on your smoker type. If your heat source is directly beneath the meat, you might consider placing it fat side down to shield the lean muscle from drying out. If you’re using an offset pit smoker, like Franklin’s, where the firebox is to the side, positioning the fattier point side closest to the fire helps to ensure more even cooking across the entire cut. Given that my oval kamado cooker is renowned for its exceptional and even heat distribution, I confidently followed Franklin’s guidance, placing the brisket fat side up.
The meticulously trimmed brisket fit perfectly on the grid. After giving it a final, gentle pat, I inserted one of my ThermoPro wireless probes precisely into the center of the thickest part of the point. With the probe securely in place, I closed the dome, signifying the true start of the low-and-slow cook. This is a critical juncture where patience is key; as the old BBQ adage goes, “if you’re looking, you ain’t cookin’.” I later realized I should have utilized the second wireless probe for this brisket, either by inserting it into the leaner flat or simply placing it on the grid to accurately monitor the ambient temperature. For this cook, I relied on the single probe connected to the ThermoPro base unit on the Big Green Egg table, alongside the EGG’s built-in external thermometer gauge.
Step 5: First Stage of Smoking for 3 Hours
With the brisket settled into its smoky chamber, I set the target internal temperature on my ThermoPro to 165 degrees Fahrenheit, marking the commencement of the initial three-hour smoking phase. My aim was to maintain an ambient smoker temperature of 260 degrees, aligning with Franklin’s preferred technique for his offset smokers. However, it quickly became apparent that my Big Green Egg, known for its efficiency and excellent heat retention, would cook a low-and-slow brisket slightly faster than Franklin’s larger, less insulated smokers. This insight underscored the importance of making small, continuous adjustments to temperature control throughout the cook to match the equipment.
At 11:41 a.m., just 2 hours and 30 minutes into the cook, my ThermoPro remote flashed an early alert: the brisket had already reached the 165-degree target temperature. While technically the beef was “done” in terms of food safety, the journey to true tenderness, that sought-after wobbly, gelatinous texture, was still far from over. This phase is merely the beginning; the real magic happens as the connective collagen slowly breaks down into rich gelatin over many more hours of low-and-slow cooking.
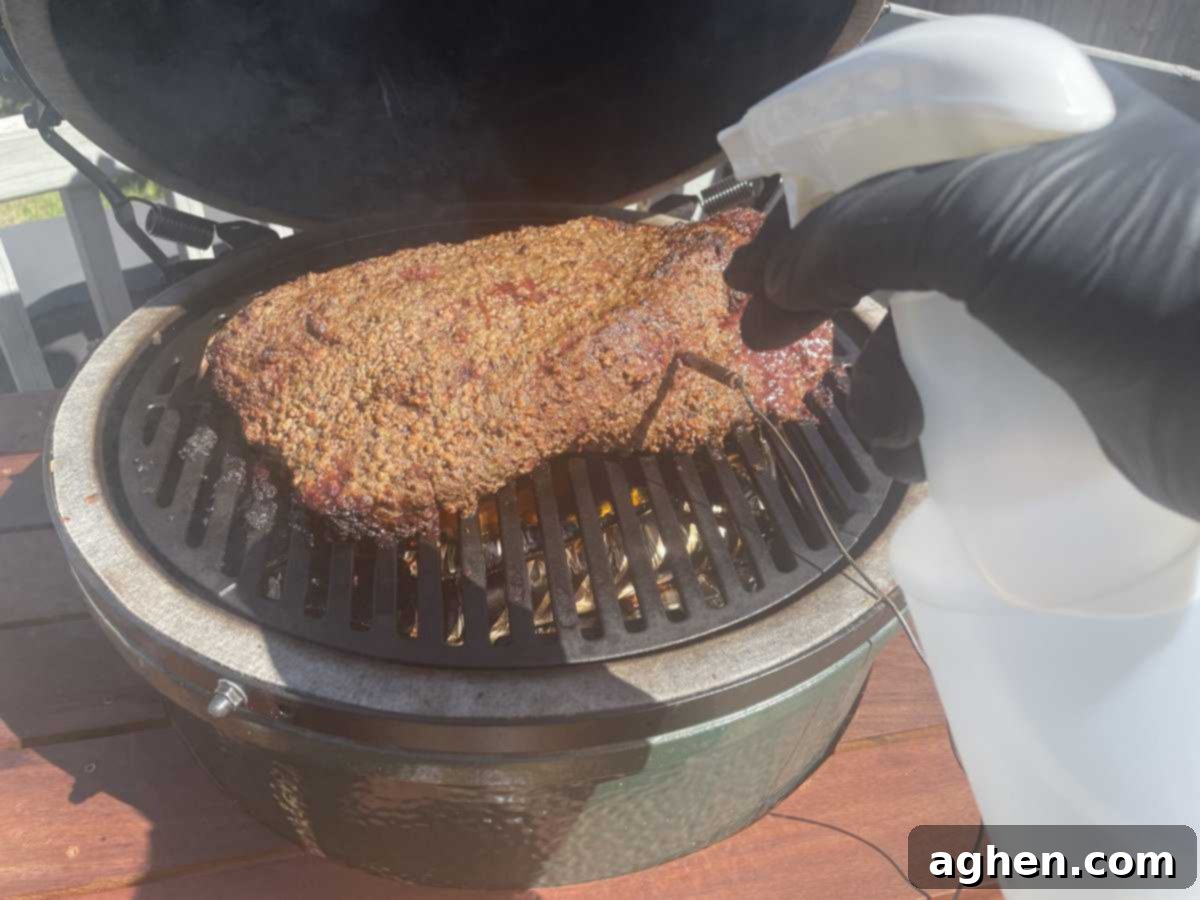
Step 6: Second Stage of Smoking for 3 Hours
The second stage of smoking, typically another three hours, shifts focus significantly towards moisture management and bark development. Even with the water pan working diligently inside the smoker, Franklin advocates for spritzing the brisket once every hour during this phase. The primary purpose of spritzing is not to re-moisten the entire brisket but to target areas that appear drier or are crisping up too quickly, ensuring a balanced and even cook across the entire surface. This also helps to cool the surface, allowing more smoke flavor to adhere and preventing the bark from getting too hard.
At 12:15 p.m., I carefully lifted the lid to inspect the brisket. It had begun to develop a beautiful mahogany hue, with some slight crisping noted on the point and the end of the flat. Using my water spritzer, I specifically targeted these drier areas, giving them a generous misting. This hourly spritzing routine would continue for the remainder of this three-hour phase. By 12:30 p.m., the internal meat temperature had risen to 175 degrees, while the Big Green Egg held steady at 265 degrees ambient temperature.
An hour later, at 1:30 p.m., I observed the brisket beginning to form its characteristic dark, flavorful bark. Again, I focused my spritzing efforts on any dry or visibly darkened areas. At this point, the meat still felt quite firm and “rubbery” to the touch, indicating the collagen breakdown was still in its early stages. By 2:35 p.m., a subtle but significant change occurred: for the first time, I detected a hint of tenderness and a slight wobbliness when gently probed. The same areas, particularly the end of the flat, still looked somewhat dry, so I spritzed them once more. The EGG temperature remained a consistent 250 degrees, and the brisket’s internal temperature had reached 186 degrees. Reaching anything over 180 degrees signals that the collagen is actively converting into gelatin, confirming that the brisket was indeed progressing towards its tender, wobbly state.
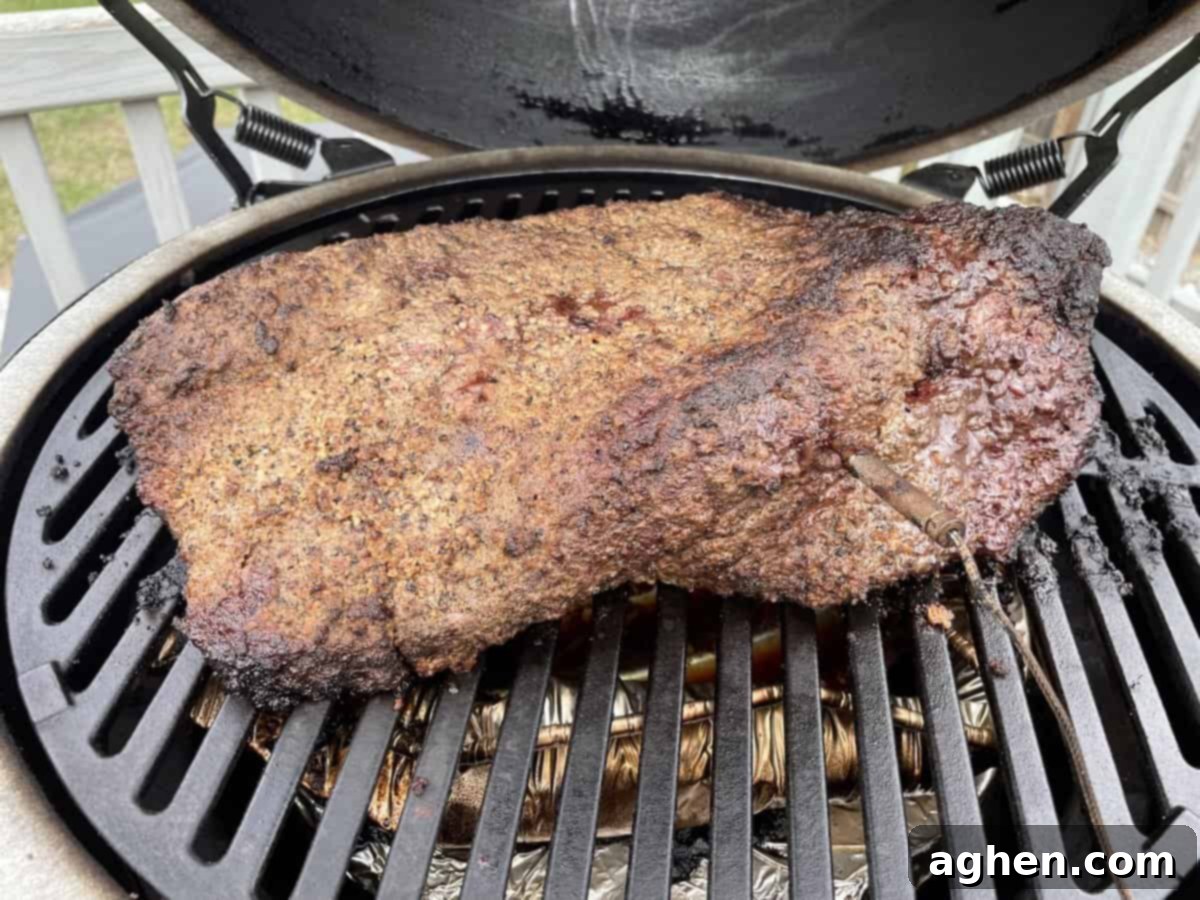
Step 7: The Stall
The “stall” is a phenomenon intimately familiar to anyone who smokes large cuts of meat, and it typically makes its appearance when the internal temperature of the brisket hovers around 180 degrees Fahrenheit. This can be one of the most frustrating phases for a beginner. The stall occurs when moisture rapidly evaporates from the surface of the meat, causing a cooling effect similar to how sweat cools your skin. This evaporative cooling counteracts the heat from the smoker, causing the internal temperature to plateau, sometimes for several hours. It’s a natural part of the process, but it can test a pitmaster’s patience.
Following Franklin’s game plan, the typical strategy to navigate and push past the stall is to increase the smoker’s temperature to around 300 degrees Fahrenheit. This slight increase in heat helps overcome the evaporative cooling, allowing the internal temperature to continue rising. In my case, at 3:15 p.m., I was likely already well into the stall. After another quick spritz to ensure surface moisture, I gently bumped the Big Green Egg’s temperature up to 285 degrees. My goal was now to guide the brisket through this plateau and steadily work towards its “happy place” – an internal meat temperature range of 200-210 degrees Fahrenheit, where ultimate tenderness resides.
A personal misstep occurred at the six-hour mark: I made the mistake of attempting to test the brisket’s tenderness by pressing my finger onto the top. All this accomplished was smearing off a perfect circle of the painstakingly developed bark, leaving a small bare spot. Learn from my error: resist the urge to prod! The bark is precious and delicate during this stage, and external pressure can easily damage it. Trust your thermometers and the visual cues of tenderness (like wobbliness) instead.
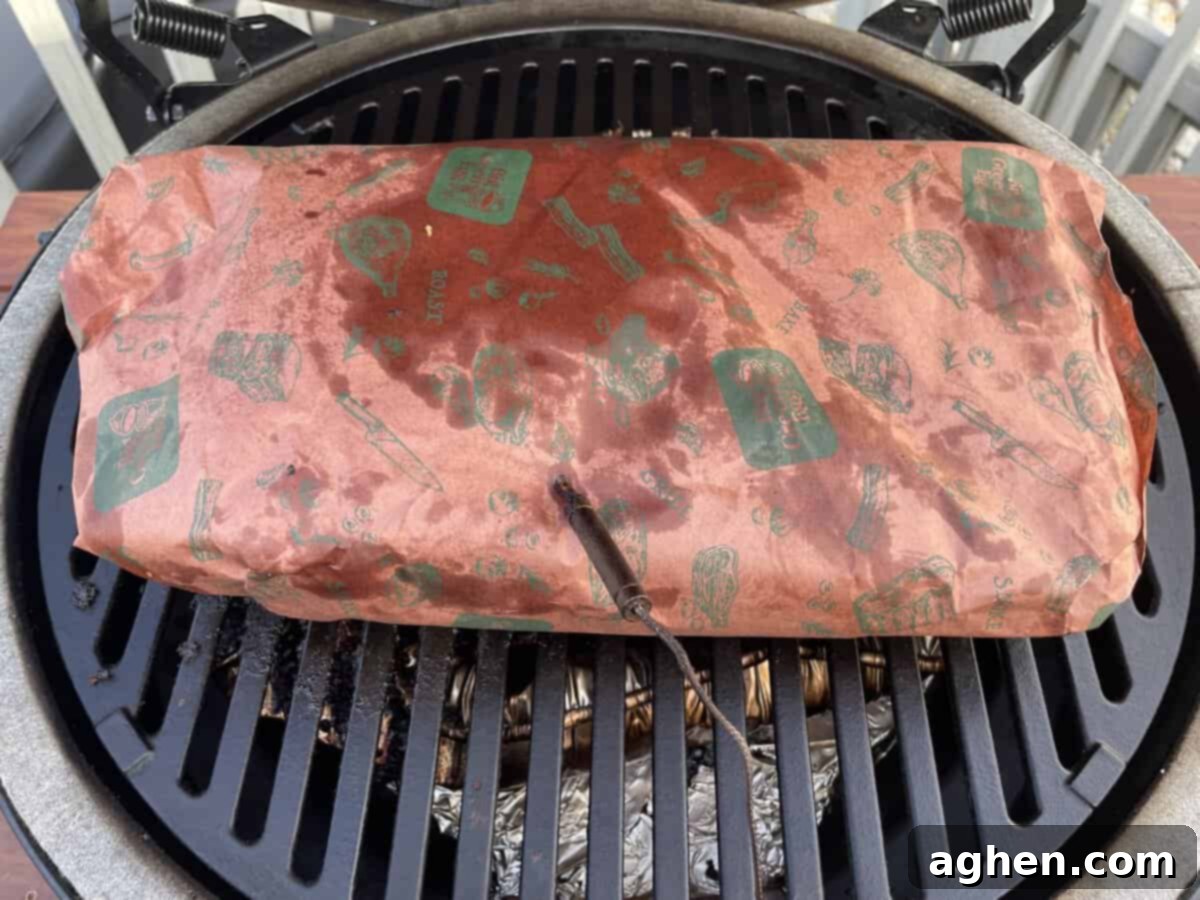
Step 8: The Wrap
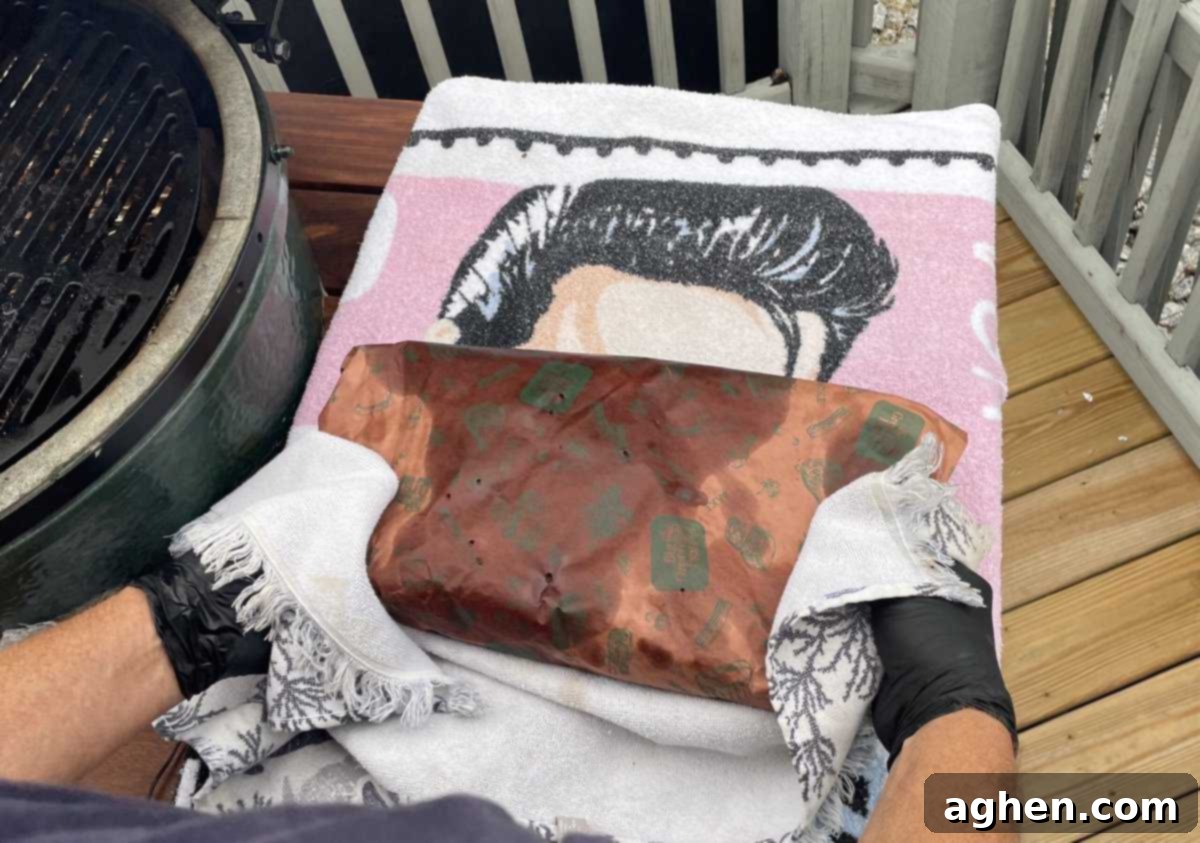
At 4:15 p.m., it was time for the critical “Texas Crutch” – wrapping the brisket. I had meticulously prepared for this moment by cutting two pieces of unwaxed, uncoated butcher paper, each four times as long as the brisket was wide. Following Franklin’s precise instructions from his MasterClass, I carefully overlapped them. The correct technique involves extending one sheet lengthwise away from yourself, then overlapping the second sheet perpendicularly in the middle. I confess I initially flip-flopped this part, which made it a little more challenging to securely flip the brisket and neatly tuck in the corners, but ultimately, it all worked out.
After the brisket was snugly wrapped and the probe reinserted, the ThermoPro readout surprisingly dipped back down to 165 degrees. Using a manual meat probe stick, I spot-checked various points: mid-170s on the point side and around 162 degrees on the flat. This indicated that the internal temperature wasn’t quite as uniformly high as my single ThermoPro probe had been suggesting throughout the cook. This discrepancy highlights a crucial lesson: always check temperatures in multiple locations, especially when using only one probe, as different parts of the brisket cook at varying rates.
Given these slightly lower-than-expected temperatures and the still somewhat rubbery texture, it became clear that the brisket needed more time and heat. So, I increased the Big Green Egg’s temperature to approximately 300 degrees Fahrenheit, aiming to quickly push the meat temperature past 180 degrees and ultimately towards its ideal range of 205-210 degrees. At this stage, I wasn’t concerned about the brisket burning, a sentiment echoed by Aaron Franklin himself. The wrap would protect it, and the higher heat would expedite the collagen breakdown, ensuring a beautiful, dark bark was sealed in. By 4:35 p.m., the EGG gauge held steady at a robust 295 degrees, and my hunger for that perfectly tender brisket was growing with every passing minute.
Step 9: Rest the Brisket
At 5:20 p.m., my ThermoPro indicated an internal temperature of 202 degrees Fahrenheit, signaling that the brisket was ready to be removed from the fire. However, a crucial double-check with the manual meat stick revealed slightly varied readings: most spots registered at least 198 degrees, some even around 205, but one area showed 194. To be absolutely certain, I allowed it a couple more minutes before finally pulling it off the smoker at 5:25 p.m. This quick, multi-point check is essential to ensure uniform doneness and tenderness.
Now came the often-underestimated yet profoundly important “rest.” For this particular brisket, I gave it a distinctive touch by wrapping it within an Elvis beach towel – a nod to “It’s Now or Never” as I committed to this final, critical step. The towel-wrapped brisket was then placed into a cooler, following Franklin’s instructions. This insulated environment allows the brisket to continue cooking gently through “carryover heat,” while simultaneously enabling the muscle fibers to relax and reabsorb the precious internal juices that were pushed out during the smoking process. This reabsorption is what makes a brisket incredibly moist and tender. The goal was to let it rest until its internal temperature slowly dropped to 145 degrees Fahrenheit.
During the lengthy resting period, I made sure not to waste the perfectly burning Big Green Egg fire. As is my custom, I seized the opportunity to add something else to the smoker. In this instance, I took all my trimmed meat scraps – a substantial pile – and smoked them for an additional 15 to 20 minutes. This resulted in the happiest dog in the world, as Bear got to enjoy some of the best gourmet dog food imaginable that week! While a meat grinder might lead to delicious brisket burgers, Bear’s happiness took precedence. Finally, around 9 p.m., after a full 12 hours since it went on the smoker, the brisket’s internal temperature had reached 145 degrees, signaling it was ready to be brought into the kitchen. This epic timeline clearly illustrates why beginning around sunrise is essential if you aim to serve this culinary masterpiece by dinnertime.
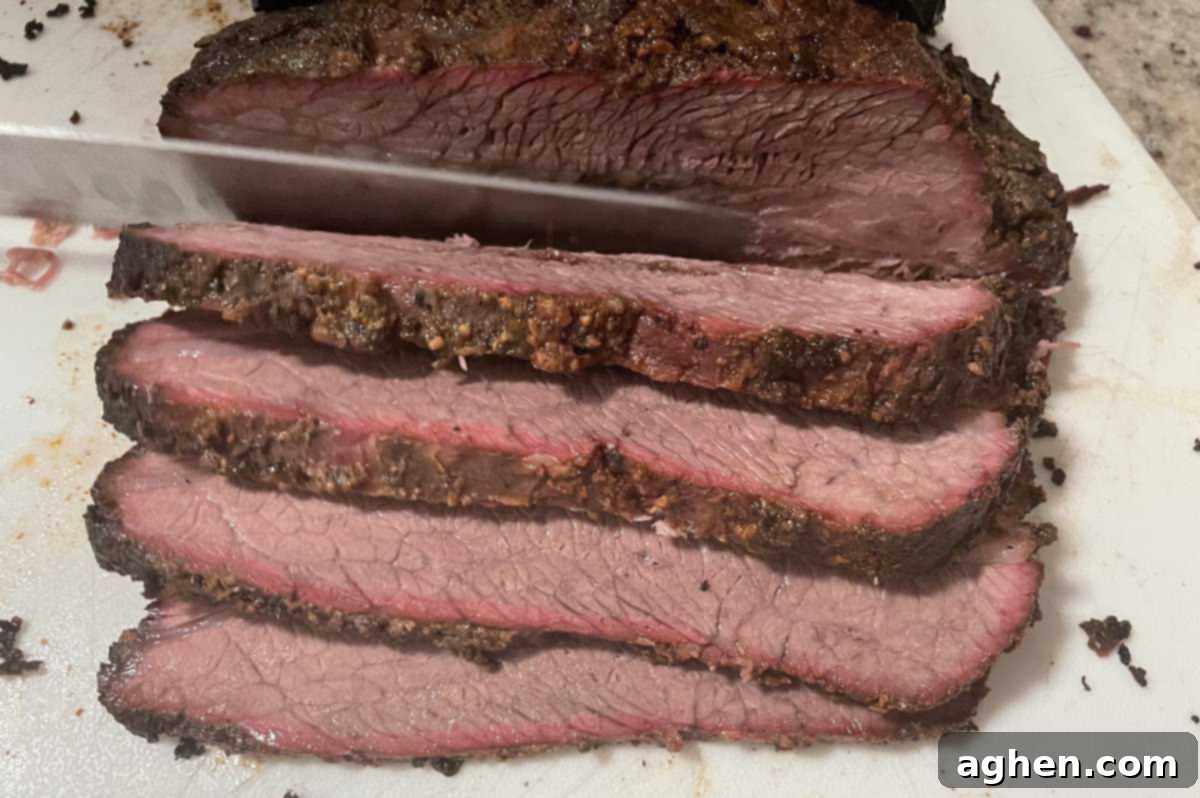
Step 10: How to Slice an Aaron Franklin Brisket
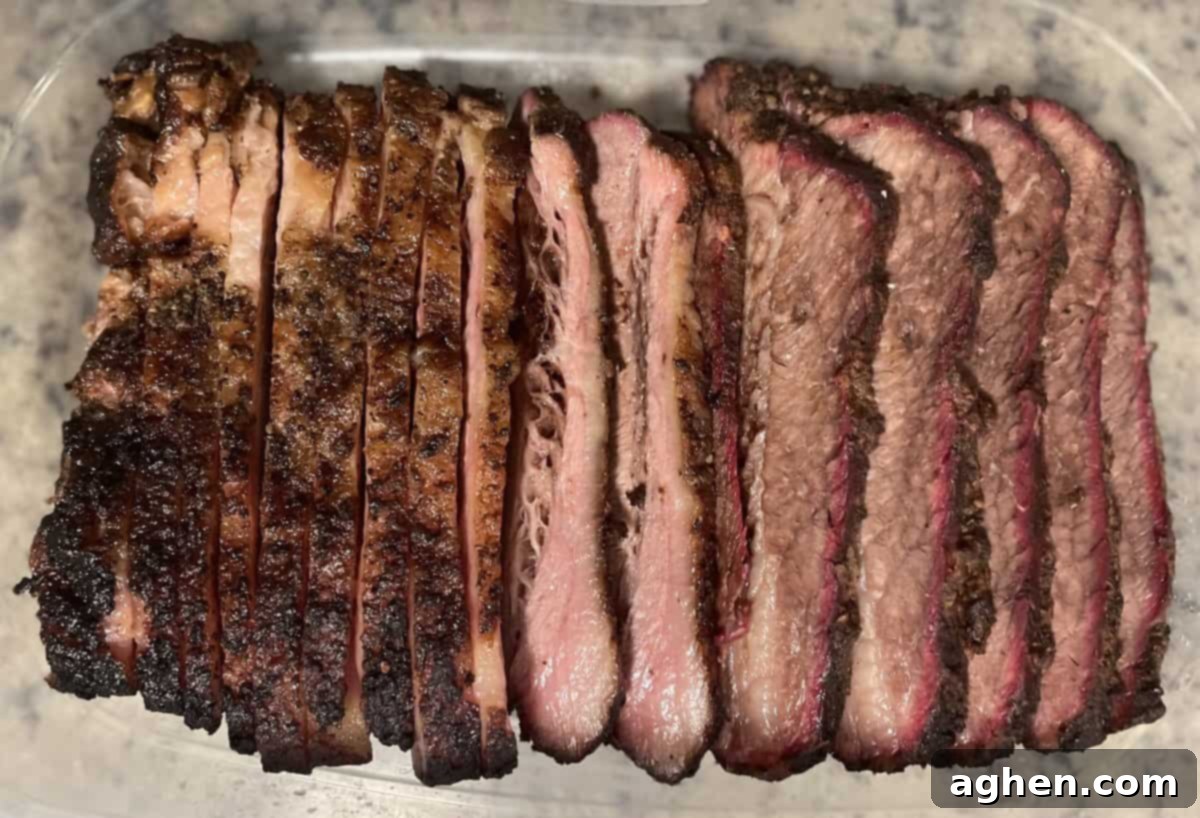
The final, glorious moment arrives: slicing the brisket. Aaron Franklin’s distinctive “pull slice” technique is the gold standard here. To ensure I executed this crucial final step correctly, I invested in a dedicated brisket slicing blade from Ace Hardware on the morning of the cook. This specialized blade, typically long and thin, is designed for smooth, effortless cuts.
The technique is straightforward yet requires precision: extend your blade out over the brisket, then pull it back through the meat in one fluid, smooth motion. That’s it. If your brisket is perfectly tender, the blade will glide through it like warm butter. However, always let caution be your guide. You’ll likely be wearing greasy BBQ gloves, and you absolutely do not want to slip. Mastering this technique ensures a clean cut that preserves the meat’s integrity and juiciness, exactly “the way he does it.”
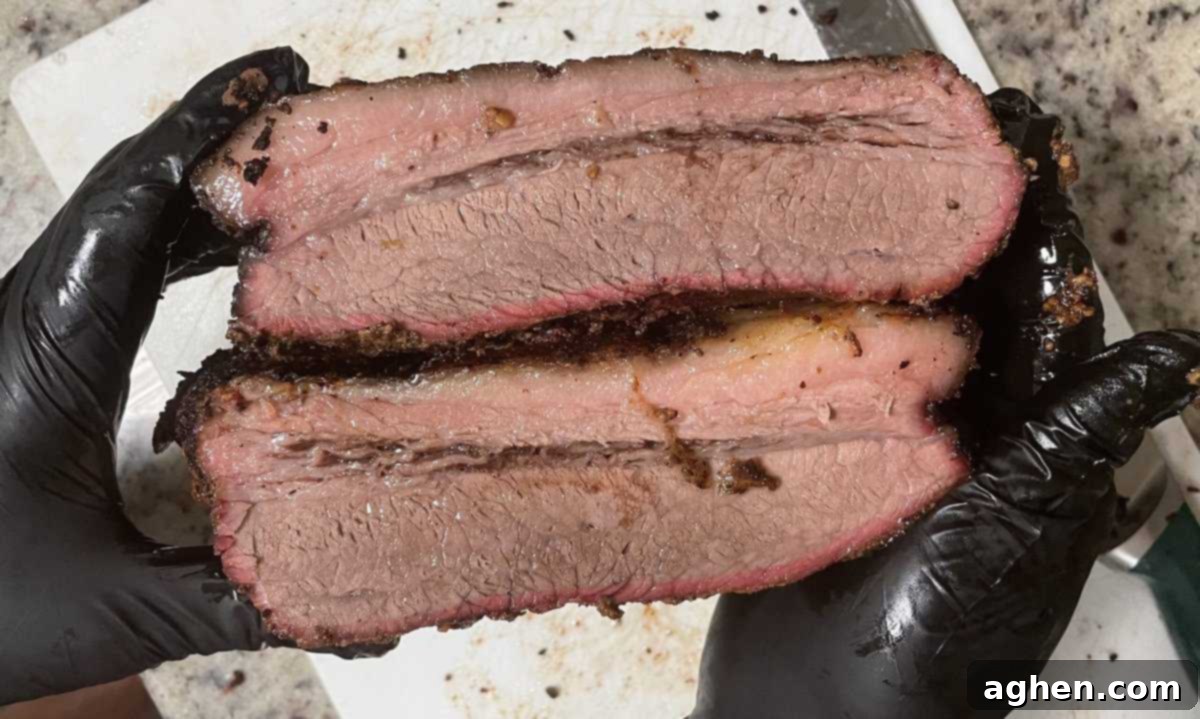
Begin by carefully slicing the entire brisket in half, separating the point from the flat. This allows you to address each section individually. At this stage, perform the obligatory moisture examination: gently squish one half onto the other. If juices beautifully seep out, it’s a thrilling visual confirmation of your success – be sure to capture it on video to impress everyone! Then, proceed to slice each half meticulously against the grain. For the fattier point side, aim for slightly thicker cuts, about 1/4 inch. For the leaner flat, a slightly thinner slice will often be more appealing, offering a delicate texture that complements the rich point.
How to Savor and Serve Your Brisket
As I reached for that very first piece, a vivid memory of Aaron Franklin cutting a strip from a wrapped brisket and letting it dangle in his fingers came to mind, his words resonating: “A brisket under its own weight, minimal pulling.” This is the ultimate test of tenderness, and now, it was time to experience the best first bite ever. I was struck by the incredible richness and creamy texture; despite my voracious appetite after 12 hours of cooking, I could consume surprisingly little in one sitting. It’s an experience akin to savoring a decadent piece of buttercream cake – deeply satisfying and intensely flavorful.
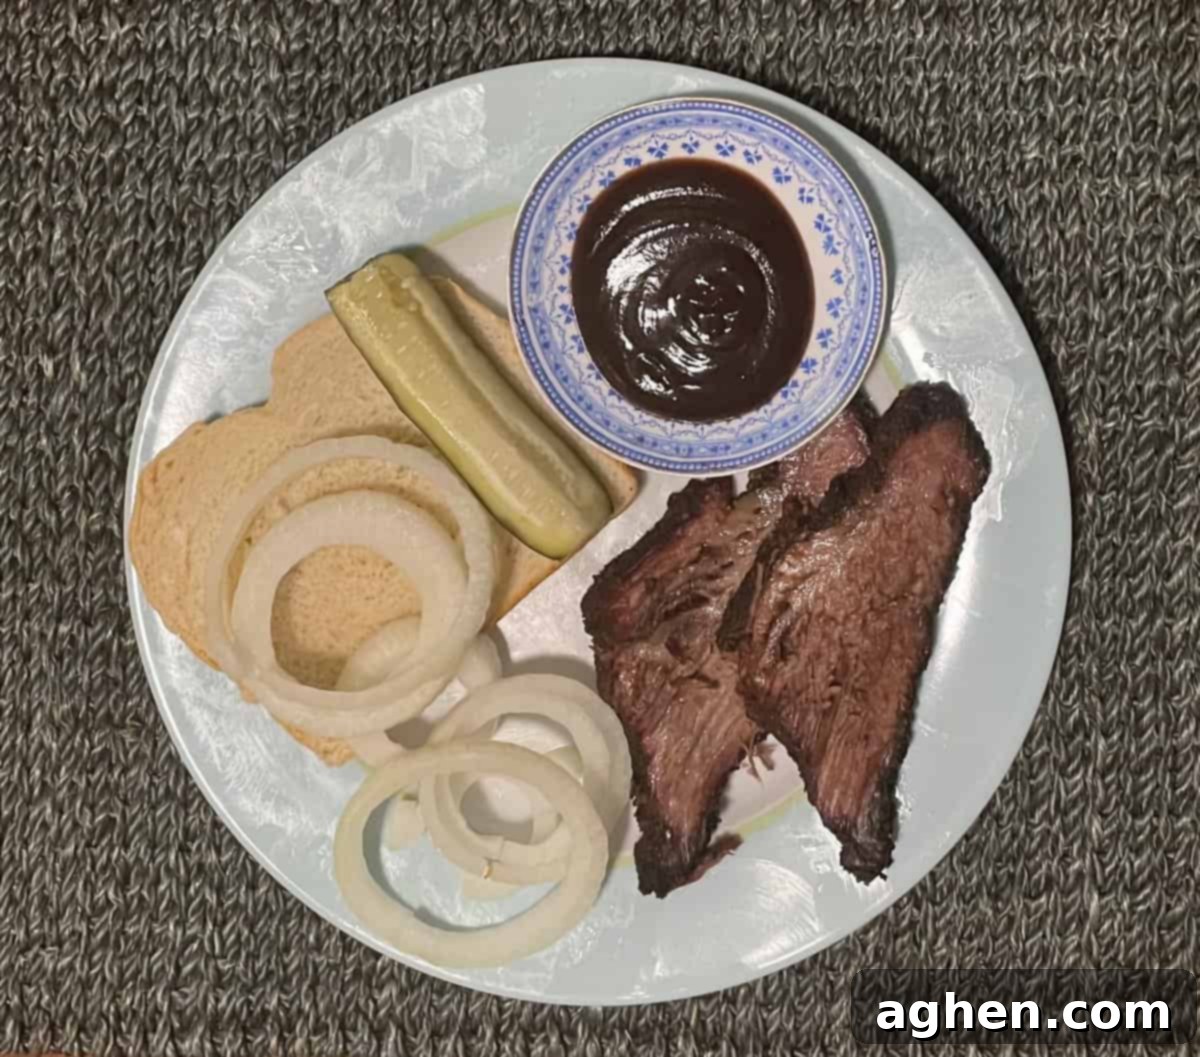
For the authentic Texas experience, serve your brisket immediately with simple accompaniments: raw onion slices and plain white bread. Forget the utensils; this is meant to be eaten with your hands. The sharp, crisp acidity of the raw onion perfectly counteracts the brisket’s creamy richness, creating a harmonious balance on the palate. Barbecue sauce, while a staple in many regions, is largely irrelevant to true Texas briskets and is even forbidden in some traditional establishments. However, if you or your guests prefer, you can certainly offer it on the side. I did so with a jug of Sonny’s Sweet sauce from Sam’s Club, and it was a heavenly addition for those who chose it. Of course, if your Aaron Franklin Challenge unfortunately goes off the rails and your brisket ends up dry as leather, then barbecue sauce becomes an absolute must.
Now, perhaps the most enjoyable part of the entire process: the distribution. I meticulously prepared plates for three different households in our St. Pete family. Instead of mundane aluminum foil, I individually wrapped each plate in fresh butcher paper, tying a festive bow on top. The reactions were truly amazing, a testament to the effort and the brisket’s quality. Their first question was invariably about the unique butcher paper, which allowed me to proudly explain Franklin’s method of wrapping his briskets. And, after smelling this incredible brisket all day, my canine companion Bear finally got to enjoy some of the best dog food imaginable, making him the happiest pup around.
A crucial piece of advice to impart to anyone receiving your leftover brisket: if they refrigerate it, instruct them to take the time to bring it back up to that glorious 145-degree range before eating. A short stint in a low-temperature oven or a gentle reheat in the microwave will suffice. Whatever method they choose, the goal is to restore it to that warm, moist perfection, ensuring every bite remains as delicious as the first.
How to Make Your Brisket Healthier
While an Aaron Franklin brisket is undeniably a rich indulgence, there are several small adjustments you can make to create a healthier version without completely sacrificing flavor. Firstly, during the trimming stage, remove as much of the hard fat as possible, beyond the recommended 1/4 inch cap. However, be mindful that the more fat you remove, the more attention you’ll need to pay to spritzing any dry spots on the leaner meat during the smoking process. Alternatively, you can choose to eat primarily from the flat side of the brisket, which is naturally less fatty. For those seeking the leanest option from the outset, you can simply purchase a “brisket flat” cut, which is how most supermarkets typically sell it. Just remember that by doing so, you’re not fully undertaking the traditional Aaron Franklin BBQ Brisket Challenge, which celebrates the whole packer. If you wish to further reduce the fat content after cooking, you can gently dab some of the rendered grease from the slices with a paper towel. Finally, the simplest way to lighten up your meal is to simply stay away from any added barbecue sauces, letting the pure flavor of the smoked beef shine.
What I Learned From Taking the Aaron Franklin Brisket Challenge
My journey through the Aaron Franklin Brisket Challenge was filled with invaluable lessons. My main takeaways were profound: season solely with coarse salt and pepper to allow the beef to speak for itself; rely exclusively on dried Post Oak Wood for that authentic Texas flavor; embrace the “Texas Crutch” by wrapping the brisket in butcher paper during the stall to push through and protect the bark; aim to remove the brisket from the smoker around 203 degrees Fahrenheit for optimal tenderness; accept that this is a full-day commitment that extends well beyond daylight hours; understand that a Big Green Egg, with its superior heat retention, may require slightly lower ambient temperatures than an offset smoker for an equally tender brisket; and finally, never underestimate the joy of sharing your creation, making as many people (and dogs!) happy as possible.
This challenge is truly a journey, much like life itself: demanding, full of twists and turns, but ultimately a rewarding test of your potential. Lessons are learned along the way, insights gained with each passing hour. And like any significant life journey, the best way to navigate it and improve for future attempts is to meticulously keep a log. Documenting your timeline, temperatures, observations, and any adjustments you make provides an invaluable record. This log becomes your personalized guide, allowing you to fine-tune your process and confidently add your own unique touch to this legendary recipe next time.
Was all this time and effort worth it? Absolutely, without a doubt. Would I do it again? Enthusiastically, yes! For much of the 12-hour process, I was engaged in other activities, occasionally monitoring temperatures and diligently updating my first-timer’s log. This makes the experience more manageable than it might appear on paper. So, I urge you: watch all the videos, read the interviews, absorb the wisdom, and then take the Aaron Franklin Texas Brisket Challenge for yourself. The taste of victory is indescribably sweet.
