Spooky & Delicious Ghosts in the Graveyard Poke Cake: The Ultimate Halloween Dessert
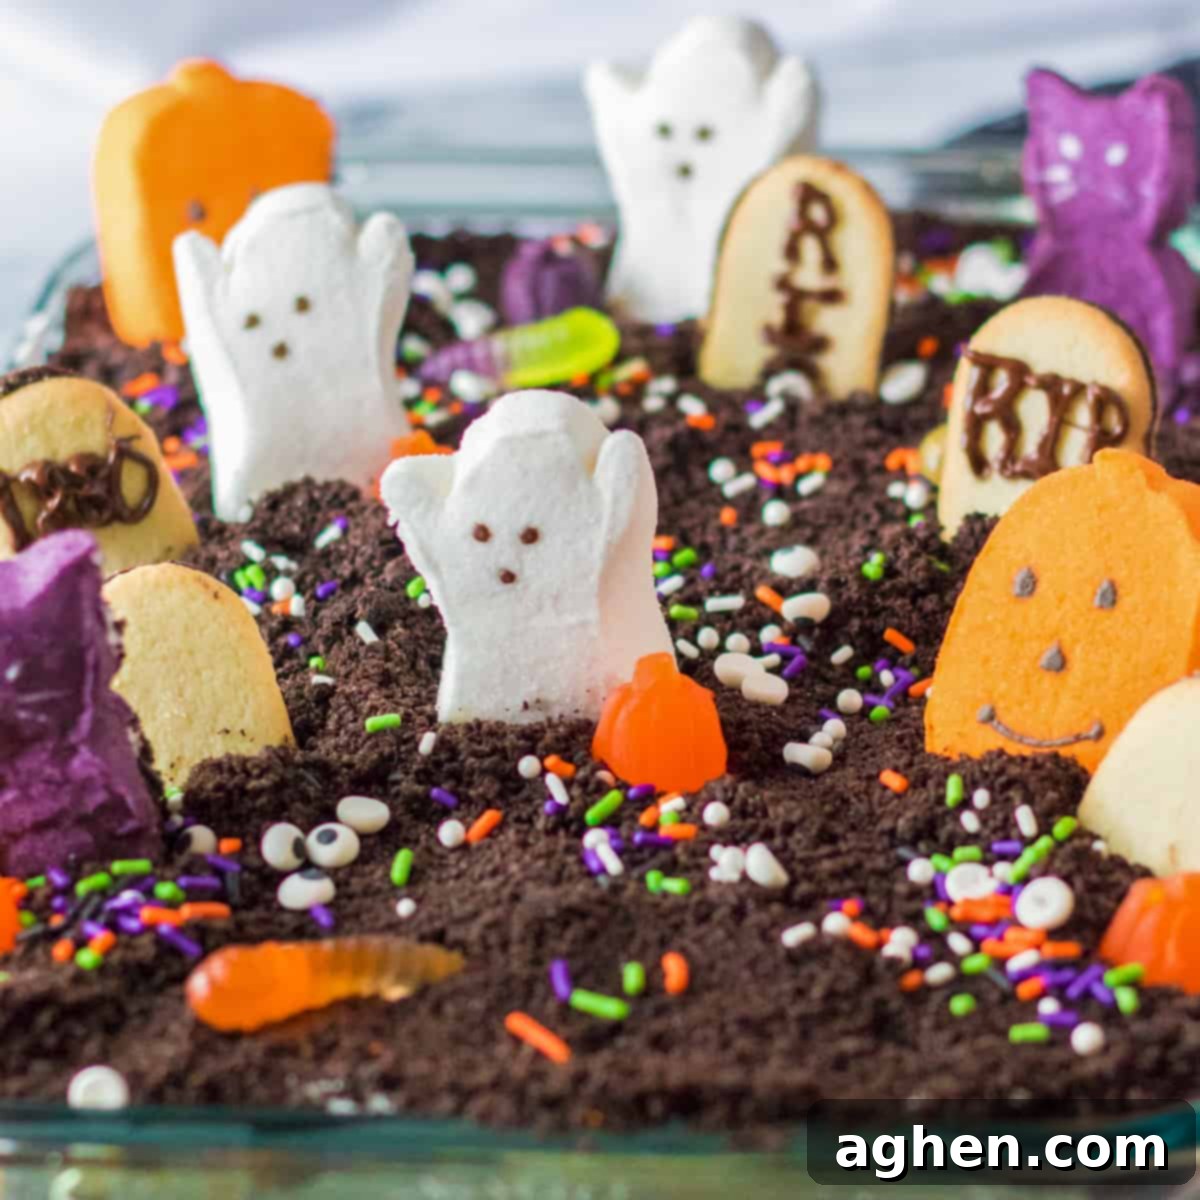
Prepare for a hauntingly delightful treat this Halloween with our Ghosts in the Graveyard Poke Cake! This festive and fun dessert transforms a classic chocolate poke cake into a spooky, edible graveyard scene, complete with marshmallow ghosts, cookie tombstones, and rich “dirt” made from OREO crumbs. It’s not just a showstopper for any Halloween party, but also an incredibly engaging activity to enjoy with the kids, allowing their creativity to run wild as they bring the spooky scene to life.
Beyond its captivating appearance, this Halloween poke cake offers an irresistible flavor profile that will satisfy any sweet tooth. The combination of moist chocolate cake, creamy pudding, and crunchy cookie crumbs creates a delightful texture and taste reminiscent of a beloved dirt and worms dessert, but with an added layer of Halloween charm.

At the heart of this spooky creation is a rich devil’s food chocolate cake, generously poked with holes and then filled with vibrant green and orange white chocolate pudding. This ingenious technique ensures every bite is bursting with moisture and flavor, making the cake exceptionally tender. A smooth, light layer of Cool Whip crowns the cake, providing a creamy contrast to the deep chocolate. Finally, a generous sprinkling of crushed OREO cookies creates the iconic “graveyard dirt,” adding a delicious cookies and cream element that echoes a classic dirt and worms recipe.
The real fun begins with the decoration! Once the base is prepared, the cake becomes a canvas for all sorts of spooky adornments. Transform Milano cookies into eerie tombstones, perch fluffy marshmallow ghosts amongst the “dirt,” and scatter your favorite Halloween candies like candy pumpkins, black cats, and gummy worms to complete the haunted graveyard effect. This step is a fantastic opportunity for children to get involved, letting their imaginations run wild as they design their very own spooky scene. Their excitement and pride in creating such a visually stunning dessert will be just as sweet as the cake itself!

This easy-to-make dessert is guaranteed to be a sensational hit at any Halloween gathering. It’s a dream come true for chocolate lovers, OREO enthusiasts, and anyone who appreciates a rich, moist, and delightfully chocolatey treat. The vibrant colors, fun decorations, and incredible taste make it universally appealing. If you’re looking for more delicious chocolate poke cake recipes, be sure to try our decadent OREO Cookie Poke Cake or the incredibly satisfying Easy Snickers Poke Cake. But first, let’s dive into making this spooktacular graveyard masterpiece!
Ingredients for Your Spooky Graveyard Creation
This section provides detailed ingredient notes, highlighting their purpose and offering convenient substitution options. All precise measurements, ingredients, and comprehensive instructions can be found in the printable recipe card at the conclusion of this post.
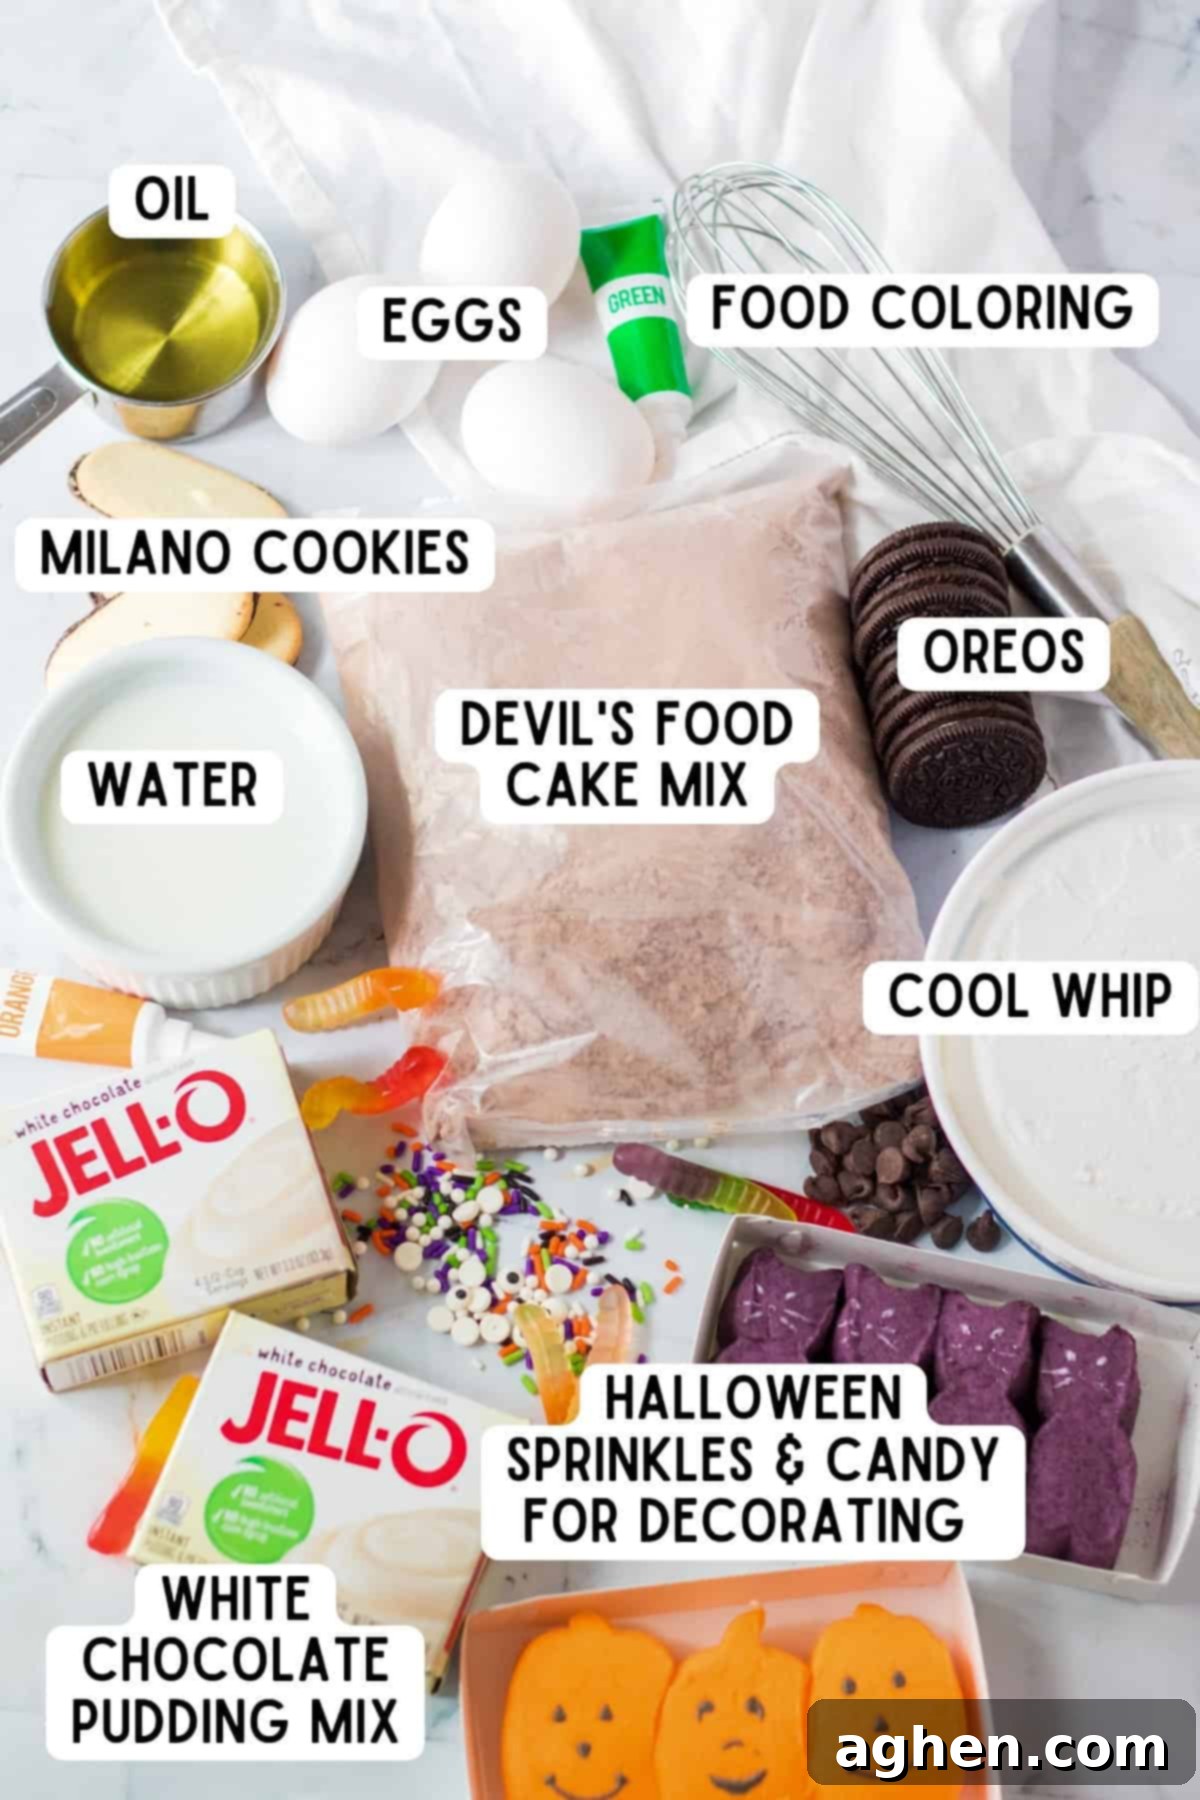
- Devil’s Food Cake Mix: This provides a rich, dark chocolate base, perfect for a spooky graveyard. Remember to also gather the water, eggs, and oil as specified in the package instructions. Any high-quality chocolate cake mix, such as chocolate fudge or even a classic chocolate mix, will also work wonderfully.
- White Chocolate Instant Pudding Mix: Use the standard 4-serving, 3.4-ounce size box. White chocolate pudding creates a light, creamy flavor that perfectly complements the chocolate cake, and its light color makes it ideal for coloring with festive Halloween hues.
- Milk: Cold milk is essential for preparing the instant pudding to the right consistency. For the creamiest results, we recommend using whole or 2% milk, though any milk variety you have on hand will be suitable.
- Cool Whip: This fluffy whipped topping forms the cloud-like base for your graveyard. Ensure it’s thawed overnight in the refrigerator for the best texture and ease of spreading. For a homemade touch, you can also opt for a stabilized whipped cream.
- OREO Cookie Crumbs: These iconic chocolate sandwich cookies are crushed to create the rich, dark “dirt” layer of our graveyard. A food processor makes quick work of crushing them into fine crumbs, but a freezer bag and a rolling pin also work effectively for a hands-on approach.
- Food Coloring: To achieve the vibrant, Halloween-themed “pudding ooze” from the cake, you will need both green and orange food coloring. Gel food colorings tend to produce the most intense and beautiful colors.
- Milano Cookies: These elegant, oblong cookies are perfectly shaped to act as the eerie tombstones in your edible graveyard. Their flat surface provides an excellent canvas for decoration.
- Chocolate Chips or Edible Marker: For writing “R.I.P.” or other spooky messages on your Milano cookie tombstones. Melted chocolate chips work well for piping, but an icing writing gel or food coloring marker offers even greater ease and precision, especially for intricate details.
- Assorted Halloween Candy: This is where the real fun of customization comes in! We used festive ghost Peeps, black cat Peeps, pumpkin Peeps, candy pumpkins, Halloween sprinkles, and gummy worms to adorn our graveyard. Feel completely free to unleash your creativity and incorporate any other spooky or fun candies you discover, such as candy corn pieces, gummy eyeballs, or chocolate skulls.
How to Assemble Your Spooky Ghosts in the Graveyard Poke Cake
This section walks you through the recipe with detailed step-by-step photos and clear instructions. For the complete printable recipe card, please scroll down to the end of this post.
Step 1: Bake Your Cake Base
Begin by preparing your devil’s food cake mix according to the package directions. Pour the batter into a 9×13 inch baking pan and bake as instructed. Once baked, remove the cake from the oven and set it aside to cool for a good 15 minutes. This cooling period is crucial before you start poking holes, as it helps the cake retain its structure.
Step 2: Prepare and Color the Pudding
While the cake is cooling, whisk together the instant white chocolate pudding mixes and cold milk in a large bowl. Continue whisking until the mixture is smooth and fully combined, without any lumps. Next, divide the prepared pudding equally into two separate bowls. Using your green food coloring, dye one bowl of pudding a vibrant green, and with your orange food coloring, dye the other bowl a festive orange. These colorful puddings will create the fun “oozing” effect in your graveyard. Set both bowls aside.

Step 3: Poke and Fill Your Cake
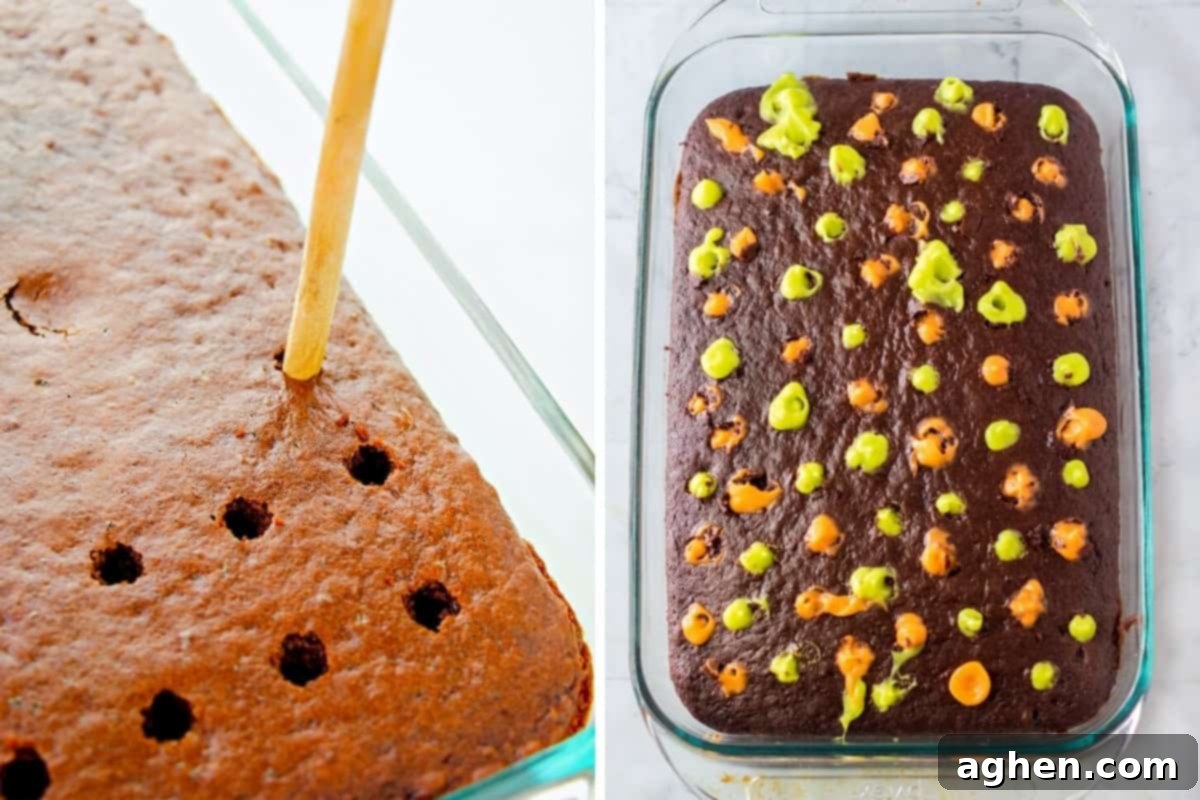
Now for the “poke” part of the poke cake! Using the handle of a wooden spoon, or even a chopstick or the wide end of a smoothie straw, carefully poke holes all over the top of the cake, spacing them about 1 inch apart. Ensure the holes are wide enough to accommodate the pudding. Once poked, gently spoon the colored puddings into these holes, alternating between the green and orange to create a fun, mottled effect. Don’t worry if it looks a little messy on top at this stage; it will all be covered up soon. (For an even easier process, consider using a cupcake injector or pastry syringe to fill the holes.)
Step 4: Layer with Whipped Topping and “Dirt”
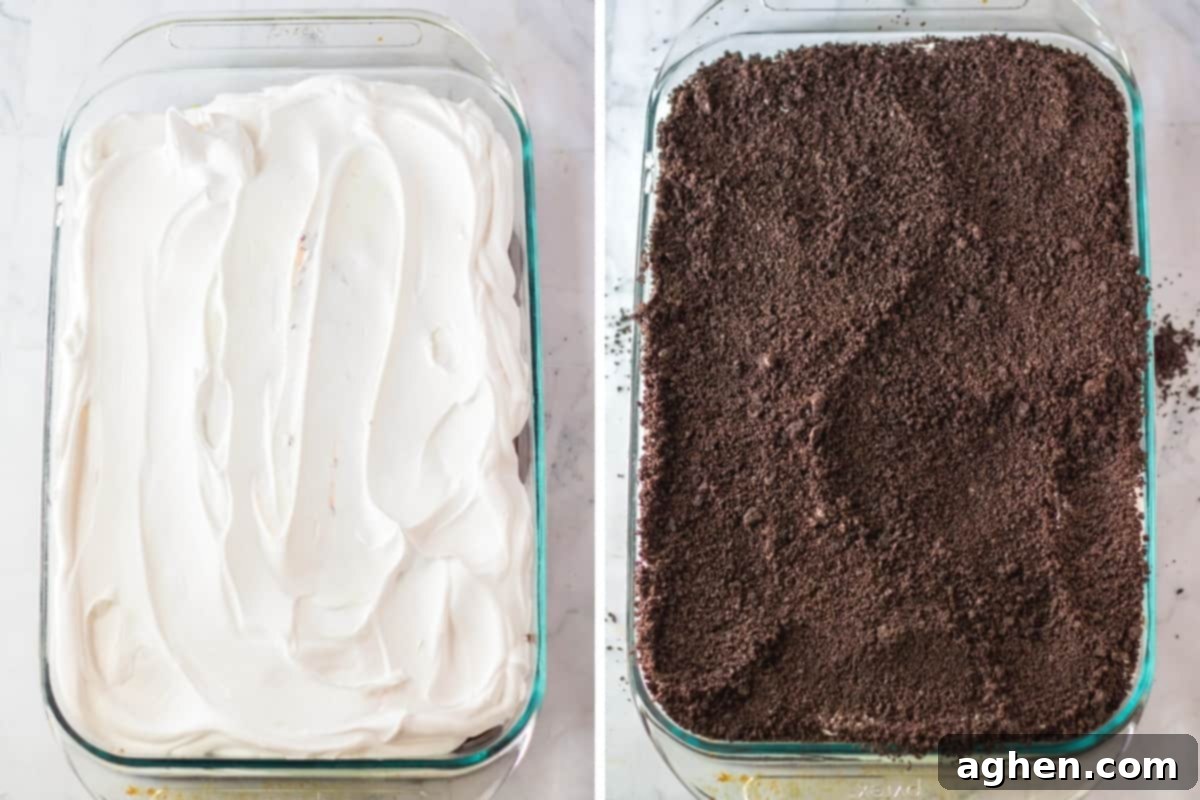
Once the pudding has filled the holes, spread the thawed Cool Whip evenly over the entire surface of the cake, creating a smooth, white canvas. Then, generously sprinkle the crushed OREO cookie crumbs over the whipped topping. This layer will become the rich, dark “dirt” of your graveyard, adding a satisfying crunch and classic cookies and cream flavor.
Step 5: Chill for Optimal Flavor and Texture
Place your assembled poke cake into the refrigerator and allow it to chill for at least 2 hours. This chilling time is essential, as it allows the pudding to fully absorb into the cake, making it incredibly moist and flavorful. It also helps the Cool Whip and OREO layers set perfectly, ensuring a clean slice.
Step 6: Craft Your Tombstones
While the cake is chilling, prepare your eerie tombstones. Gently break off the bottom portion of each Milano cookie to give it a more tombstone-like shape. Then, use an edible black marker or melted chocolate (refer to the section below for detailed melting instructions) to write “R.I.P.” or any spooky dates or messages on the cookies. Set these decorated tombstones aside to allow the chocolate or icing to set.
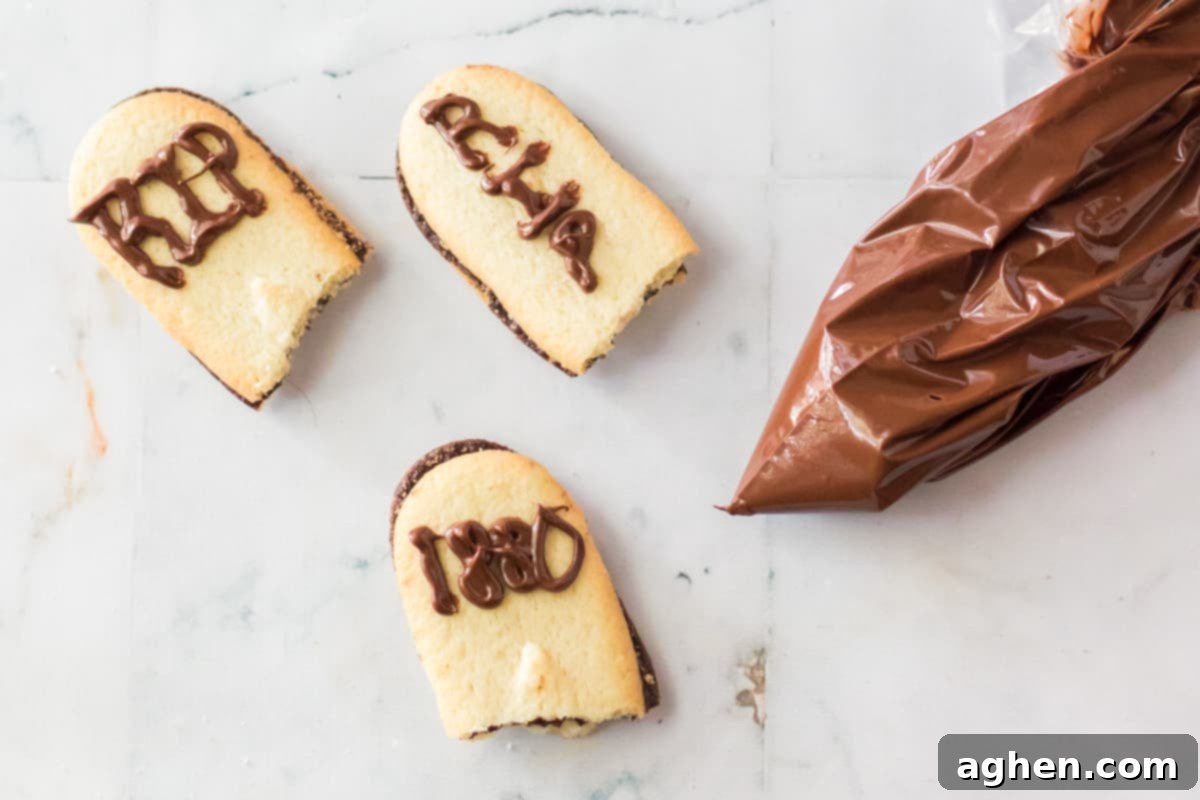
Step 7: Final Graveyard Assembly
Just before you’re ready to serve this ghoulish delight, retrieve the chilled cake from the refrigerator. Now it’s time for the grand finale! Artfully arrange your cookie tombstones by gently pressing them into the OREO “dirt.” Position the marshmallow ghost Peeps, black cat Peeps, pumpkin Peeps, gummy worms, candy pumpkins, and any other chosen Halloween candies and sprinkles around the graveyard scene. Get creative with their placement to build a truly haunted and inviting dessert landscape. Your spooky masterpiece is now ready to impress!
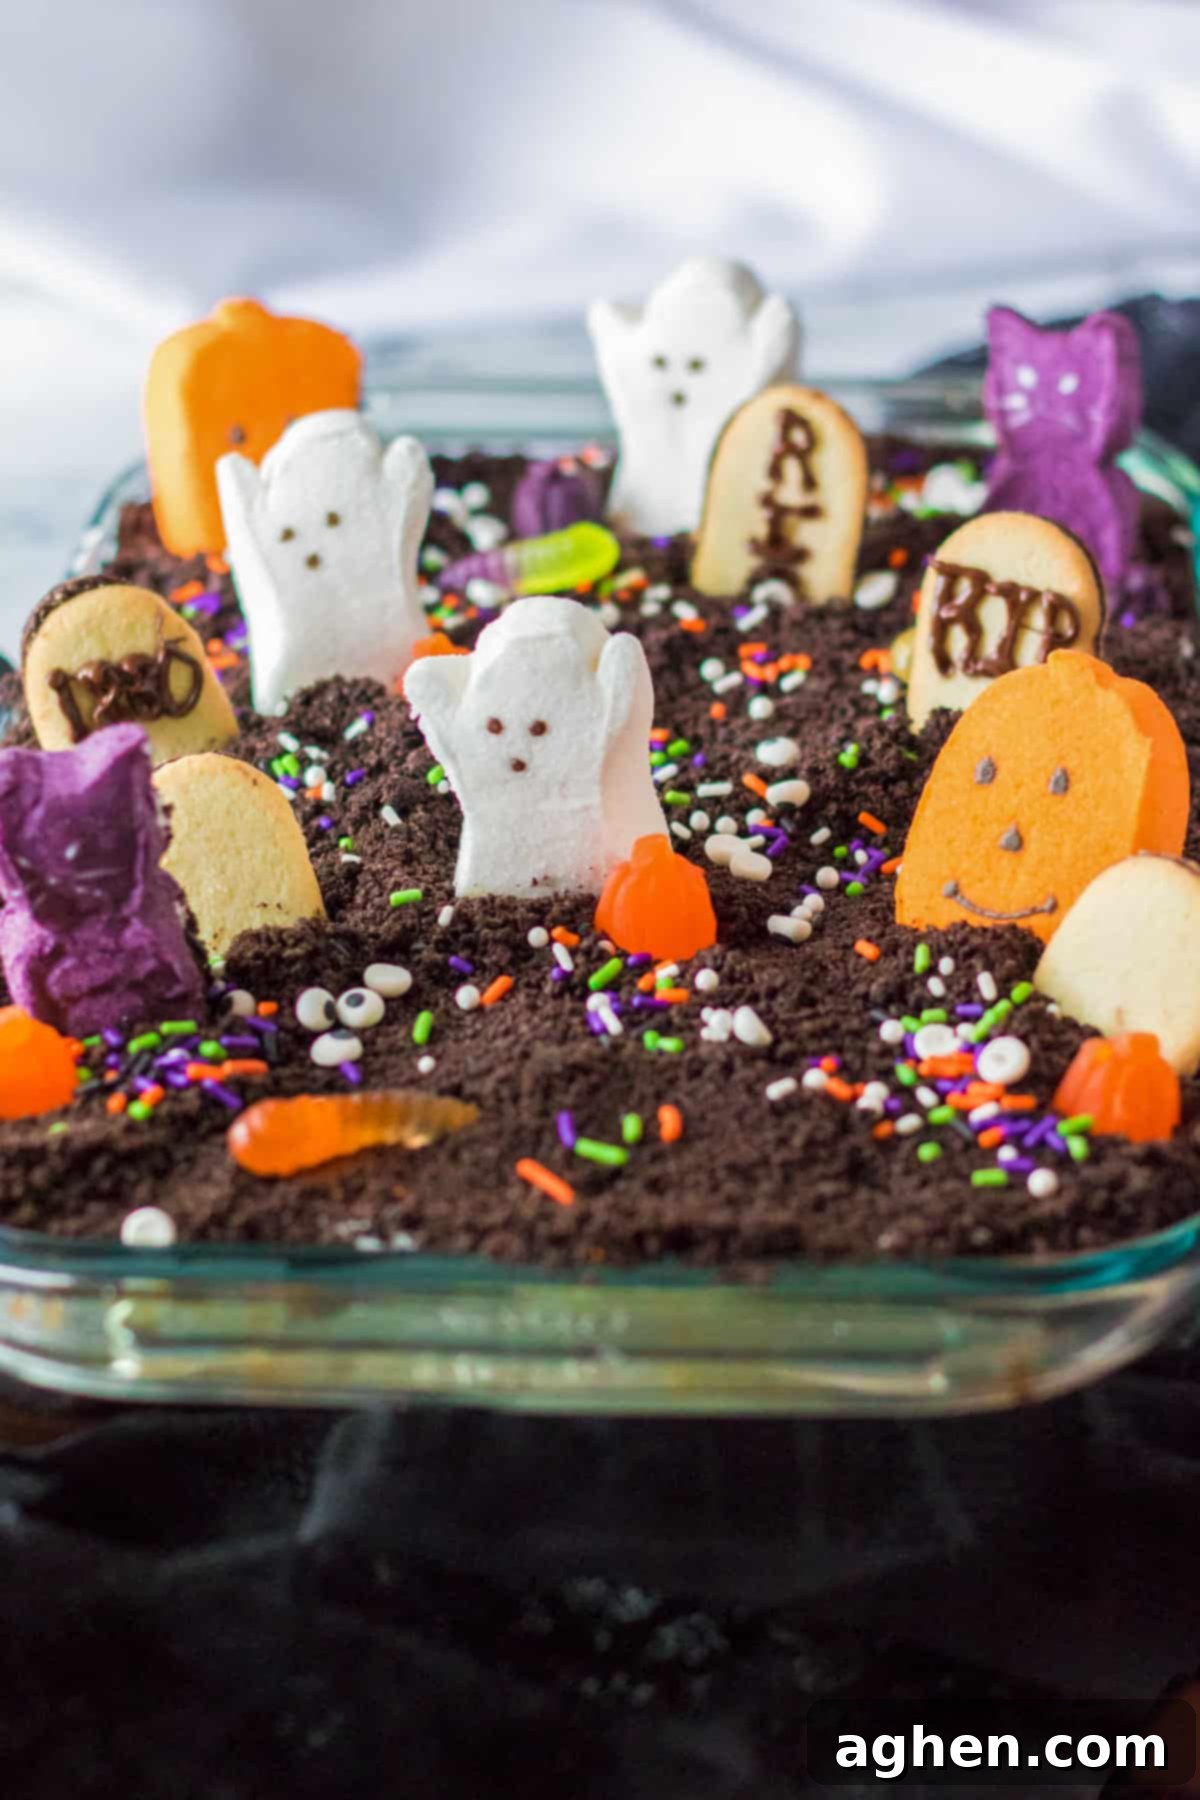
Storage Instructions for Your Graveyard Cake
To keep your Ghosts in the Graveyard Poke Cake fresh and delicious, cover any leftover dessert tightly with plastic wrap or an airtight lid. Store it in the refrigerator for up to 3 days. While it’s best enjoyed fresh, the flavors deepen over time as the pudding continues to moisten the cake.
Make Ahead Tips for Effortless Entertaining
This easy Halloween cake is an excellent choice for making ahead, as its flavor and texture actually improve with a bit of extra time in the fridge. The extended chilling period allows the pudding to fully integrate into the cake, resulting in an exceptionally moist and incredibly delicious dessert.
To prepare your cake in advance, simply follow the recipe instructions up through Step 5 (chilling the cake after adding the Cool Whip and OREO crumbs). Cover the cake securely with plastic wrap and refrigerate it for up to 2 days before your event. When you’re ready to serve, simply add the final touches by placing the cookie tombstones, marshmallow ghosts, and other Halloween candies and sprinkles, then serve chilled.
How to Perfectly Melt Chocolate Chips for Decorating
Achieving smooth, pipeable melted chocolate for your tombstones is simple. Place your chocolate chips or melting wafers in a microwave-safe bowl. Heat them in 30-second intervals, stirring thoroughly after each interval. Continue this process until the chocolate is completely smooth and melted. Be careful not to overheat, as this can cause the chocolate to seize. Once melted, transfer the chocolate into a small freezer bag or a piping bag, then snip a very small hole in one corner. This creates a makeshift piping tool, allowing you to easily pipe your spooky “R.I.P.” messages or other details onto the Milano cookies to transform them into realistic tombstones.

Creative Variations and Spooky Substitutions
Feel free to customize your Ghosts in the Graveyard Poke Cake to suit your taste and what you have on hand. Here are some fun ideas to inspire your spooky creation:
- Vanilla Pudding: If white chocolate pudding isn’t available, don’t fret! Vanilla instant pudding mix makes an excellent alternative, offering a classic flavor that pairs beautifully with chocolate cake and still takes on food coloring wonderfully.
- Double Pudding for Extra Moistness: For an exceptionally moist and intensely flavored cake, consider doubling the pudding! Use two boxes of pudding mix and 3 cups of milk. After filling the holes, you’ll have extra pudding to spread a thin layer over the top of the cake before adding the Cool Whip. This creates an even more decadent experience.
- Homemade Whipped Cream: Prefer a fresh, homemade touch over Cool Whip? You can certainly top your Halloween poke cake with homemade whipped cream instead. Just remember that homemade whipped cream tends to be less stable than Cool Whip, so it’s best to add it just before serving to maintain its light and airy texture.
- Chocolate Pudding Topping: For the ultimate chocolate indulgence, skip the whipped topping entirely and cover the cake with an additional layer of chocolate pudding instead. This creates a deeply rich, all-chocolate dessert experience.
- Cake Mix Choices: While devil’s food cake is our top recommendation for its deep color and flavor, any variety of chocolate cake mix will be delicious in this recipe. Chocolate fudge cake mix offers an even richer flavor, while a classic chocolate cake mix provides a familiar comfort. Choose your favorite!
- Alternative Ghosts: If marshmallow Peeps aren’t your preference, charming homemade ghost meringues make a fantastic alternative. They’re light, crispy, and equally adorable perched atop your graveyard.
- Tombstone Options: Beyond Milano cookies, other types of cookies can serve as excellent tombstones. Nutter Butter cookies or rectangular vanilla sandwich cookies offer a sturdy base and unique shapes for your graveyard markers.
- Pan Size Flexibility: No 9×13 inch baking dish? No problem! You can easily adapt this recipe to fit two 9-inch round baking dishes or even two 8-inch round dishes. Adjust baking times as needed and keep an eye on doneness.
- Edible Grass: To add an extra touch of realism to your graveyard scene, cut small strips of green chewy fruit snack rolls. Gently press these around the base of your tombstones or scattered across the “dirt” to mimic patches of vibrant green grass.

Expert Recipe Tips for a Perfect Graveyard Cake
Follow these simple tips to ensure your Ghosts in the Graveyard Poke Cake turns out perfectly spooky and utterly delicious:
- The Perfect Poking Tool: We’ve found that the handle of a wooden spoon is the ideal size for creating the perfect holes in a poke cake. Its round shape creates wide enough channels for the pudding to seep in. However, a sturdy chopstick or even a wider smoothie straw can also work effectively. The key is to create substantial holes, about an inch apart, to allow for maximum pudding absorption.
- Streamline Pudding Insertion: If you happen to have one handy, a cupcake injector or a pastry syringe can make the task of filling the cake holes with pudding significantly easier and less messy, ensuring even distribution of the colorful pudding.
- Create a Themed Dinner Experience: Elevate your Halloween celebration by pairing this spectacular graveyard dessert with a ghost-themed dinner! Imagine serving Halloween shepherd’s pie or fun ghost-shaped Halloween pizzas before presenting this dessert. It’s a wonderful way to create a memorable evening of ghost-themed family fun and delight everyone with a cohesive, spooky menu.
More Fun & Spooky Halloween Desserts to Try
If you loved making and eating this Ghosts in the Graveyard Poke Cake, you’re in for more Halloween treat fun! Explore these other festive and delicious recipes perfect for the spooky season:
- Creepy-Crawly Rice Krispies Spider Treats
- Magical Witch Hat Cupcakes
- Adorable Mummy Cookies
- Easy Halloween Cake Mix Cookies
- Layered Halloween Trifle
- Charming Witch Hat Cookies
- Sweet & Simple Candy Corn Fudge

Ghosts in the Graveyard Poke Cake
Author: Jaclyn
Ingredients
- 15.25 ounces devil’s food cake mix + ingredients called for on box
- 3.4 ounce instant white chocolate pudding mix
- 2 cups cold milk
- green and orange food coloring
- 8 ounces cool whip thawed
- 30 oreo cookies crushed into fine crumbs for the “dirt”
- 4 milano cookies for tombstones
- ½ cup semi-sweet chocolate chips or black writing icing/marker for decorating tombstones
- additional decorations, as desired such as ghost Peeps, black cat Peeps, pumpkin Peeps, candy pumpkins, Halloween sprinkles, or gummy worms
Instructions
-
Prepare the devil’s food cake mix in a 9×13 pan exactly as directed on the package instructions. After baking, allow the cake to cool for 15 minutes.
-
Meanwhile, in a large bowl, combine the instant white chocolate pudding mix with the cold milk, whisking thoroughly until smooth and well combined. Divide the pudding equally into 2 smaller bowls. Use green food coloring to dye one bowl of pudding green and orange food coloring for the other. Set aside.
-
Using the handle of a wooden spoon, poke holes about 1 inch apart all over the top surface of the cooled cake.
-
Carefully spoon the colored puddings into the poked holes, alternating between the green and orange pudding for a vibrant effect.
-
Spread the thawed Cool Whip whipped topping evenly over the entire top of the cake.
-
Generously sprinkle the crushed OREO cookie crumbs over the Cool Whip layer to create the “dirt.”
-
Place the entire cake in the refrigerator to chill for at least 2 hours. This allows the pudding to set and infuse moisture into the cake.
-
Meanwhile, prepare your Milano cookie tombstones: break off the bottom of each cookie to shape it, then write “R.I.P.” or a date using black writing icing or melted chocolate (refer to the recipe notes for chocolate melting instructions). Set aside to dry.
-
Before serving, decorate the chilled cake with the prepared tombstone cookies, marshmallow ghost Peeps, and any other desired Halloween candy and sprinkles to complete your spooky graveyard scene.
Notes
How to melt chocolate for decorating: Place your chocolate chips or melting wafers in a microwave-safe bowl and heat in 30-second intervals, stirring after each, until the chocolate is smooth and melted. Place the melted chocolate in a freezer bag and cut a small hole in the corner. Use this to pipe melted chocolate onto cookies.
Store this spooky dessert covered in the refrigerator for up to 3 days to keep it fresh and moist.
Nutrition

Did You Make This Spooky Recipe?
We’d love to see your haunted creation! Share it with us on Instagram @crayonsandcravings and make sure to follow us on Pinterest @crayonsandcravings for even more delicious and fun recipe ideas!
Pin Recipe
Leave A Review
