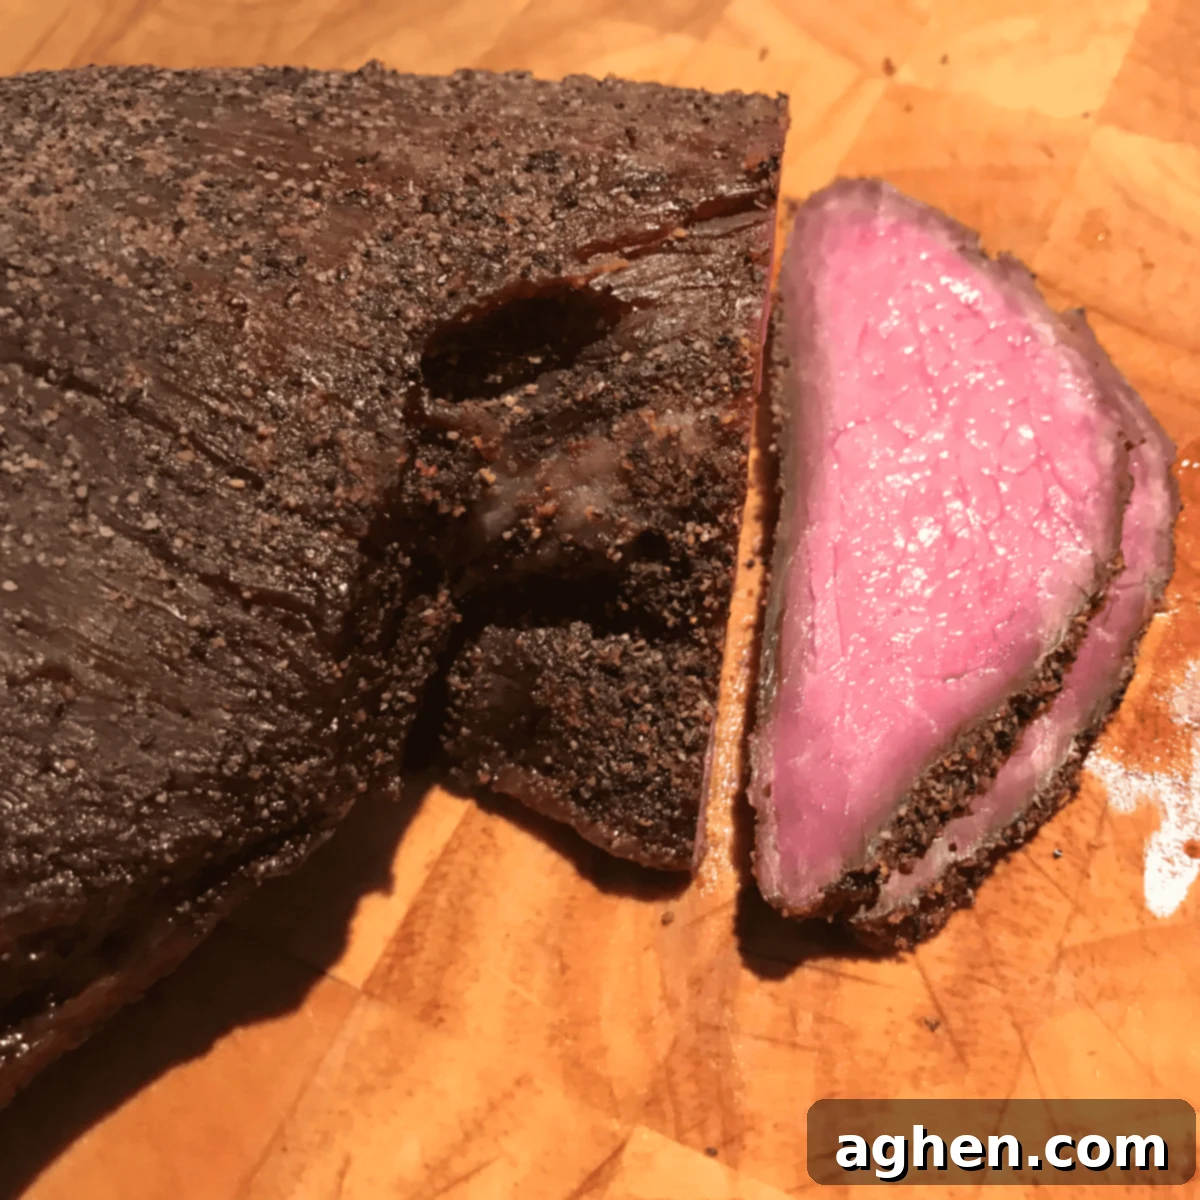
Mastering Smoked Tri-Tip: Achieve Tender & Flavorful Beef with Our Cilantro Rub Recipe
The tri-tip, a lean and boneless cut of beef renowned for its rich, meaty flavor, truly excels when prepared in a smoker. What might seem like a simple piece of meat transforms into an incredibly tender and juicy masterpiece with the right technique. This comprehensive guide will lead you through the process of creating a succulent smoked tri-tip, elevated by a vibrant cilantro-based rub that promises to infuse every bite with an unforgettable aromatic essence. From selecting the perfect cut to understanding the nuances of smoking and the critical art of resting, we’ll ensure your smoked tri-tip reaches its full potential.
Our recipe is designed for maximum flavor impact with minimal fuss. You will learn how to prepare a perfectly balanced rub, follow easy, precise cooking steps, and unlock the ultimate secret to a remarkably succulent and juicy steak: allowing the meat to rest sufficiently before slicing. I personally recommend a generous 30-minute rest—no kidding—and guarantee you will be profoundly rewarded for your patience with a tri-tip that melts in your mouth and bursts with savory juices.
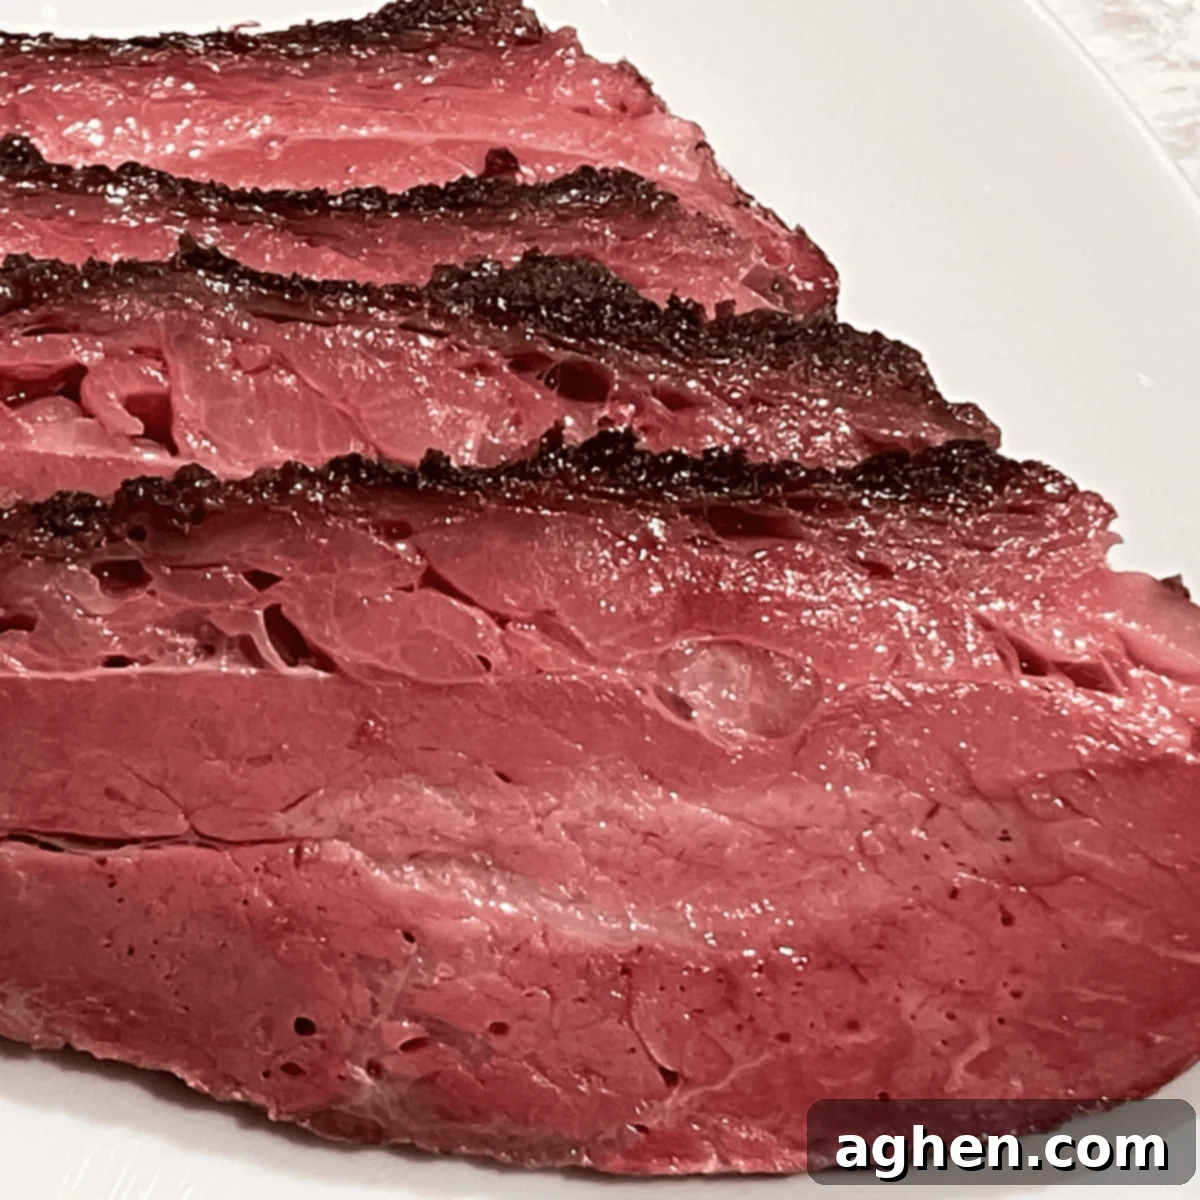
Smoked Tri-Tip Recipe Overview
Understanding the basic parameters will set you up for success. Here’s a quick glance at what to expect for your smoked tri-tip adventure:
- Portioning: Servings typically depend on the size of your tri-tip roast. Most roasts are around 2 to 3 pounds, though larger cuts are available. A standard dinner portion is approximately 6 ounces per person.
- Cooking Time: For a 2.25-pound tri-tip, expect around 90 minutes of smoking at 225°F (107°C) to reach a perfect medium-rare. This is followed by a crucial 30-minute resting period. Keep in mind that larger cuts will naturally require extended cooking and resting times to achieve desired doneness and tenderness.
- Key Steps: The process involves applying a flavorful cilantro rub, a period of curing, low-and-slow smoking, a quick high-heat sear for an amazing crust, and an essential rest to lock in juices. Each step contributes significantly to the final taste and texture.
Ingredients for Cilantro-Cured Smoked Tri-Tip
The foundation of an exceptional smoked tri-tip is a well-crafted rub. Our cilantro cure is designed to impart incredible depth of flavor and promote tenderness. Here’s a detailed list of what you’ll need:
- 1 Tri-tip Roast: A 2 to 2.5-pound cut is ideal for this recipe, allowing for efficient and even cooking. This guide specifically used a 2.25lb tri-tip.
For the Dry Rub (Cure): This vibrant blend of fresh herbs and spices will create a flavorful crust and deep aromatic profile.
- 1 Bunch of Cilantro: The star of the show, providing a fresh, herbaceous, and slightly citrusy note.
- 150 g (approximately 9 tablespoons) Salt: Essential for the curing process, it seasons the meat from within and aids in moisture retention. (See notes below for salt type considerations).
- 45 grams (3 tablespoons) Sugar: Balances the salt, contributes to the lovely caramelized crust during searing, and adds subtle sweetness.
- Zest of 1 Lime: Adds a bright, tangy citrus aroma that beautifully complements the cilantro.
- 13 grams (2 tablespoons) Ground Coriander: The dried seed of the cilantro plant, offering an earthy, slightly lemon-peppery flavor that pairs perfectly.
- 4 grams (1 teaspoon) Garlic Powder: A fundamental savory element that provides a warm, pungent depth.
- 4 grams (1 teaspoon) Onion Powder: Enhances the aromatic complexity with its sweet, savory notes.
- 10 grams (1 Tablespoon) Ground Cumin: Delivers a warm, earthy, and slightly smoky undertone, characteristic of many delicious rubs.
- 5 grams (1 teaspoon) Ground Ginger: Offers a subtle, spicy warmth and a touch of sweetness that brightens the overall flavor profile.
- ¼ teaspoon Sel Rose or Prague Powder (Curing Salt #1): This ingredient is primarily for aesthetic purposes, helping to achieve a vibrant pink color in the finished meat, mimicking a traditional smoke ring. (Refer to notes for more details on its optional use).
Important Ingredient Notes:
- Choosing Your Salt: While kosher salt is a popular choice for curing due to its flake size, for this recipe, any good quality salt will suffice as it will be finely processed. If using fine table salt, you might want to slightly reduce the amount as it’s denser than kosher salt by volume.
- Cilantro Preparation is Key: Fresh cilantro frequently carries sand or grit. It is imperative to wash it thoroughly and then dry it completely, ideally a day in advance. Excess water can make your rub pasty and compromise its adherence to the meat. Once dried, pluck the leaves from the thicker stems; smaller, more tender stem sections found between the leaves are fine to include for added flavor.
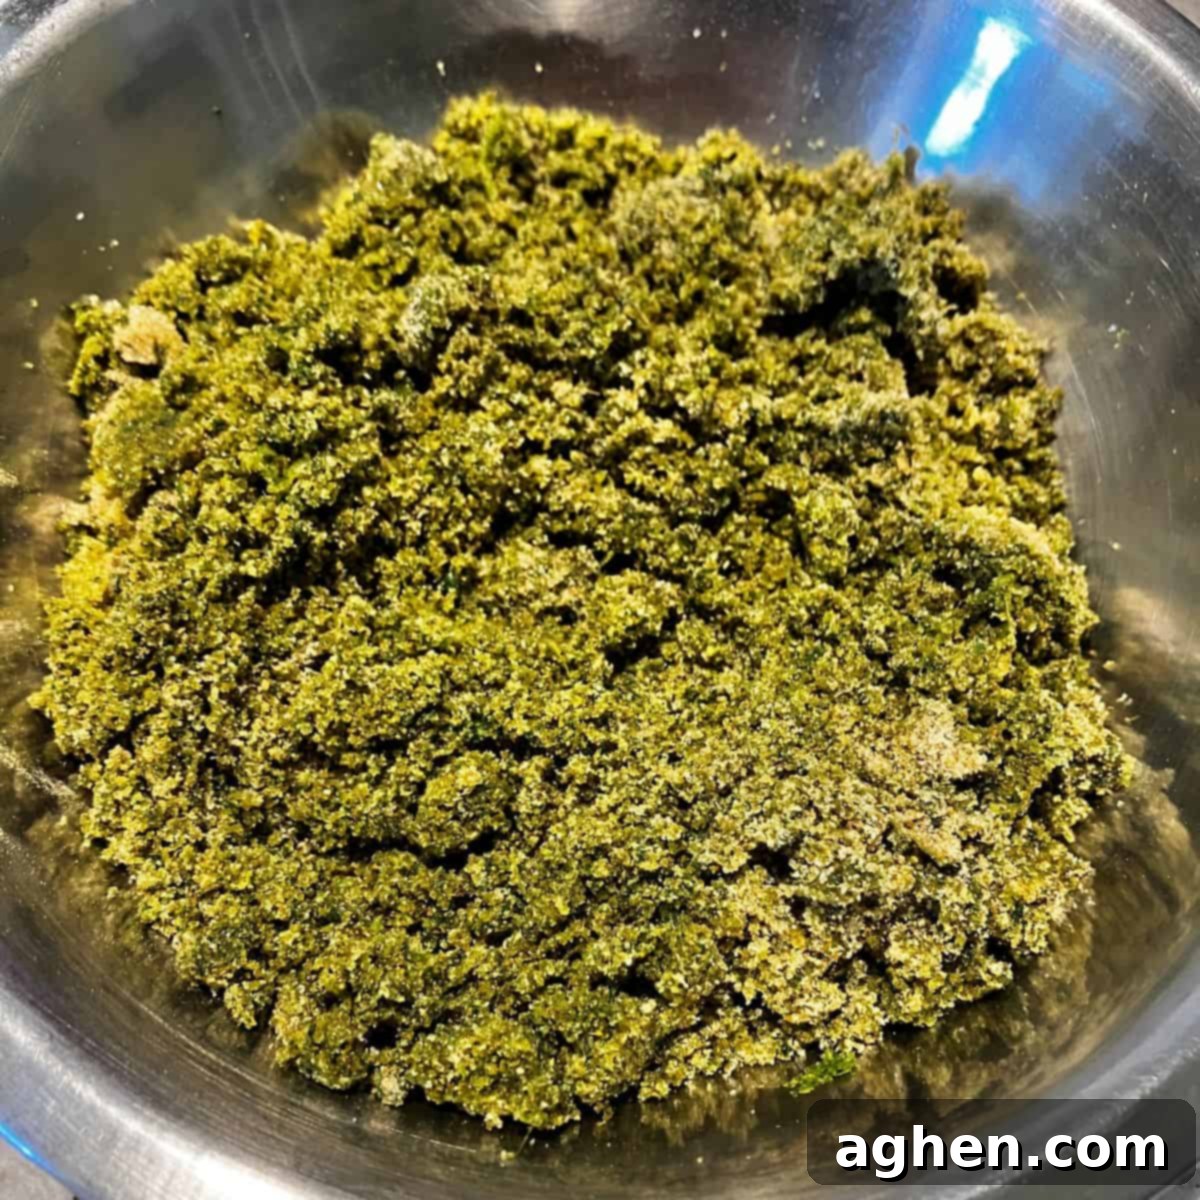
- Crafting the Cure: For a cohesive and potent rub, combine all the dry rub ingredients—cilantro, salt, sugar, lime zest, ground coriander, garlic powder, onion powder, cumin, ginger, and the optional Sel Rose/Prague Powder—in a food processor. Process until the cilantro is very finely minced and fully integrated, creating a bright green, slightly damp paste. This ensures that every ingredient is evenly distributed and ready to cling to the tri-tip.
- Understanding Prague Powder (Sel Rose): Also known as Curing Salt #1 or sodium nitrite, Prague Powder is traditionally used in cured meats to prevent bacterial growth (specifically botulism) and to maintain a characteristic pink color. In this recipe, because the tri-tip will be cooked to a safe internal temperature, its primary function is aesthetic – to give the meat an appealing pink hue that resembles a smoke ring. It is not critical for food safety in this application and can be omitted if you prefer or if you wish to avoid nitrites.
Step-by-Step Instructions for Making Smoked Cilantro-Cured Tri-Tip
The tri-tip’s dense muscle fibers are remarkably forgiving, making it an excellent candidate for both quick grilling and the slow, smoke-infused cooking method. Our approach leverages both for the best results. Don’t be shy with the rub application; I prefer a thick coating to ensure maximum flavor penetration, but you can adjust the amount based on your personal preference.
- Make the Rub: Start by preparing your vibrant cilantro cure. Following the guidance in our ingredient notes, ensure your cilantro is washed and thoroughly dried. Combine the cilantro leaves and any tender stems with the salt, sugar, lime zest, ground coriander, garlic powder, onion powder, cumin, ginger, and the optional Sel Rose/Prague Powder in a food processor. Process until the cilantro is finely minced and the mixture is well-combined into a uniform, bright green paste.
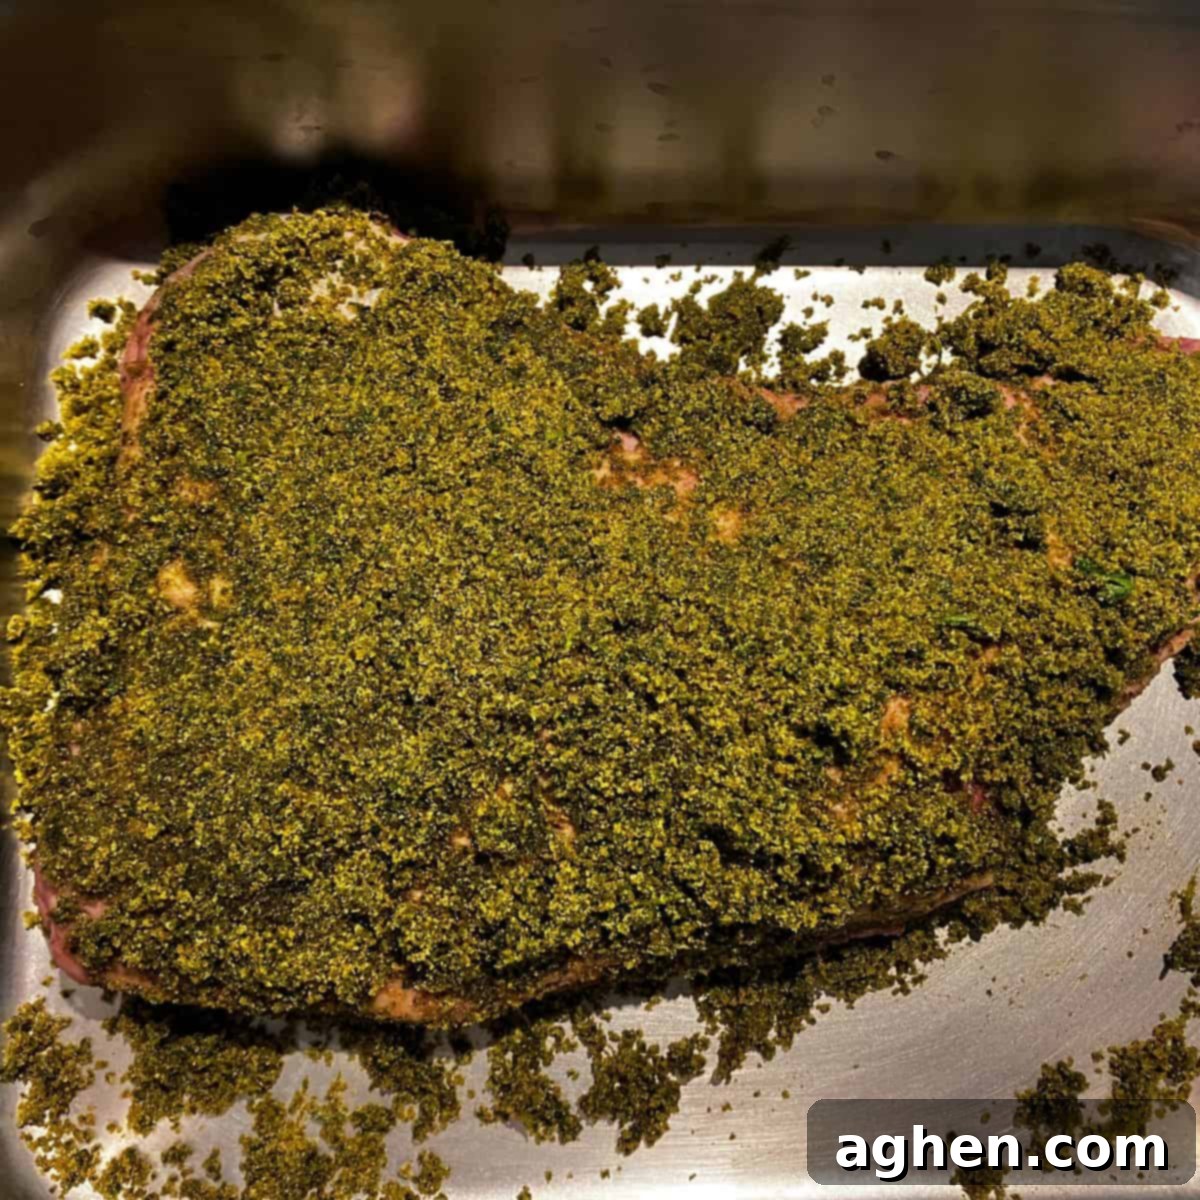
- Cure the Meat: Generously coat all surfaces of the tri-tip with the prepared cilantro rub. I find that a very thick, almost crust-like layer works best for infusing deep flavor and promoting tenderness. Place the seasoned tri-tip in a non-reactive container, such as a glass baking dish or a stainless steel hotel pan with a lid, or securely seal it in a zip-top bag. Refrigerate for the desired curing time. For a truly profound flavor, a full 24-hour cure is recommended. A shorter cure (2-4 hours) will still impart surface flavor, but the longer duration allows for deeper penetration.
- Discard the Cure: Before the smoking process begins, it’s time to prepare the tri-tip’s surface. You have a couple of options:
- Scrape Off: Gently scrape off most of the cure from the meat. I often leave a slight amount in the crevices, as these small pockets of rub will caramelize and add delightful bursts of intense flavor during the searing phase.
- Rinse Off: If you prefer a milder flavor profile or are concerned about potential saltiness, you can rinse the tri-tip thoroughly under cold running water. If you choose to rinse, it is absolutely essential to pat the meat completely dry with paper towels afterward. A dry surface is crucial for achieving a desirable “bark” during smoking and a crisp, even sear.
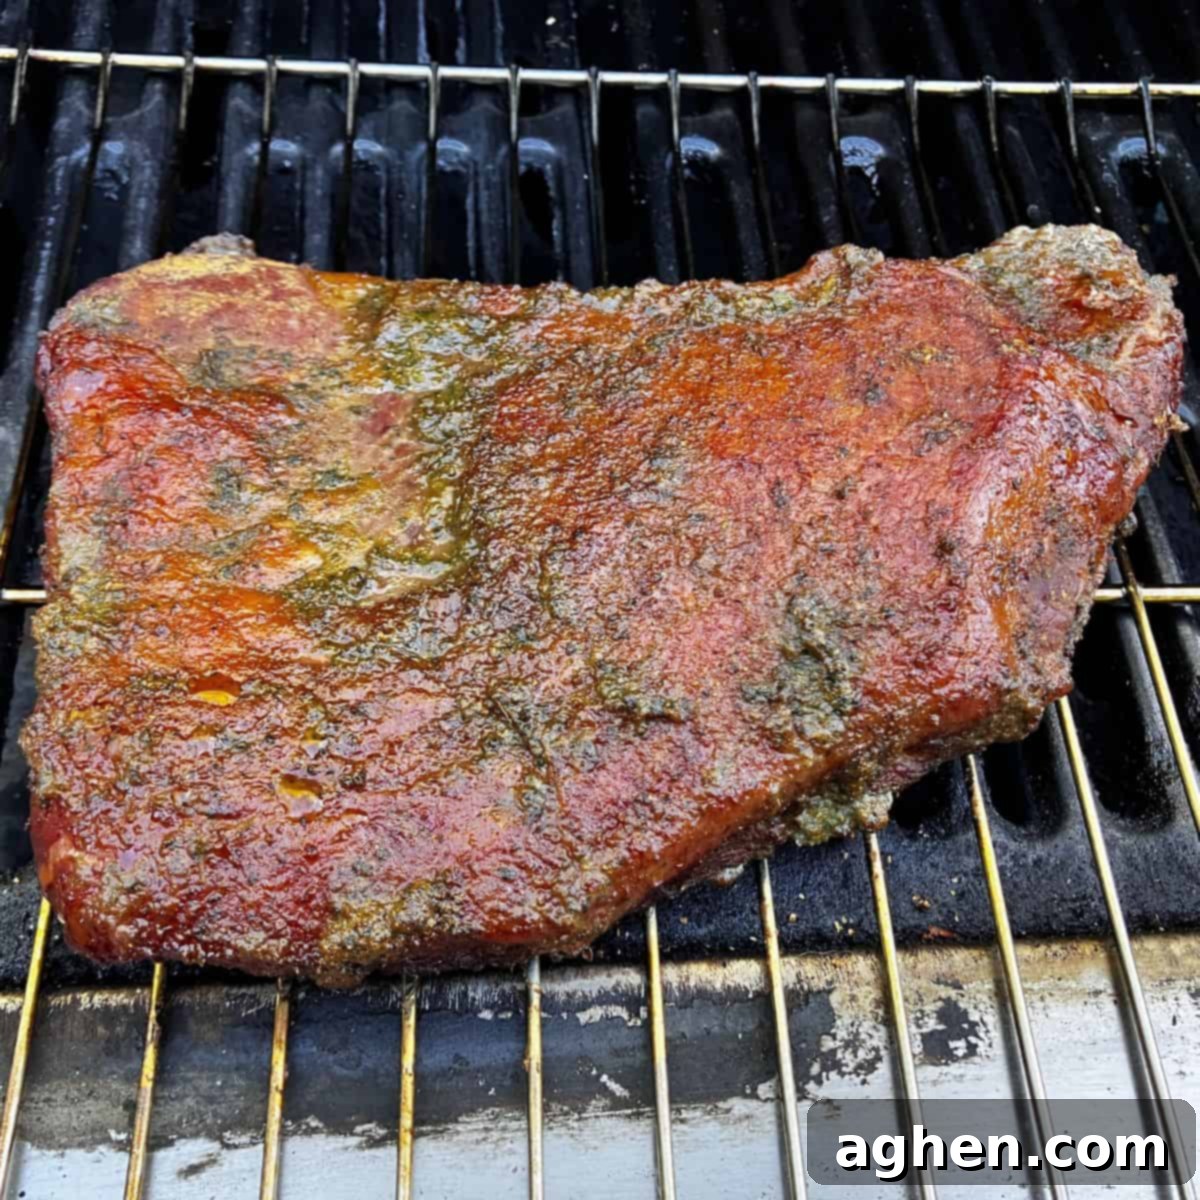
- Smoke the Meat: Preheat your smoker to a consistent temperature of 225°F (107°C). Place the tri-tip directly onto the grates. For a 2.25-pound tri-tip, aim for approximately 90 minutes of smoke time to reach an internal temperature suitable for medium-rare. You should remove the tri-tip when its internal temperature, measured with a reliable meat thermometer inserted into the thickest part, reaches approximately 115°F (46°C). This accounts for “carry-over cooking,” where the internal temperature will continue to rise during the subsequent searing and resting stages, eventually reaching your target of 125-130°F (52-54°C) for medium-rare. Remember, larger cuts will require more time.
- Prepare the Grill for Searing: Approximately 15 to 20 minutes before your tri-tip is expected to finish smoking, ignite your grill for searing. If using a gas grill, crank it up to high heat. For charcoal or wood grills, ensure they are stoked and preheated to a blazing hot temperature suitable for direct searing, which might take around 30 minutes to achieve. The goal is an intensely hot surface for a quick, impactful crust.
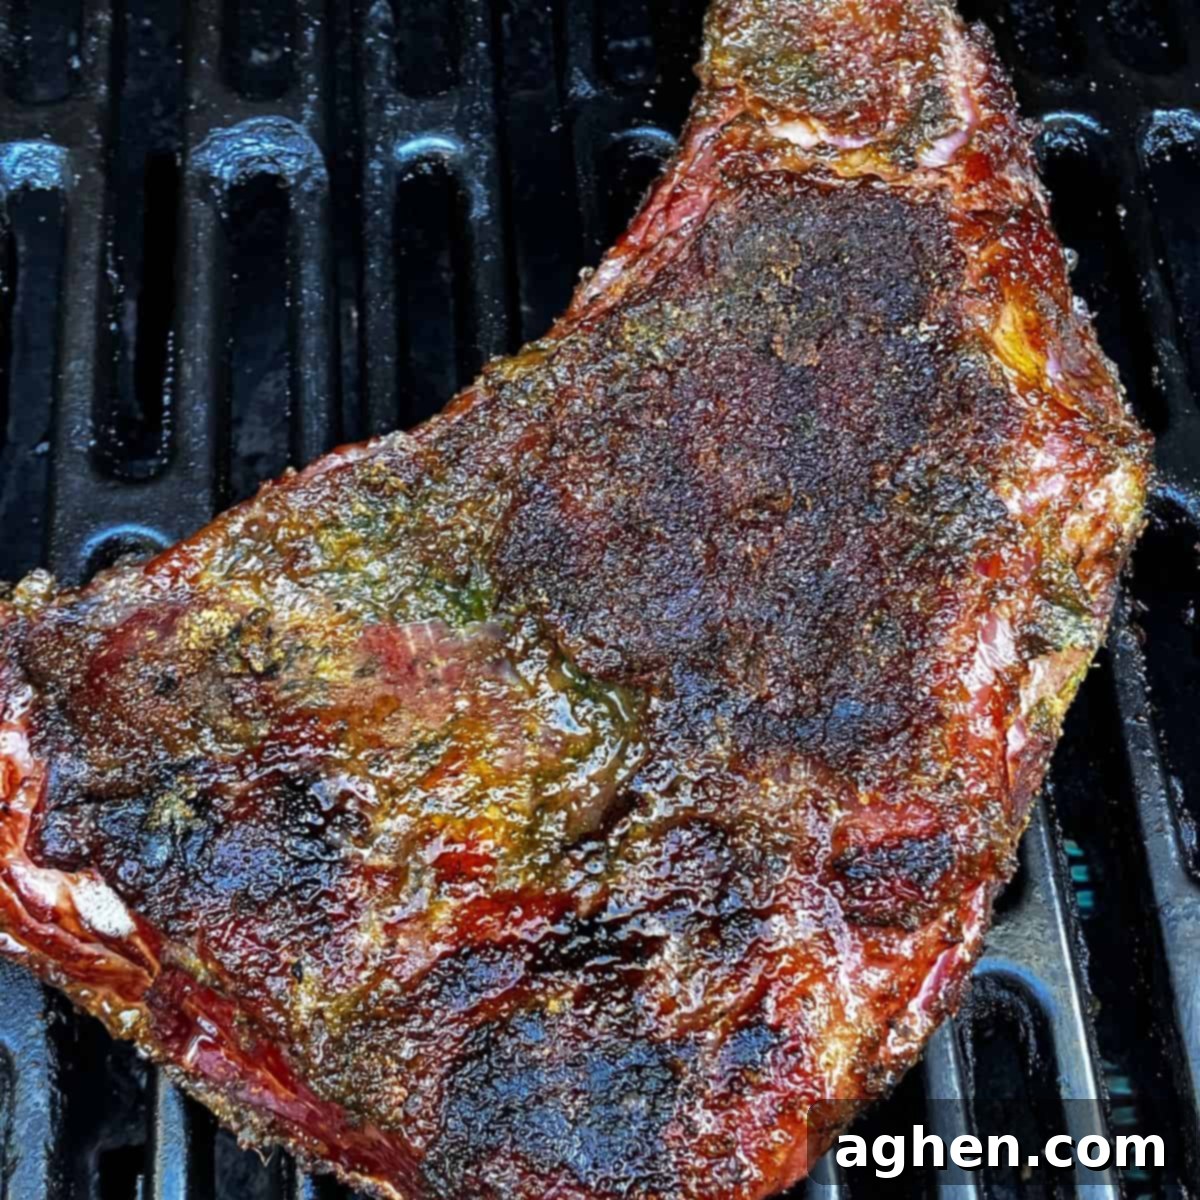
- Sear the Steak: Carefully transfer the smoked tri-tip from the smoker to your preheated, screaming-hot grill. Sear each side for about 2 to 3 minutes, or until a beautiful, deeply browned crust (often referred to as a “bark”) forms and distinct char marks appear. This high-heat sear is vital for adding a desirable texture and an extra layer of flavor, effectively locking in those smoky juices. Remain vigilant during this step to prevent burning.
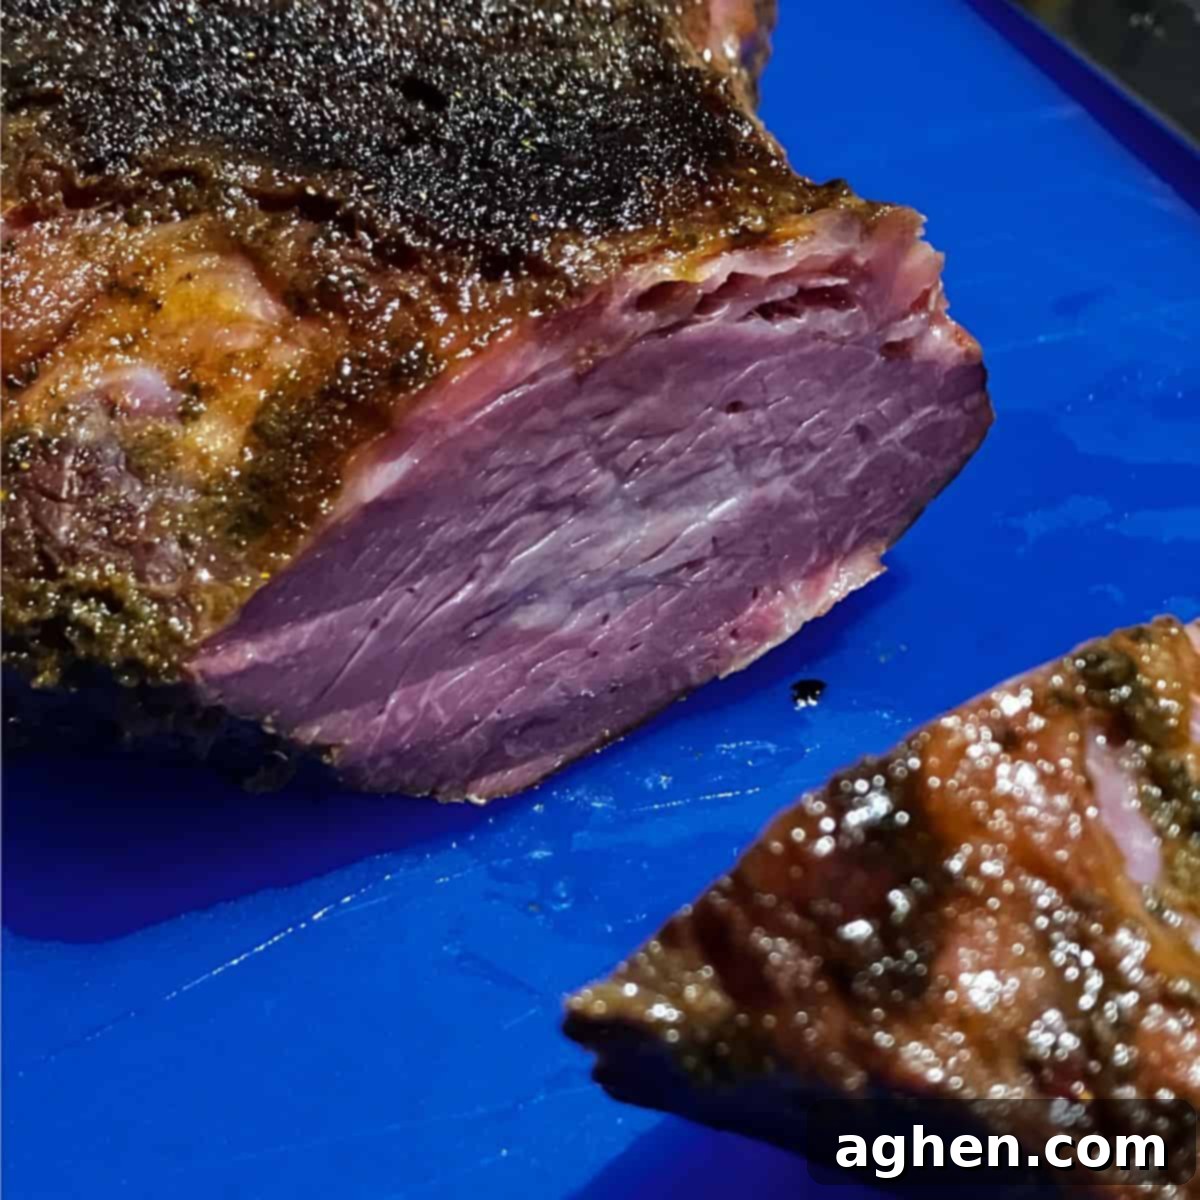
- The Critical Rest: This step is arguably the most crucial for achieving an incredibly juicy tri-tip. Immediately after searing, securely wrap the tri-tip in aluminum foil. For enhanced heat retention and juiciness, place the foil-wrapped meat inside a zip-top bag, pressing out as much air as possible before sealing. Then, insert this entire baggie into a second zip-top bag, again expelling air and sealing it. Finally, envelop this double-bagged package in several thick kitchen towels. This multi-layered insulation effectively creates an insulated chamber, allowing the meat’s internal temperature to equalize and, more importantly, enabling the muscle fibers to relax and reabsorb all the flavorful juices that have migrated to the center during cooking. Let the tri-tip rest for a minimum of 30 minutes; for larger cuts, extending the rest to 45-60 minutes will yield even more tender and juicy results. Do not be tempted to skip or shorten this vital step!
Variations and Substitutions for Your Smoked Tri-Tip
The beauty of a good rub lies in its versatility. While this recipe provides an excellent foundation, feel free to customize it to your taste. The most critical ratio to maintain, especially in a cure, is that of salt to sugar, as this balance significantly impacts both flavor and the meat’s texture.
- Cilantro Alternatives: For individuals who find cilantro tastes like soap (a common genetic variation), substituting it is simple. Fresh parsley can be used as a direct replacement to maintain a vibrant green color and an herbaceous note, though the overall flavor profile will shift. Other fresh herbs such as oregano, thyme, or a combination could also create a delicious, albeit different, flavor.
- Spice Profile Adjustments: Feel free to experiment with the other spices in the rub. Add a touch of cayenne pepper or smoked paprika for a gentle heat, or increase the garlic and onion powder for more robust savory notes. A dash of ground mustard or even a subtle hint of allspice can introduce new layers of complexity.
- Different Curing Times: While a 24-hour cure provides a deep, integrated flavor, a shorter curing period of 2 to 4 hours will still impart excellent surface flavor without transforming the meat as intensely. Experiment with different durations to find your preferred level of cure penetration.
Expert Tips and Tricks for Making Smoked Cilantro-Cured Tri-Tip
To elevate your smoked tri-tip from merely good to truly outstanding, paying attention to a few key details can make all the difference. Here are some invaluable tips and tricks:
- Optimal Curing Containers: For curing, a restaurant-style 4-inch deep half-hotel pan with a secure lid is my preferred choice. Its non-reactive stainless steel material ensures no unwanted flavors leech into the meat, and the tight-fitting lid prevents any leaks or strong odors from permeating your refrigerator. While zip-top bags are convenient, they can sometimes spring a leak, especially with a moist rub. If you opt for bags, I highly recommend double-bagging for extra security.
- The Art of Resting (Extended Detail): The resting phase is paramount for a juicy tri-tip. Immediately after searing, wrap the tri-tip tightly in heavy-duty aluminum foil. For superior heat retention, place this foil-wrapped package inside a zip-top bag, pressing out as much air as possible before sealing. Then, for an even better rest, place that baggie inside another, again squeezing out air before sealing. Finally, wrap this entire double-bagged package in several thick kitchen towels. This multi-layered insulation acts as a mini-cooler, allowing the internal temperature of the meat to equalize. Crucially, it gives the muscle fibers time to relax and reabsorb the flavorful juices that have migrated to the center during cooking. Always remember which side is the fat side and ensure it’s facing up in the package to allow rendered fat to baste the meat. A minimum of 30 minutes is non-negotiable, but a rest of 45-60 minutes for a larger roast will yield even more tender and succulent results.
- Collecting and Utilizing Meat Juices: When you unwrap your perfectly rested tri-tip, do so over a stainless steel bowl or a cutting board with a juice groove. You’ll be greeted by a collection of incredibly flavorful meat juices. These are liquid gold – do not discard them! These concentrated juices can be whisked into a quick pan sauce, added to gravies, or used to deglaze the pan you used for searing for an intensified flavor. While some might enjoy these rich drippings as a savory “shot” or mix them into an adult beverage, it’s important to note that because our cilantro cure contains garlic and onion powder, these juices should not be given to pets, as these ingredients can be harmful to animals.
- Slicing Against the Grain: This technique is a game-changer for tri-tip and can dramatically impact its tenderness. The grain of a tri-tip changes direction. As you begin slicing thin strips from the longer, skinnier end, pay close attention to the muscle fibers. You will notice a distinct shift in the grain pattern about halfway through the meat. It is absolutely crucial to adjust your cutting angle to always slice perpendicular (against) the grain. This might require you to cut the roast into two or even three sections before slicing. Slicing against the grain effectively shortens the muscle fibers, resulting in a much more tender, easier-to-chew bite. Failing to do so, even with a perfectly cooked tri-tip, can result in tough, stringy meat.
- Repurposing Over-Cured Sections: Occasionally, the very thin tip of the tri-tip can absorb more of the cure and become overly firm or salty. This small portion (an inch or so) is far from waste! Dice it into small, intensely flavorful pieces and use it as you would pancetta or bacon. It’s excellent crisped up and added to caramelized cabbage, folded into scrambled eggs, sprinkled over a fresh salad, or mixed into a hearty pasta dish. Its concentrated flavor makes it an ideal savory seasoning.
- Controlling Cure Application and Time: The depth and intensity of the cure’s flavor are directly influenced by both the amount of rub applied and the duration it remains on the meat. A light sprinkling for just a couple of hours will impart a subtle surface flavor. A thick, generous coating for a full 24 hours, as suggested in this recipe, will create a deeper, more profound transformation, akin to traditional curing methods like gravlax. The longer the meat is exposed to the cure, the more its flavor and texture will be influenced. Experiment to discover your preferred balance.
- Maintaining Rub Freshness: Unlike some traditional dry rubs that can be stored for extended periods, this cilantro-based cure contains fresh herbs. Even with the salt content, fresh herbs will not retain their vibrant flavor and color indefinitely. This particular cure is best utilized immediately or within a day or two. After a few days, you’ll observe it darkening in color and losing its fresh, aromatic intensity, indicating it’s past its prime for optimal flavor contribution. If you anticipate not using the entire batch, consider preparing a smaller quantity.
- Wood Selection for Smoking: The type of wood you choose for your smoker plays a significant role in the final flavor profile. For beef, popular choices include oak, hickory, and pecan, which impart strong, traditional smoky notes. Fruit woods like apple or cherry offer a milder, slightly sweeter smoke that can beautifully complement the bright cilantro and lime in our rub. Don’t hesitate to experiment with different woods to find your ideal pairing.
- Precision Temperature Monitoring: Investing in a good quality leave-in probe thermometer for your smoker is highly recommended. This allows you to accurately monitor the internal temperature of your tri-tip without needing to open the smoker lid, which can cause temperature fluctuations and extend cooking times. Accuracy is paramount for hitting that perfect medium-rare doneness consistently.
- Versatile Serving Suggestions: Smoked tri-tip is incredibly adaptable. It’s fantastic thinly sliced for gourmet sandwiches, served as the star of a meal alongside roasted vegetables and creamy mashed potatoes, or even incorporated into a vibrant salad. A fresh chimichurri sauce or a zesty salsa verde would make an excellent accompaniment, enhancing the herbaceous notes of the cilantro cure.
Perfect Smoked Tri-Tip
Share by Email
Print Recipe
Ingredients
- 2.25 lb Tri-Tip
For the rub:
- 1 Bunch of cilantro
- 150 g (9 tablespoons) salt, see notes
- 45 grams (3 tablespoons) sugar
- Zest of 1 lime
- 13 grams (2 tablespoons) ground coriander
- 4 grams (1 teaspoon) garlic powder
- 4 grams (1 teaspoon) onion powder
- 10 grams (1 Tablespoon) ground cumin
- 5 grams (1 teaspoon) ground ginger
- ¼ teaspoon Sel Rose or Prague Powder, see notes
Prevent your screen from going dark
Instructions
- Make the rub: Chop the fresh herbs and mix with the cure ingredients until fully incorporated into a paste.
- Cure the meat: Generously cover the tri-tip with the rub. Cure in the fridge for desired time, ideally 24 hours.
- Discard the cure: Scrape off most of the cure before smoking. You can leave some for flavor pockets or rinse and pat dry.
- Smoke the meat: Smoke at 225°F (107°C) for approximately 90 minutes, removing when internal temperature reaches 115°F (46°C) for medium-rare.
- Prepare the grill: About 15 minutes before the tri-tip is done smoking, preheat your grill to high heat for searing.
- Sear the steak: Transfer the smoked tri-tip to the hot grill and sear each side for 2-3 minutes until a crust forms.
- Let it rest: Immediately wrap the seared tri-tip in foil, place in a double zip-top bag, and wrap in kitchen towels. Rest for at least 30 minutes.
Notes
- Kosher salt is common for curing, but any good quality salt is suitable since it will be processed.
- Wash and thoroughly dry cilantro a day before use to avoid excess water in the rub.
- Process all rub ingredients in a food processor until the cilantro is completely incorporated and the mixture is bright green.
- Prague Powder (sodium nitrite) is optional; it’s primarily for achieving a pink color, not essential for food safety as the meat will be fully cooked.
Additional Info
Tried this recipe?
Mention @drizzlemeskinny or tag #drizzlemeskinny!
