DIY Chocolate Christmas Candy House: A Festive, Edible Holiday Centerpiece
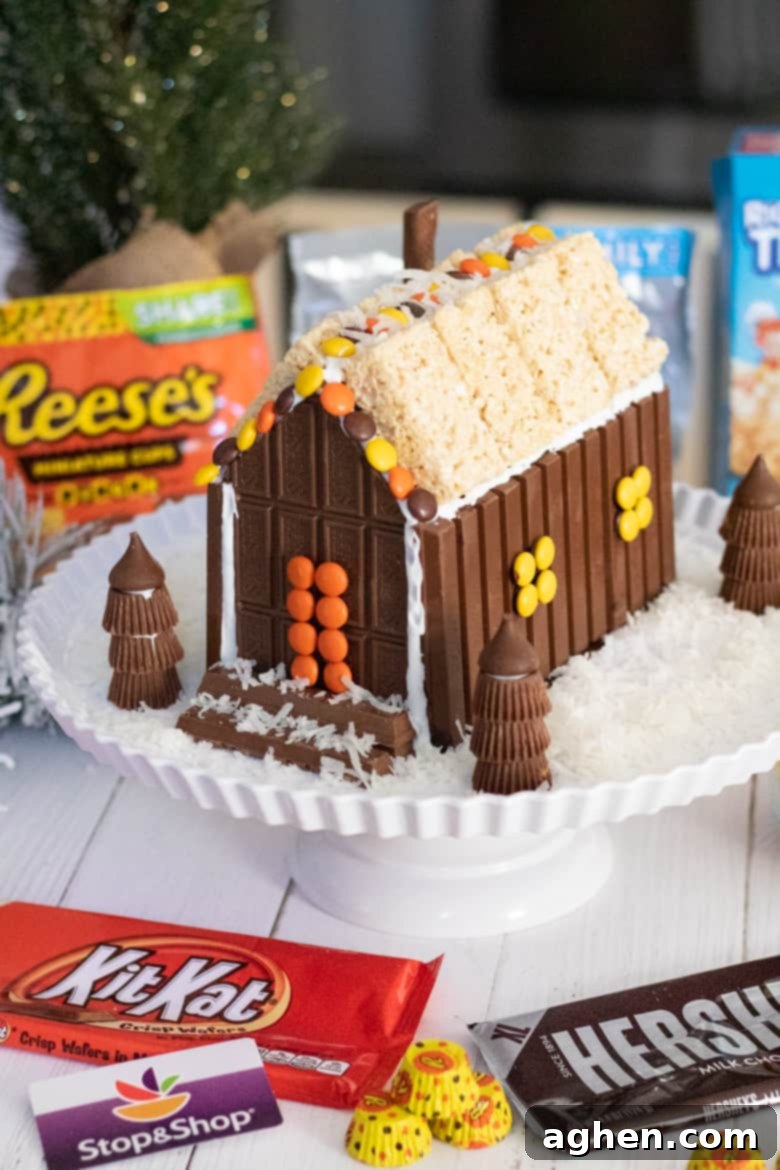
This enchanting chocolate Christmas candy house offers a delightful, modern alternative to the traditional gingerbread house. Crafted with readily available, simple ingredients like rich chocolate bars, chewy Rice Krispie treats, and vibrant peanut butter cups, this adorable structure promises hours of creative fun for the entire family. What’s more, the joy of building this sweet masterpiece is only surpassed by the pleasure of devouring it piece by delicious piece!
This post has been sponsored by The Hershey Co. All thoughts and opinions are my own, aimed at inspiring your holiday creativity.
Crafting Your Own Chocolate Christmas Cabin: A Sweet Family Tradition
As a parent, I always strive to infuse the Christmas season with a unique sense of wonder and magic for my son. One of our most cherished annual holiday traditions has always been the construction of a gingerbread house. However, as many children (and adults!) do, my son has a distinct preference for the rich, comforting taste of chocolate over the spicy notes of gingerbread. This year, we decided to embrace that preference wholeheartedly and embarked on a delightful new project: creating a spectacular Christmas candy house using all of our absolute favorite chocolate treats.
This evolving Christmas tradition isn’t just a fantastic way to spend quality time together as a family; it’s an opportunity to forge lasting memories filled with laughter, creativity, and plenty of sweet indulgence. The finished candy gingerbread house transcends its edible nature, transforming into a whimsical and eye-catching addition to our holiday decor. It serves as a charming Christmas centerpiece that captivates everyone who sees it, inviting admiration and, eventually, joyous consumption. If you’re looking to start a new, delicious holiday tradition or simply want to try your hand at building a festive chocolate Christmas cabin this year, continue reading for our comprehensive instructions, complete with step-by-step photos to guide you through every delicious detail.
Essential Ingredients & Supplies for Your Candy Masterpiece
Gathering your materials is the first exciting step in bringing your chocolate Christmas cabin to life. The beauty of this project lies in its simplicity and the use of widely available, beloved candies. Here’s a detailed list of what you’ll need to create a truly spectacular (and edible!) holiday display:
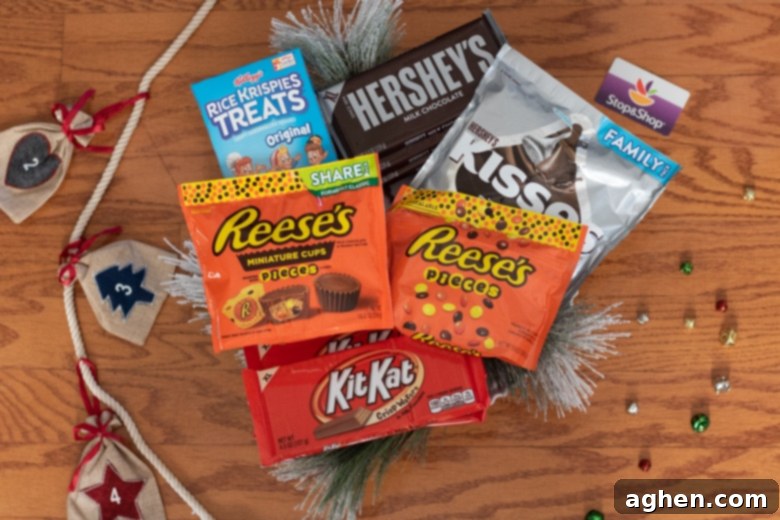
- Walls and Foundation (Structural Elements): For the sturdy foundation and towering walls of our candy cabin, we opted for XL size HERSHEY’S Milk Chocolate Bars and KIT KAT® Bars. The extra-large size of these chocolate bars is absolutely perfect for constructing a robust, generously sized cabin-style house, providing both structural integrity and a rich chocolate base. If you prefer a smaller house or want to experiment with different textures, regular-sized chocolate bars can also be used, though you might need more of them.
- Roof (Sweet Canopy): Kellogg’s Rice Krispies Treats or Rice Krispie Treat Sheets form the ideal roof. While I typically enjoy making Homemade Rice Krispies Treats from scratch, the pre-made ones are actually a superior choice for this project. Their consistent shape, firm texture, and ease of handling make them perfect for quickly assembling a durable and delicious roof, saving you valuable time during the construction process.
- Decorations (Festive Accents): This is where the real fun begins! We used an assortment of REESE’S Peanut Butter Cups, HERSHEY’S KISSES, and REESE’S PIECES Candy to bring our cabin to life. These candies offer a wonderful variety of shapes, sizes, and colors, allowing for creative windows, doors, miniature trees, and other festive details. Feel free to incorporate your own favorite candies for a truly personalized touch.
- Snow (Winter Wonderland Effect): To create a magical, freshly fallen snow effect around our cabin, we used delicate coconut flakes. Their white color and flaky texture beautifully mimic real snow, adding a touch of winter charm to your candy house. You can also use powdered sugar for a similar effect.
- Glue (The Edible Adhesive): For securing all the components, we relied on both royal icing and melted chocolate. Royal icing provides a strong hold and dries hard, making it excellent for intricate details and covering seams. You can easily make your own royal icing using your favorite recipe or opt for the convenience of a royal icing mix. During the holiday season, you’ll often find ready-made royal icing available at major retailers like Walmart and Target. Melted chocolate, particularly leftover pieces from your construction bars, proves to be an exceptionally strong “glue” for joining chocolate to chocolate, creating a robust and seamless bond.
The best part is that all these delightful goodies are typically easy to find at your local grocery store. You’ll find the chocolate bars and various decorative candies in the candy aisle, while the convenient Rice Krispies Treats are usually located in the cereal aisle. A quick shopping trip is all it takes to gather everything you need for this sweet adventure.
You will also need the following essential supplies:
- Sharp Knife: Crucial for making clean, precise cuts through the chocolate bars without causing them to break or crumble.
- Cutting Board: Provides a stable and safe surface for all your cutting needs.
- Large Baking Sheet or Cake Stand: This will serve as the sturdy base upon which your entire candy house will be built and displayed. Choose one large enough to accommodate the house and its surrounding “snowy” landscape.
Step-by-Step Guide: How to Construct Your Chocolate Christmas House
Building your chocolate Christmas house is an exciting and rewarding process. Follow these detailed steps to ensure your candy cabin is both structurally sound and beautifully decorated:
Step 1: Laying the Foundation (The Base)
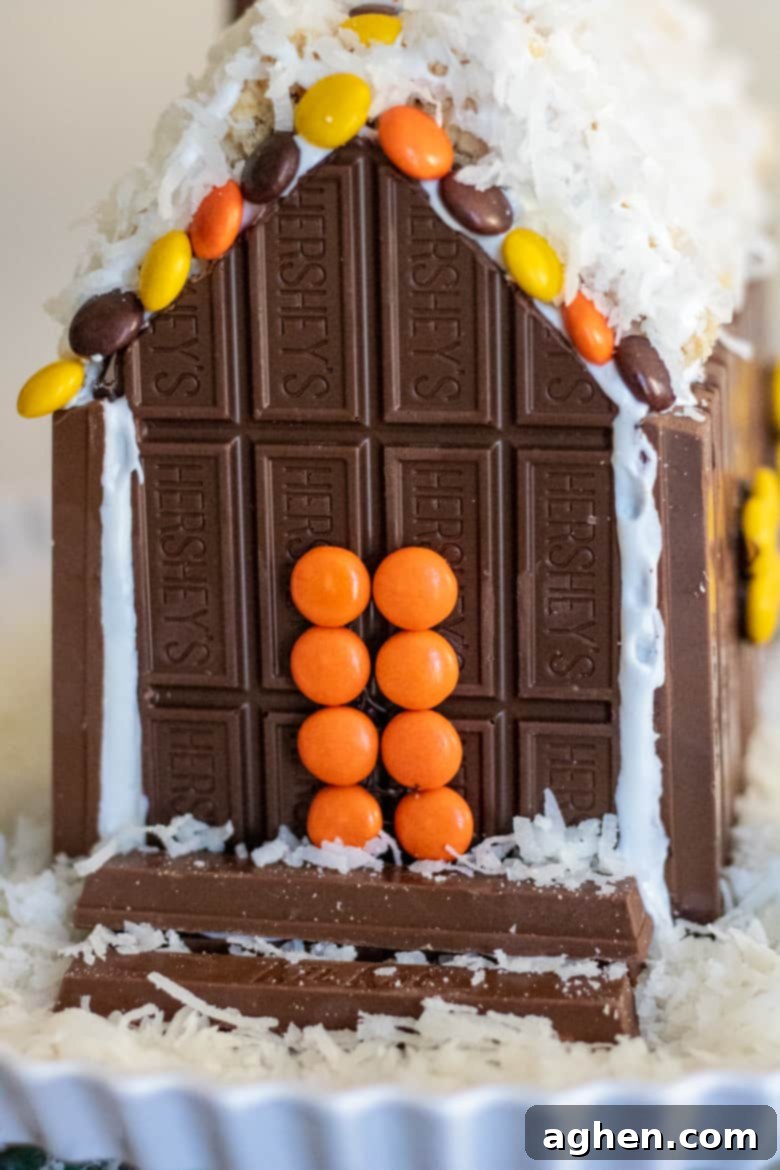
Begin by carefully arranging your KIT KAT® XL Bars to form the stable base of your house. These bars will act as the ground level and provide a solid starting point. To prevent any sliding or shifting during construction, apply a small amount of “glue” – either melted chocolate or royal icing – underneath the base bars and adhere them firmly to your chosen large baking sheet or cake stand. This initial step is crucial for the overall stability of your candy cabin.
Step 2: Constructing the Front and Back Walls
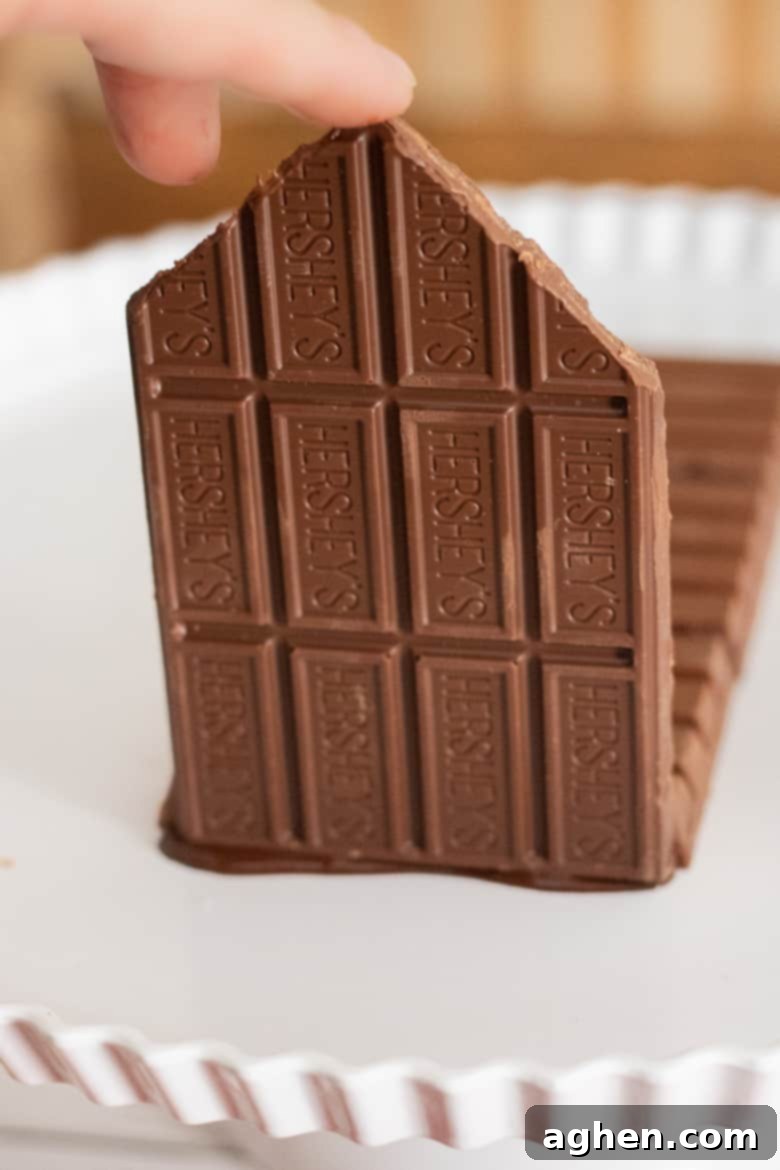
Next, take your HERSHEY’S Milk Chocolate XL Bars and carefully cut them to the appropriate shapes and sizes for the front and back walls of your cabin. Remember to account for any sloped roof lines if you’re aiming for a classic A-frame look. Using melted chocolate as your primary adhesive, generously apply it to the edges of the Hershey’s bars where they will meet the Kit Kat base and where they will connect to the side walls. Gently press them into place, holding them steady for a couple of minutes until the melted chocolate begins to set and creates a firm bond. Patience here is key to a strong structure.
Pro Cutting Tip for Chocolate Bars:
To achieve perfectly clean and smooth cuts through your chocolate bars, a little trick goes a long way. Soak your sharp knife in very hot water for approximately 60-90 seconds. This simple action heats the blade, allowing it to essentially melt its way through the chocolate with minimal effort. This technique prevents the chocolate from cracking or breaking under pressure. Just be absolutely sure to thoroughly wipe off any water from the knife before making your cuts, as water can cause chocolate to seize.
Step 3: Completing the Side Walls
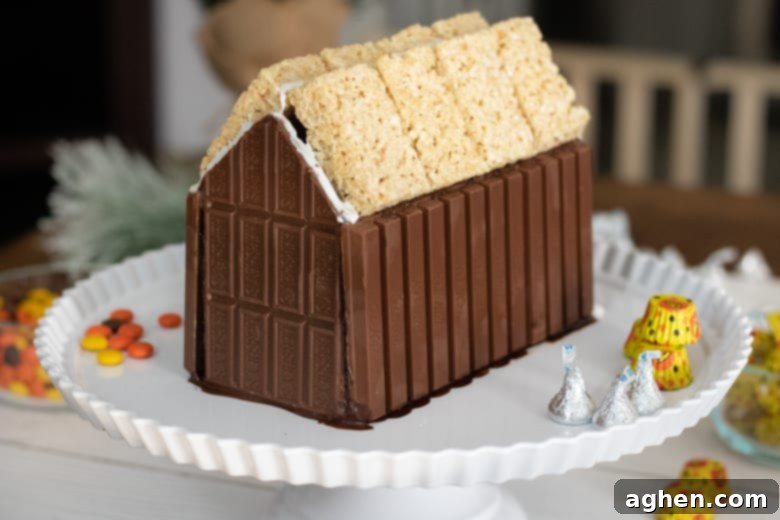
With the front and back walls securely in place, use additional KIT KAT® XL Bars to construct the remaining side walls of your cabin. Apply melted chocolate to the connecting edges, pressing the Kit Kat bars firmly against the Hershey’s bars and the base. Ensure all connections are strong and the walls stand upright and even. This forms the main structure of your sweet dwelling.
Step 4: Adding the Roof
Now it’s time to crown your cabin with a delicious roof. Take your Rice Krispies Treats (either individual bars or a sheet cut to size) and place them on top of your chocolate walls. The slightly pliable nature of Rice Krispies Treats makes them ideal for forming a roof, as they can be gently molded if needed. Secure them with melted chocolate or royal icing along the top edges of your walls.
Step 5: Sealing and Strengthening
Once the main structure is assembled, carefully inspect your candy cabin for any visible seams or gaps between the walls or where the roof meets the walls. Use either royal icing or melted chocolate to fill these spaces. This not only reinforces the structure, making it more stable, but also creates a neater, more finished appearance. Think of it as edible caulk!
Step 6: The Joy of Decorating (Windows and Doors)
This is undoubtedly the most enjoyable part – personalizing your cabin! Unleash your creativity and begin adding decorative elements. We created charming windows and a welcoming front door using colorful REESE’S PIECES Candy. The vibrant hues of these candies add a cheerful pop against the chocolate walls. You can arrange them in patterns, or simply scatter them for a whimsical look.
Step 7: Creating Festive Candy Trees
To bring a miniature winter wonderland scene to your candy cabin, craft cute little trees. This is easily done by stacking three REESE’S Peanut Butter Cups on top of one another, securing each layer with a dab of icing or melted chocolate. Finish each tree by topping it with a single HERSHEY’S KISS, pointy side up, resembling a star. Arrange these delightful trees around your cabin for a complete festive landscape.
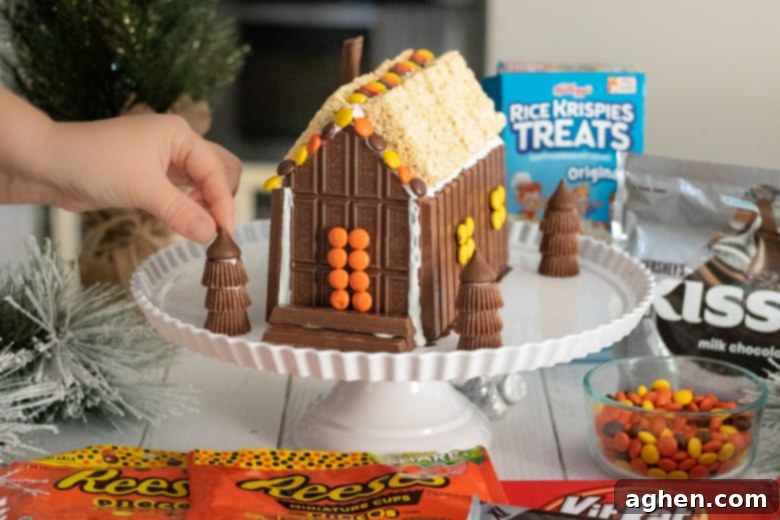
Step 8: Adding a Touch of Snowy Magic
For a truly enchanting finishing touch, sprinkle delicate coconut flakes generously around the base of your candy cabin. This will beautifully mimic the look of freshly fallen snow, instantly transforming your display into a winter wonderland. The texture and color of the coconut flakes add a wonderful, soft contrast to the dark chocolate. You can even use a small amount of icing to “glue” extra coconut flakes to the roof and the tops of your Reese’s trees for an even more realistic snowy effect. A snowy scene always enhances the festive atmosphere!
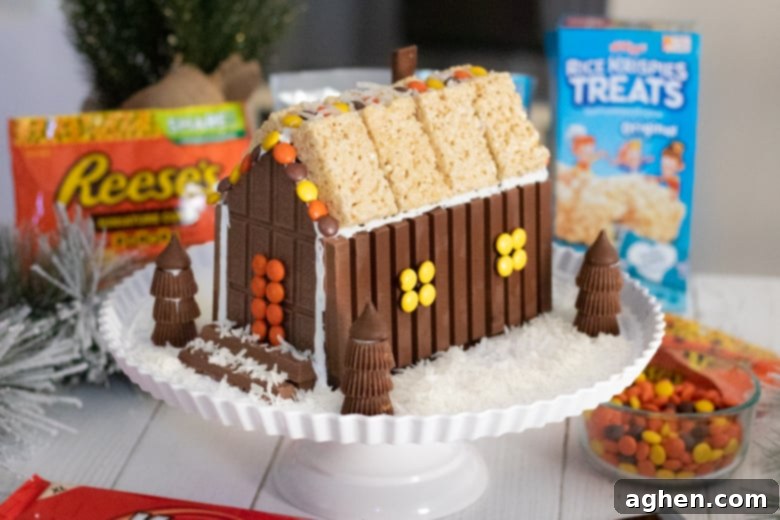
If you’d like to take the snowy theme a step further, consider using icing to adhere additional coconut flakes to the roof and the very tops of your candy trees. This creates the illusion of a heavy snowfall, making your candy house look even more inviting and festive. The soft white of the snow against the rich chocolate is a truly lovely winter scene.
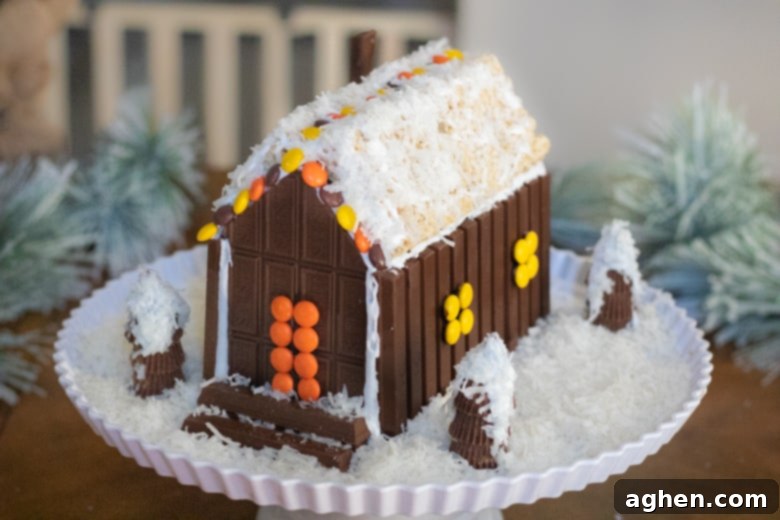
Building our chocolate candy cabin was an incredibly fun and engaging family activity, a perfect way to bond during the bustling holiday season. The final result was not only visually beautiful but also incredibly tasty, making it a double win! One of the best incidental benefits? We ended up with plenty of extra REESE’S and HERSHEY’S KISSES left over, ensuring we had a sweet stash to snack on. This delightful surplus helps us resist the temptation to nibble on our gorgeous, decorative cabin before Christmas Day, preserving its festive splendor for as long as possible!
Looking for creative ways to use your leftover candies beyond just snacking? Transform them into other delectable treats! You can use them to make a rich Reese’s dip, a festive Christmas monkey bread, delightful peanut butter cup cookies, or even charming secret kiss cookies. The possibilities are endless!
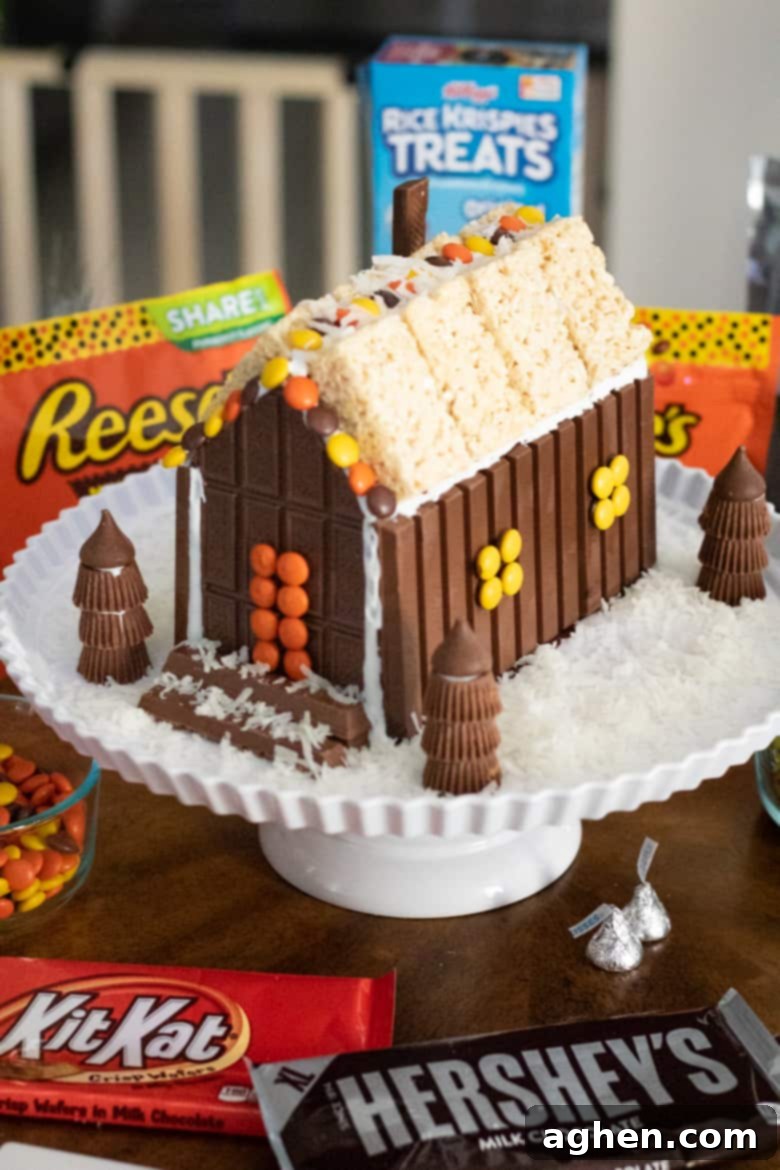
Storage Tips for Your Chocolate Christmas Cabin
To ensure your magnificent chocolate Christmas house remains a beautiful centerpiece throughout the holiday season, proper storage is essential. Once completed, carefully wrap the entire house in plastic wrap or place it inside an airtight storage container. This acts as a protective barrier against dust, debris, and any curious little hands (or paws!). Store your candy house in a cool, dry place, ideally away from direct sunlight and any sources of humidity. Exposure to warmth or direct light can cause the chocolate to melt, soften, or discolor, diminishing its appearance. For those who wish to preserve their candy house for long-term display, perhaps as a keepsake or a recurring decoration, you can apply a craft spray varnish once it’s fully dried. However, it’s crucial to remember that once varnished, the house will no longer be edible. This option is purely for decorative preservation.
Expert Tips & Clever Tricks for Success
- Inspect Your Candies Carefully: Before you even begin construction, take a moment to check all your candy bars while still in the store. Make sure you don’t inadvertently purchase any bars that are already broken or cracked, as this can complicate cutting and assembly.
- Always Buy Extra: It’s always a good idea to buy a few extra candy bars than you think you’ll need. Accidents happen – a bar might break unexpectedly as you’re cutting it, or you might misjudge a measurement during assembly. Having spares on hand will prevent a frantic last-minute trip to the store and keep your creative flow uninterrupted.
- Mastering the Chocolate Cut: When cutting chocolate bars, resist the urge to press down too firmly, as this is a common cause of cracking. As mentioned in our earlier tip, heating up your knife with hot water is a game-changer. It allows the knife to smoothly glide and melt through the chocolate, requiring less pressure and resulting in cleaner, more precise edges. Remember to wipe the knife dry after heating!
- Patience is a Virtue (Especially with Glue): Allow ample time for your melted chocolate or royal icing “glue” to set. Rushing the process can lead to walls collapsing or sections shifting. Holding pieces in place for a minute or two can make a significant difference in the final stability of your house.
- Work on a Stable Surface: Ensure your chosen base (baking sheet or cake stand) is completely flat and stable. Working on an uneven surface can lead to a crooked house or pieces falling apart.
- Involve the Whole Family: This project is fantastic for all ages. Assign different tasks – younger children can help with decorating, while older children and adults can handle the structural assembly and cutting. It’s a wonderful way to foster teamwork and creativity.
Exciting Additions & Creative Variations
While our core recipe provides a fantastic blueprint, don’t hesitate to personalize your chocolate Christmas house with these delightful additions and variations:
- Peppermint Perfection: Incorporate crushed peppermint candy or miniature candy canes for a wonderfully festive touch and a burst of minty flavor. They can outline windows, form fences, or add a pop of red and white to your roof.
- Graham Cracker Ease: For an even simpler construction, consider using graham crackers for the roof, side pieces, and back pieces of the house. They are easy to cut and assemble, making the building process quicker and less prone to breakage.
- A Rainbow of Candies: Expand your decorating palette! Various small candies such as colorful jelly beans, spicy red hots, chewy gumdrops, fruity Skittles, and classic gumballs all make excellent gingerbread house decorations. They add a vibrant pop of color and diverse textures.
- Chocolate Chip Path: Create a whimsical pathway leading to your candy cabin’s door using chocolate chips or mini chocolate candies.
- Pretzel Log Cabin: For a rustic log cabin feel, use pretzel sticks to build the walls. You can then fill the gaps with icing or melted chocolate.
- Mini Marshmallow Snowdrifts: Pile mini marshmallows around the base of your cabin or on the roof to create soft, fluffy snowdrifts, adding a delightful dimension to your winter scene.
- Gingerbread People Residents: Bring your scene to life by adding miniature people using small gingerbread cookies. You can decorate them with royal icing to give them unique personalities.
Christmas Candy Cabin: Frequently Asked Questions
Here are some common questions and helpful answers to guide you through building your festive chocolate candy house:
A large, sturdy cookie sheet, a festive cake stand, or a flat serving tray all work wonderfully as the base for your candy house. These options provide a stable and portable foundation. For an extra tip: covering your chosen base with aluminum foil or parchment paper before you start building can make the cleanup process significantly easier after the holidays (or after you’ve enjoyed eating your creation!).
Through extensive trial and error, I’ve found that melted chocolate provides a superior and more robust bond for securing the chocolate walls in place compared to royal icing. The melted chocolate creates a strong, edible adhesive that perfectly fuses the chocolate bars. It’s crucial to hold the walls firmly in place for a little bit – usually a minute or two – to allow the melted chocolate “glue” sufficient time to cool and set up properly. This patience will prevent your walls from shifting or collapsing.
You have several convenient options for obtaining royal icing. You can easily find one of the many reliable royal icing recipes available online and make it from scratch. Alternatively, you can use a pre-packaged royal icing mix, which only requires adding water. During the bustling holiday season, grocery stores, craft stores, Walmart, and Target often sell ready-made royal icing in tubes or tubs, offering a quick and easy solution for your decorating needs.
Crafting these adorable chocolate Christmas trees is incredibly simple and fun! To create a festive tree out of chocolate, gently stack three REESE’S Peanut Butter Cups one on top of the other, securing each layer with a tiny dab of royal icing or melted chocolate. For the perfect finishing touch, place a HERSHEY’S KISS on the very top, with its point facing upwards, to mimic a charming star or tree topper.
Absolutely! The beauty of building a candy house is the freedom to customize it to your heart’s desire. Feel entirely free to use any of your favorite candies and treats. Colorful jelly beans can make vibrant pathways, red hots add a fiery touch, candy canes are perfect for festive accents, or even tootsie rolls can be molded into various shapes. Let your imagination run wild and create a truly unique and delicious candy house!
The actual construction time for the chocolate candy house typically ranges from 1 to 2 hours, depending on the complexity of your design and how many people are involved. However, it’s important to factor in drying time for the “glue.” If you’re using royal icing, it can take several hours to fully harden, especially for thicker applications. Melted chocolate sets much faster, usually within minutes, but for maximum stability, allowing at least 30 minutes to an hour for all structural bonds to fully cool and solidify is recommended.
Yes, this chocolate candy house project is wonderfully suited for family participation! While adults or older children should handle the cutting of the chocolate bars and the initial structural assembly, younger children can enthusiastically contribute to the most fun part: decorating! They can place the Reese’s Pieces for windows, arrange the candy trees, and sprinkle the coconut snow, fostering their creativity and fine motor skills. It’s a fantastic activity for creating cherished holiday memories together.
More Fun & Festive Christmas Ideas to Explore
- Christmas Jello Poke Cake
- Grinch Hot Chocolate
- Christmas Strawberry Tree Treats
- Ginch Desserts – loads of cute ideas!
- Peanut Butter Reindeer Cookies
Christmas Candy House
Author: Jaclyn
1 hour
0 minutes
1 hour
Saved!
Ingredients
-
2 HERSHEY’S Milk Chocolate XL Bars -
3 KIT KAT® XL Bars -
1 bag Family Size HERSHEY’S KISSES Milk Chocolates -
1 bag Share Size REESE’S Peanut Butter Cups -
1 bag REESE’S PIECES Candy -
1 box Kellogg’s Rice Krispies Treats -
royal icing for binding and decoration -
coconut flakes optional, for a magical snowy effect
Instructions
-
Carefully arrange KIT KAT® XL Bars to form a sturdy base for your house. Secure them to your display surface with a dab of melted chocolate or royal icing.
-
Cut HERSHEY’S Milk Chocolate XL Bars to create the front and back walls, shaping them as desired (e.g., with a peaked top for the roof). Remember to soak your knife in hot water before cutting for smooth, clean slices.
-
Using melted chocolate (which works best for chocolate-to-chocolate bonds) or royal icing as “glue,” attach the HERSHEY’S Bars as your front and back walls. Hold each wall firmly in place for a couple of minutes until the adhesive begins to set and stabilize.
-
Complete the cabin’s structure by adding two more KIT KAT® XL Bars for the side walls, securing them with melted chocolate or royal icing.
-
Place Rice Krispies Treats on top of your assembled walls to form the roof, securing them with adhesive.
-
Fill in any noticeable seams, cracks, or gaps between the walls or where the roof meets the walls using melted chocolate or royal icing for a polished finish and added stability.
-
Unleash your creativity! Use REESE’S PIECES Candy to fashion charming windows and a welcoming front door.
-
Construct a small chimney and front steps by breaking off pieces from a KIT KAT® XL Bar, then attaching them with icing or melted chocolate.
-
Create adorable candy trees by stacking three REESE’S Peanut Butter Cups, securing each layer, and topping them with a HERSHEY’S KISS.
-
For a beautiful winter wonderland effect, sprinkle coconut flakes generously around the base of the cabin. For an extra touch of “snow,” use a bit of icing to “glue” flakes to the roof and on the tops of your candy trees.
Notes
- Cutting Chocolate Made Easy: To ensure smooth, clean cuts through the HERSHEY’S Milk Chocolate XL Bars without them breaking, immerse your knife in hot water for 60-90 seconds before each cut. Wipe it dry, then slice. This technique allows the knife to melt through the chocolate rather than forcefully cut it.
- Best Adhesive: I found that melted leftover pieces from the HERSHEY’S Milk Chocolate Bars make the best “glue” for joining chocolate bars. It creates a stronger and more seamless bond than royal icing for the structural elements. Royal icing is fantastic for decorative details and sealing smaller gaps.
- Optimal Storage for Enjoyment: To keep your edible candy house fresh and free from dust, wrap it carefully in plastic wrap or store it in an airtight container. Keep it in a cool, dry place, away from direct sunlight or sources of heat and humidity, which can cause melting or fading.
- Display-Only Preservation: If you wish to keep your candy house as a decorative item for multiple seasons, you can apply a craft spray varnish once it’s completely dry. Please note that once varnished, the house will no longer be safe to eat.
Did You Make This Sweet Recipe?
I would absolutely love to see your incredible creations! Share your beautiful chocolate Christmas candy house with me on Instagram @crayonsandcravings. Don’t forget to follow me on Pinterest @crayonsandcravings for even more delicious recipes and festive inspiration!
Pin Recipe
Leave A Review